USER’S GUIDE AXIS T8311 Video Surveillance Joystick AXIS T8312 Video Surveillance Keypad AXIS T8313 Video Surveillance Jog Dial ENGLISH AXIS T8310 Video Surveillance Control Board
Legal Considerations Video and audio surveillance can be prohibited by laws that vary from country to country. Check the laws in your local region before using this product for surveillance purposes. Electromagnetic Compatibility (EMC) This equipment generates, uses and can radiate radio frequency energy and, if not installed and used in accordance with the instructions, may cause harmful interference to radio communications.
AXIS T8310/T8311/T8312/T8313 User’s Guide Page 3 AXIS T8310, AXIS T8311 AXIS T8312 & AXIS T8313 User’s Guide This User’s Guide provides instructions for installing AXIS T8310 Video Surveillance Control Board. For all other aspects of using the product, please see the AXIS Camera Station help pages. Installation Steps 1. Check the package contents against the list below. 2. Hardware overview. See page 4. 3. Install the hardware.
Page 4 AXIS T8310/T8311/T8312/T8313 User’s Guide Hardware Overview AXIS T8310 AXIS T8311 AXIS T8312 AXIS T8313 Note: The functionality of the programmable hotkeys is dependent on the application software. The descriptions below are valid for AXIS Camera Station.
AXIS T8310/T8311/T8312/T8313 User’s Guide Page 5 AXIS T8312 Start USB port (2x) Live view Recordings Logs Configuration USB port Preset Alarm (Tool) View 0-9 Tab Alt AXIS T8313 USB port Bookmark Previous Play/Pause Next Search recordings Toggle search/ Snapshot Shuttle wheel Jog wheel ENGLISH Time Camera
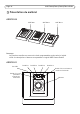
Page 6 AXIS T8310/T8311/T8312/T8313 User’s Guide Install the hardware AXIS T8311 Video Surveillance Joystick, AXIS T8312 Video Surveillance Keypad and AXIS T8313 Video Surveillance Jog Dial can be connected separately or together as one unit using AXIS T8312 Video Surveillance Keypad as a USB hub. The units can be placed interchangeably to meet the requirements and needs of the workstation and the users. The illustration below gives examples of how to connect the units.
AXIS T8310/T8311/T8312/T8313 User’s Guide Page 7 Troubleshooting If you experience problems during the installation, please do or check the following: • • • • Restart the supporting application software, e.g. AXIS Camera Station. Disconnect the USB plug from the computer, wait 10 seconds and then reconnect. Move the USB plug to another available USB port on your computer. Verify that the operating system has identified the joystick.
Page 8 AXIS T8310/T8311/T8312/T8313 User’s Guide Technical specifications Item Specification Models AXIS T8310 Video Surveillance Control Board: Deflection Functionality Application defined hotkeys • AXIS T8311 Video Surveillance Joystick • AXIS T8312 Video Surveillance Keypad • AXIS T8313 Video Surveillance Jog Dial • AXIS T8311: Square delimiter Pan/Tilt (XY): ±15° with central return spring Zoom (Z): ±25° with central return spring • AXIS T8311: Control of the pan, tilt, zoom functional
AXIS T8310/T8311/T8312/T8313 Guide d'installation Page 9 AXIS T8310, AXIS T8311 AXIS T8312 et AXIS T8313 Guide d'utilisation Ce guide d'utilisation vous explique comment installer le Kit de contrôle de vidéosurveillance AXIS T8310. Pour toute autre question concernant l'utilisation du produit, reportez-vous aux pages d'aide d'AXIS Camera Station. Procédure d'installation 1. Vérifiez que l'emballage contient bien tous les éléments de la liste ci-dessous. 2. Présentation du matériel.
Page 10 AXIS T8310/T8311/T8312/T8313 Guide Présentation du matériel AXIS T8310 AXIS T8311 AXIS T8312 AXIS T8313 Remarque : Les fonctions associées aux raccourcis clavier programmables varient selon le logiciel utilisé. Les descriptions ci-dessous correspondent au logiciel AXIS Camera Station.
AXIS T8310/T8311/T8312/T8313 Guide d'installation Page 11 AXIS T8312 Page de démarrage Port USB (x2) Visualisation Enregistrements Configuration Journaux Port USB Prédéfini Alarme (Outil) Visualisation Heure Caméra 0-9 Tabulation AXIS T8313 Port USB Signet Retour arrière Lecture/ Pause Avance rapide Recherche dans les enregistrements Alterner recherche/ capture d'images Molette de navigation Molette d'avance FRANÇAIS Alt
Page 12 AXIS T8310/T8311/T8312/T8313 Guide Installation du matériel Vous pouvez brancher la Manette de vidéosurveillance AXIS T8311, le Clavier de vidéosurveillance AXIS T8312 et la Molette de vidéosurveillance AXIS T8313 individuellement ou en un seul bloc, en utilisant le Clavier de vidéosurveillance AXIS T8312 en tant que concentrateur USB. Les unités peuvent être reliées les unes aux autres de manière interchangeable, en fonction des exigences du poste de travail et des besoins des utilisateurs.
AXIS T8310/T8311/T8312/T8313 Guide d'installation Page 13 4. Lancez l'application de prise en charge, par exemple AXIS Camera Station. La manette/le clavier/la molette est détecté(e) automatiquement. Remarque : Le système doit disposer d'un logiciel de prise en charge capable de détecter le nouveau matériel, tel qu'AXIS Camera Station. Pour plus d'informations sur les logiciels de gestion vidéo, rendez-vous sur www.axis.com.
Page 14 AXIS T8310/T8311/T8312/T8313 Guide Caractéristiques techniques Article Caractéristique technique Modèles Kit de contrôle de vidéosurveillance AXIS T8310 : • Manette de vidéosurveillance AXIS T8311 • Clavier de vidéosurveillance AXIS T8312 • Molette de vidéosurveillance AXIS T8313 Déviation • AXIS T8311 : séparateur carré Vue panoramique/inclinaison (XY) : ± 15 ° avec ressort de retour central Zoom (Z) : ± 25 ° avec ressort de retour central Fonctionnalités • AXIS T8311 : contrôle de la vu
AXIS T8310/T8311/T8312/T8313 Installationshandbuch Seite 15 AXIS T8310, AXIS T8311 AXIS T8312 & AXIS T8313 Benutzerhandbuch Dieses Benutzerhandbuch enthält Anweisungen für die Installation des AXIS T8310 Videoüberwachungs-Steuerungsgeräts. Alle weiteren Hinweise zur Verwendung des Produkts finden Sie auf den Hilfeseiten zu AXIS Camera Station. Das AXIS T8310 Videoüberwachungs-Steuerungsgerät umfasst drei Komponenten, die entweder einzeln oder als Einheit zusammen installiert werden können.
Seite 16 AXIS T8310/T8311/T8312/T8313 Hardwareübersicht AXIS T8310 AXIS T8311 AXIS T8312 AXIS T8313 Hinweis: Welche Funktionen durch die programmierbaren Funktionstasten ausgeführt werden, hängt von der jeweiligen Anwendungssoftware ab. Die folgenden Beschreibungen gelten für AXIS Camera Station.
AXIS T8310/T8311/T8312/T8313 Installationshandbuch Seite 17 AXIS T8312 Startseite USB-Anschluss Aufnahmen Konfiguration Protokolle Live-Darstellung USB-Anschluss Voreinstellung Alarm (Tool) Ansicht Zeit Kamera 0-9 Tab-Taste Alt-Taste USB-Anschluss Lesezeichen Vorheriges DEUTSCH AXIS T8313 Wiedergabe /Pause Nächstes Aufzeichnungen suchen Umschalten zwischen Suche/ Snapshot Shuttle-Rad Jog-Rad
Seite 18 AXIS T8310/T8311/T8312/T8313 Installieren der Hardware Der AXIS T8311 Videoüberwachungs-Joystick, das AXIS T8312 VideoüberwachungsFunktionstastenfeld und das AXIS T8313 Videoüberwachungs-Jog Dial können entweder einzeln oder als Einheit, bei der das AXIS T8312 Videoüberwachungs-Funktionstastenfeld als USB-Hub dient, verbunden werden. Die Einheiten sind auswechselbar, d. h. sie können entsprechend den Anforderungen der Workstation und der Anwender angeschlossen werden.
AXIS T8310/T8311/T8312/T8313 Installationshandbuch Seite 19 4. Starten Sie die entsprechende Anwendungssoftware, z. B. AXIS Camera Station. Der Joystick bzw. das Funktionstastenfeld oder Jog Dial werden automatisch erkannt. Hinweis: Auf dem Computer muss eine unterstützte Anwendungssoftware, z. B. AXIS Camera Station, installiert sein, damit die neue Hardware erkannt werden kann. Weitere Informationen über unterstützte Systeme finden Sie unter „www.axis.com“.
Seite 20 AXIS T8310/T8311/T8312/T8313 Technische Daten Komponente Modelle Daten AXIS T8310 Videoüberwachungs-Steuerungsgerät: • AXIS T8311 Videoüberwachungs-Joystick • AXIS T8312 Videoüberwachungs-Funktionstastenfeld • AXIS T8313 Videoüberwachungs-Jog Dial Ablenkung • AXIS T8311: Quadrat-Begrenzung Schwenken/Neigen (XY): ±15° mit zentraler Rückfederung Zoom (Z): ±25° mit zentraler Rückfederung Funktionalität • AXIS T8311: Steuerung der PTZ-Funktionen der Kameras • AXIS T8312: Schnelle Naviga
Guida all'installazione AXIS T8310/T8311/T8312/T8313 Pagina 21 AXIS T8310, AXIS T8311 AXIS T8312 & AXIS T8313 Guida per l'utente Questa Guida per l'utente fornisce le istruzioni per installare la AXIS T8310 Video Surveillance Control Board. Per tutti gli altri aspetti relativi all'uso del prodotto, consultare le pagine della guida di AXIS Camera Station. La AXIS T8310 Video Surveillance Control Board è formata da tre unità che possono essere installate separatamente o insieme in un'unica soluzione.
Pagina 22 Guida all'installazione AXIS T8310/T8311/ Panoramica dell'hardware AXIS T8310 AXIS T8311 AXIS T8312 AXIS T8313 Nota: Le funzionalità dei tasti di attivazione programmabili dipende dal software applicativo. Le descrizioni che seguono sono valide per AXIS Camera Station.
Guida all'installazione AXIS T8310/T8311/T8312/T8313 Pagina 23 AXIS T8312 Pagina iniziale Porta USB (2x) Vista dal vivo Registrazioni Registri Configurazione Porta USB Preimpostazione Allarme (strumento) Vista Ora Telecamera 0-9 Tabulazione Alt AXIS T8313 Segnalibro Precedente Riproduci/Pausa Avanti Cerca registrazioni Commuta ricerca/ Fermo immagine Rotella Shuttle (commutazione) Rotella Jog (velocità) ITALIANO Porta USB
Pagina 24 Guida all'installazione AXIS T8310/T8311/ Installazione dell'hardware AXIS T8311 Video Surveillance Joystick, AXIS T8312 Video Surveillance Keypad e AXIS T8313 Video Surveillance Jog Dial possono essere connessi separatamente o insieme come un'unica unità utilizzando la AXIS T8312 Video Surveillance Keypad come hub USB. Le unità possono posizionate in modo intercambiabile per soddisfare i requisiti e le esigenze della stazione di lavoro e degli utenti.
Guida all'installazione AXIS T8310/T8311/T8312/T8313 Pagina 25 4. Avviare il software applicativo di supporto, ad esempio AXIS Camera Station. Il joystick/keypad/ jog dial viene rilevato automaticamente. Nota: Il sistema deve avere un software applicativo di supporto, ad esempio AXIS Camera Station, che possa rilevare il nuovo hardware. Andare a www.axis.com per informazioni sui sistemi di supporto.
Pagina 26 Guida all'installazione AXIS T8310/T8311/ Specifiche tecniche Articolo Specifica Modelli AXIS T8310 Video Surveillance Control Board • AXIS T8311 Video Surveillance Joystick • AXIS T8312 Video Surveillance Keypad • AXIS T8313 Video Surveillance Jog Dial Deflessione • AXIS T8311: Delimitatore quadrato Pan/Tilt (XY): ±15° con molla di ritorno centrale Zoom (Z): ±25° con molla di ritorno centrale Funzionalità • AXIS T8311: Controllo delle funzionalità di rotazione, inclinazione e zoom dell
AXIS T8310/T8311/T8312/T8313 Guía de instalación Página 27 AXIS T8310, AXIS T8311 AXIS T8312 & AXIS T8313 Manual del usuario Este manual de usuario incluye las instrucciones necesarias para instalar la Tabla de control de videovigilancia AXIS T8310. Para obtener información sobre cualquier cuestión relacionada con el uso del producto, consulte las páginas de ayuda de la AXIS Camera Station.
Página 28 AXIS T8310/T8311/T8312/T8313 Guía de instalación Presentación del hardware AXIS T8310 AXIS T8311 AXIS T8312 AXIS T8313 Nota: Las funciones de las teclas de acceso directo programables dependen del software de la aplicación. Las descripciones que figuran a continuación son válidas para la AXIS Camera Station.
AXIS T8310/T8311/T8312/T8313 Guía de instalación Página 29 AXIS T8312 Comienzo Puerto USB Grabaciones Configuración Registros Visualización en Puerto USB directo Posición predefinida Alarma (Herramienta) Vista Hora Cámara 0-9 Tabulador Alt AXIS T8313 Puerto USB Favorito Anterior Reproducir/ Siguiente Pausa Buscar grabaciones Rueda shuttle Rueda jog ESPAÑOL Alterna búsqueda/ toma de instantánea
Página 30 AXIS T8310/T8311/T8312/T8313 Guía de instalación Instalación del hardware El Joystick de videovigilancia AXIS T8311, el Teclado numérico de videovigilancia AXIS T8312 y el Jog Dial de videovigilancia AXIS T8313 pueden conectarse por separado o juntos (como una sola unidad) a través del Teclado numérico de videovigilancia AXIS T8312, que actúa como hub USB. Las unidades pueden colocarse de manera intercambiable para adaptarse a las necesidades de la estación de trabajo y de los usuarios.
AXIS T8310/T8311/T8312/T8313 Guía de instalación Página 31 4. Inicie el software de aplicación compatible, por ejemplo, la AXIS Camera Station. El joystick, el teclado numérico o el mando de control secuencial se detectarán automáticamente. Nota: El sistema debe contar con un software de aplicación compatible (por ejemplo, AXIS Camera Station) que pueda detectar el nuevo hardware. Visite www.axis.com para más información sobre los sistemas compatibles.
Página 32 AXIS T8310/T8311/T8312/T8313 Guía de instalación Especificaciones técnicas Artículo Especificación Modelos Tabla de control de videovigilancia AXIS T8310: • Joystick de videovigilancia AXIS T8311 • Teclado numérico de videovigilancia AXIS T8312 • Jog Dial de videovigilancia AXIS T8313 Movimiento • AXIS T8311: delimitador cuadrado Movimiento horizontal/vertical (XY): ±15° con resorte de retorno central Zoom (Z): ±25° con resorte de retorno central Funciones • AXIS T8311: control de las fun
User’s Guide AXIS T8310/T8311/T8312/T8313 © Axis Communications AB, 2010 Ver.1.1 Printed: April 2010 Part No.