Axis Network Document Servers User’s Manual AXIS 70 AXIS 70U AXIS 7000 Network Document Servers User’s Manual
User’s Manual Axis Network Document Servers Notices Take some time to read through the safety notices before installing the Network Document Servers. Please observe all safety markings and instructions when using this product. Caution! - must be observed to avoid loss of data or damage to your equipment. Important! - must be observed to avoid operational impairment. Do not proceed beyond any of the above notices, until you have fully understood the implications.
User’s Manual TOC Preface . . . . . . . . . . . . . . . . . . . . . . . . . . . . . . . . . . . . . . . . . . . . . . . . . . . . . . . . . . . . . . 5 Support Services . . . . . . . . . . . . . . . . . . . . . . . . . . . . . . . . . . . . . . . . . . . . . . . . . . . . . . . 6 Introduction . . . . . . . . . . . . . . . . . . . . . . . . . . . . . . . . . . . . . . . . . . . . . . . . . . . . . . . . . . 7 The AXIS 70/70U Network Document Server . . . . . . . . . . . . . . . . . . . . . . . . . . . . .
TOC User’s Manual Example: Job Applications . . . . . . . . . . . . . . . . . . . . . . . . . . . . . . . . . . . . . . . . . . . . Retrieving the XML DD file . . . . . . . . . . . . . . . . . . . . . . . . . . . . . . . . . . . . . . . . . . . . Troubleshooting . . . . . . . . . . . . . . . . . . . . . . . . . . . . . . . . . . . . . . . . . . . . . . . . . . . . . Restoring Factory Default Settings . . . . . . . . . . . . . . . . . . . . . . . . . . . . . . . . . . . . .
User’s Manual Preface Preface Thank you for purchasing an Axis Network Document Server. This product allows scanner devices to be connected anywhere in Ethernet and Fast Ethernet networks. Being faster, cheaper and safer than fax, traditional mail and couriers, this is the perfect solution for digitized document distribution over IP networks. About This Manual - This manual applies to the • AXIS 70 with software release 1.00 and above • AXIS 70U with software release 1.
User’s Manual Preface Support Services Should you require any technical assistance, please contact your Axis reseller. If your questions cannot be answered immediately, your Axis reseller will forward your queries through the appropriate channels to ensure a rapid response. If you are connected to the Internet, you can: • • Download user documentation and firmware updates Find answers to previously resolved problems in the FAQ database.
User’s Manual Introduction Introduction The AXIS 70/70U Network Document Server The AXIS 70/70U Network Document Server is the easy solution for instant digital document distribution over networks. Faster, cheaper and safer than fax, traditional mail and courier. The total cost of ownership is favorable since the distribution relies upon the fixed IP network and not fax lines, postage or courier.
Introduction User’s Manual The AXIS 7000 Network Document Server The AXIS 7000 Network Document Server connects and networks a broad range of office and production scanners anywhere in Ethernet and Fast Ethernet networks. The AXIS 7000 transforms paper documents into a digital format and sends them as an e-mail attachment, to a file server, to a web page, to print or to a URL thus offering versatile document management over IP networks.
User’s Manual Introduction Simplicity The file-server-independent approach makes installation quick and convenient. In most environments, the physical connection to the network is the only installation required prior to using the AXIS 7000. No additional software is required on clients or file servers, except for viewing applications for displaying images in TIFF, JPEG and PDF format.
Introduction Ease of Use User’s Manual The AXIS 7000 is designed for quick and easy installation on your network and your scanner device.
User’s Manual Introduction Document Server Comparison Functionality Office Scanners < 15 ppm Supported Devices Distribution methods X X X Production Scanners X Digital Copiers X X X X A3 and larger paper sizes X User defines paper sizes X X X X TIFF format X JPEG format X PCL format X Black/white, grayscale and color support X X X Compression format G.4 Packbite, JPEG X X X COmpression format G.
Introduction User’s Manual AXIS 70 AXIS 70U AXIS 7000 Bcc functionality X X X Cc functionality X X X Functionality Application Integration XML support NT authentication User authentication Address book X X SMTP authentication X X X LDAP External address book X X X FTP External address book X Specify file name for e-mail and file destinations X X X Add temporary e-mail destinations via web Add temporary e-mail destinations via keyboard Other 16 MB SDRAM X X X X X X A
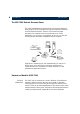
User’s Manual Physical Description Physical Description This section provides a physical description of the Document Server and explains the purpose and function of the connectors, indicators and user interface. The Back Panel (AXIS 7000 AXIS 70) Keyboard Connector Push button Push Button Connector SCSI-2 connector Network Connector Power supply The Push button is used for restoring the Document Server parameters.
Physical Description User’s Manual The Front Panel Status Indicator Busy Indicator Power Indicator Network Indicator The front panel indicators show the status of the Document Server. The function of each indicator is described below. Status Indicator The Status indicator flashes during startup and remains lit when the Document Server is ready for use. If the status indicator turns off, this may indicate an error.
User’s Manual Physical Description Control Panel The Document Server Control panel has user keys (described below) and a message display that describes the selected menu options and current status of the unit. AXIS 7000 ver. 2.40 The message display consists of 2 lines of 16 characters indicating status and menu options. User Keys The function of each user key is described below: Add page The Add page key scans the material in the scanner device.
Physical Description Send Up/Down User’s Manual The Send key sends the scanned material to the selected destination(s) and releases the Document Server for other users. For a single page/stack of sheets, use this key to scan the material and send the image in one step. The Up and Down keys scroll and select menu options. User Key Combinations Advanced Settings Menu Up/Down Pressing and holding the Menu key while simultaneously pressing the Select key displays the Advanced menu.
User’s Manual Physical Description To enter an e-mail address - press Insert To search for an e-mail address - type first letters or initials Keys C O M M U N I CAT IONS Part.No 18908 Network Document Server The function of each key is described below: F1 The F1 key scans the material in the scanner device. Use this key to scan each page of bound materials, for example, books and magazines. F1 corresponds to the Add page key on the control panel.
Physical Description Tab Enter Up/Down User’s Manual The Tab key scrolls the menu. Tab corresponds to the Menu key on the control panel. The Enter key selects multiple destinations. Enter corresponds to the Select key on the control panel. The Up and Down arrow keys scroll and select menu options. The Up and Down arrow keys correspond to the Up/Down keys on the Control Panel.
User’s Manual Physical Description AXIS 7000 Accessories AXIS MFP Kit The AXIS MFP Kit is a bracket for mounting the AXIS 7000 and keyboard on a digital copier. Supported copiers include models from Canon, Sharp and Océ. The MFP Kit mounts in less than 10 minutes. AXIS TR Bridge The AXIS TR Bridge is an optional accessory for your AXIS 7000 Network Document Server, providing a cost-efficient, permanent or temporary connection to a Token Ring network.
Basic Installation User’s Manual Basic Installation This section describes the various aspects of product installation and includes: • • • • • A detailed hardware inventory Instructions for installing the Document Server into your networking environment Instructions for setting the IP address using the Document Server control panel, DHCP, RARP, BOOTP and AXIS IP Installer Instructions for setting a host name Instructions on how to verify your installation Checking the Hardware Inventory Unpack and ch
User’s Manual Optional Accessories Basic Installation SCSI Cables (AXIS 7000) (AXIS 70) 50-pin high-density shielded SCSI-2 connector (micro-D) 14260 50-pin high-density shielded SCSI-2 connector (Centronics) 14259 AXIS MFP kit (AXIS 7000) Bracket for mounting AXIS 7000 and keyboard 17439 AXIS MFP kit with US Keyboard (AXIS 7000) Bracket for mounting AXIS 7000 and keyboard.
Basic Installation User’s Manual AXIS Network Product CD The AXIS Network Product CD provides an easy-to-use electronic catalog, that includes Axis product software, utilities software, white papers, user documents, technical notes etc. It can be used within all of the supported Axis computing environments. Document Server does not require any additional software installation from the AXIS Network Product CD. You can view the contents of the AXIS Network Product CD via Adobe Reader or HTML interface.
User’s Manual Basic Installation Connecting the AXIS 70U to your scanner device: 1. Switch off the scanner device and disconnect the Document Server’s external power supply. 2. Connect the USB cable to the USB connector on the Document Server. 3. Connect the USB cable to the scanner device. Note: The AXIS 70U does not support USB hubs or USB converters and can only be connected to one scanning device at a time. The AXIS 70U supports USB 1.
Basic Installation User’s Manual Notes: The tri-colored Network indicator flashes: • yellow - indicating network activity on a 10MB Ethernet network. • green - indicating network activity on a 100MB Fast Ethernet network. • red -if there is no network connection. • Not lit - indicates that there is no network activity. Assigning an IP Address To establish communication with the TCP/IP environment, you must assign an IP address and optionally choose a unique host name for your Document Server.
User’s Manual AXIS IP Installer Basic Installation Suitable for all supported networking environments. Supplied on the AXIS Network Product CD and available via the Axis web site, this is an Axis tool that simplifies the setting of IP addresses for all Axis ThinServerTM devices, including print servers, camera servers, storage servers and document servers. Note: you should not use AXIS IP Installer to set the IP address of the Document Server, if you have an active DHCP server on your network.
Basic Installation User’s Manual Control Panel Follow the instructions below to set the IP address from the control panel: Note: The Administrator can disallow this function from the web-based Administration pages. For further details refer to “User Options” on page 41. 1. Power up the Document Server. Press Menu appears: when this display AXIS 7000 Version: 2.40 2. After a few seconds this display will be shown: IP address: 000.000.000.000 3.
User’s Manual Basic Installation 11. Press Select to edit the subnet mask: Edit net mask: 000.000.000.000 12. To change the value, repeat steps 4 - 6 above. 13. Press Menu to display the node address. This address is not editable. The node address should equal the Document Server serial number found on the underside label of the unit. 14. Press Menu once more to display the final instructions: .. Press ..... if you are finished 15. Press Select to exit the IP settings.
Basic Installation Using a PC keyboard User’s Manual Connecting a PC compatible keyboard directly to the Mini-DIN connector of your Document Server provides a quick and convenient method for managing the unit and setting the IP address during system start up. Follow the procedures below to set the IP address from the keyboard. Note: The Administrator can disallow this function from the Web-based Administration pages. For further details refer to “User Options” on page 41. 1.
User’s Manual Basic Installation Using DHCP, ARP, RARP and BOOTP Use DHCP, ARP, RARP and BOOTP as an alternative to setting the IP address from the control panel or keyboard. Follow the appropriate instructions for the preferred method below. Important! Do not use the IP address used in any of the following examples. Before you begin: Using DHCP • Power - Make sure the Document Server is powered on and attached to the network.
Basic Installation User’s Manual Using ARP in Windows In Windows 95 and Windows NT, you can download the IP address using ARP. Perform the following commands to download the IP address and verify the communication. Important! Windows 95 only: If the ARP table is empty, you must first ping an existing unit on your network before setting the IP address of your Document Server. Type arp -a to display the ARP table.
User’s Manual Using ARP in UNIX and OS/2 Basic Installation In UNIX and OS/2, type the following commands to download the IP address and verify the communication: arp -s temp ping The Ethernet address or node address equals the Document Server serial number with each pair of digits separated by a colon. Example: arp -s spserv 00:40:8c:11:00:86 temp ping spserv The host will return ‘spserv is alive’ or a similar message.
Basic Installation User’s Manual 2. If necessary, update your host table and alias name databases as required by your system. 3. Start the RARP daemon, if it is not already running. This is typically performed using the command rarpd -a 4. Restart the Document Server to download the IP address. Note: RARP is enabled by default but can be disabled by an Administrator using the System Settings page.
User’s Manual Using BOOTP in UNIX Basic Installation Follow these steps to download the IP address using the BOOTP method: 1. Append the following entry to your boot table. This is typically performed by editing the file /etc/bootptab. :ht=:vm=:\ :ha=:ip=:\ :sm=:gw= where: ht ether for Ethernet vm rfc1048 ha The Ethernet or node address, i.e.
Basic Installation User’s Manual Mapping a Host Name to the IP Address If you are using host names, you can map a unique host name to the acquired IP address. Refer to your system manuals or to your Network Administrator for instructions on how to perform the name mapping on your particular system. Note: If the host name has not been included in the system host table, you can still perform the following instructions on how to download the IP address.
User’s Manual Basic Installation If no destinations have been specified, the Document Server will display: Connect using Web browser If one or more destinations have already been specified, the Document Server will display: Send to: xxxxxx where “xxxxxx” is the first destination in the destination list. To verify the communication, you can access the Document Server using a standard Web browser such as Netscape Navigator or Internet Explorer: 1. Place a document in the scanner device. 2.
Configuring the Document Server User’s Manual Configuring the Document Server This section is targeted specifically to users responsible for the administration of the Document Server. The Administrator is granted high-level privileges denied to the ordinary user. Some settings described here are available for the AXIS 7000 only. Important! To access the Document Server configuration file, you must first set the IP address as described in “Assigning an IP Address” on page 24.
User’s Manual Configuring the Document Server The Web-based Administration tools provide a convenient method for managing destinations, profiles, defining the network protocol settings, establishing user privileges, authentication etc. The tools are password protected and available to the Administrator only. Accessing the Tools You can access the Document Server Home Page using a standard Web browser such as Netscape Navigator or Internet Explorer. 1. Start the Web browser. 2.
Configuring the Document Server User’s Manual Note: It is recommended that you change the password of your Document Server as soon as possible, since all Axis products are shipped with the same default password. 5. The This Document Server page is displayed: The Administrator can modify the system settings directly from this page. Access the other Administration tools using the control buttons to the left of the page.
User’s Manual Configuring the Document Server Specifying the System Settings Click This Document Server page to display software version, unit hardware address, memory size information and the current system settings. Important! When installing the Document Server for the first time, it is recommended that the Administrator retains the default system settings, profiles and paper sizes. Optionally, customize these when you are familiar with the unit operation and functionality.
Configuring the Document Server General User’s Manual Server Password and Confirm This is the Administrator password required for accessing the AXIS 7000 for administration tools. To change the password, simply enter your new password in the Server Password field. Repeat the new password in the Confirm field to check the spelling and syntax.
User’s Manual Configuring the Document Server Note: To use Microsoft Windows NT Network (SMB) properly WINS must be enabled and the Domain/GroupName parameter must be set to a valid name. Manually Click here to set date and time manually. User Options The Allow Users to: field defines the privileges allowed to normal users by the Administrator(s).
Configuring the Document Server International User’s Manual Allows the Administrator(s) to select: • The preferred language for messages displayed on the Document Server control panel display - English, French, German, Spanish, Italian, Swedish Danish and Norwegian are supported • The keyboard layout which is compatible with the external keyboard • The measurement unit to be used for displaying defined paper sizes (centimeters or inches) Notes: Meta Information (AXIS 7000 only) • The language defaul
User’s Manual Configuring the Document Server Specifying Network Settings Click Network Settings to view and modify the configuration parameters for all supported protocols:TCP/IP - defines the: • • • • • • • IP Address Default router Subnet mask Automatic download method (BOOTP, RARP or DHCP) • Domain name, DNS server and WINS server Web (HTTP) - an external URL reference with URL to page or image options.
Configuring the Document Server Services Overview User’s Manual The table below provides an overview of information and services available from this page Button Description Guides the user through the setup procedures for the following protocols - TCP/IP, E-mail (SMTP) and the External Address book. Wizard Detailed View Restart Server Note: You cannot set up all of the supported protocols with one pass of the Wizard.
User’s Manual Configuring the Document Server Important! • The Network settings for the TCP/IP and E-mail (SMTP) protocols must be specified by the Administrator before the Document Server can be used for distributing reproduced documents on the network. You can optionally configure the External Address Book for automatic retrieval and loading of e-mail addresses and/or other destination types.
Configuring the Document Server User’s Manual Protocol setting Purpose and function Web (HTTP) An external URL reference with URL to page or image options.
User’s Manual Configuring the Document Server 1. From the Protocols dialog, click the TCP/IP tag. 2. Check the appropriate checkbox to define your preferred method for setting the IP address automatically, i.e. DHCP, BOOTP or RARP. For further information on these methods, refer to “Assigning an IP Address ”on page 24. Notes: • If DHCP, BOOTP or RARP is enabled, your manual settings might be overridden when you restart the Document Server.
Configuring the Document Server User’s Manual 4. Enter the IP address for the Default Router. All traffic directed outside the local network (according to the subnet mask) is sent to the default router. Any re-routing via other routers is done automatically. The setting 0.0.0.0 indicates that no default router is set. 5. Specify the Subnet Mask used for determining when the traffic should be sent via a router.
User’s Manual Web (HTTP) Configuring the Document Server Select Web(HTTP) to add a customized link to the Document Server Home Page: • URL to Page: Useful for establishing guidelines and rules of usage for the Document Server. The full path must be specified, e.g. http://www.company.com • URL to Image: Link to an image used as a customized link. Specify the full path; for example: http://www.company.com/images/image.gif, or the path relative to the URL of the page, e.g. images/image.gif.
Configuring the Document Server User’s Manual 1. From the Protocols dialog, click the E-mail (SMTP) tag. 2. Specify the name or IP address of the Primary Mail Server that provides the e-mail facilities, e.g. mail or mail.domain.com or an IP address. 3. Optionally, specify the name or IP address of the Secondary Mail Server. The secondary mail server is only used if the primary mail server is disconnected or unavailable. 4. In the SMTP Port field, specify the number of the TCP/IP port. 5.
User’s Manual Configuring the Document Server 7. Check the Send copy to Bcc recipient checkbox to enable the option to send a blind carbon copy (Bcc) of an e-mail. Specify the default e-mail address of the recipient in the Bcc Address field. 8. Check the Send copy to Cc recipient checkbox to enable the option to send a copy (Cc) of an e-mail. Specify the default e-mail address of the recipient in the Cc Address field. 9.
Configuring the Document Server User’s Manual Notes: External Address Book • The user can specify another sender at the moment of scanning. This, however, does not apply if the administrator has enabled Authentication or if the Specify the sender of scanned documents option is not selected (see the admin|Edit|User Options tab) • Make sure that your Document Server has a valid SMTP reply address to avoid rejection by spam filters.
User’s Manual Configuring the Document Server Your options are: Product Parameter Options No External Address Book External Address Book via LDAP (e-mail destinations only) AXIS 70/70U/7000 Description Select this option if you do not want to retrieve an External Address Book. Select this option to retrieve an external address book from an LDAP (Lightweight Directory Access Protocol) server. For more information on LDAP, see “LDAP” on page 141.
Configuring the Document Server AXIS 7000 External Address Book from a File (e-mail, printer and file destinations) FTP Server User’s Manual Select this option to read an external address book from a file on an FTP server. Specify the name or IP Address of the FTP server Specify the user name for logging on to the FTP server. If left blank, the User and Password specified on the Destination Default page will be used User Password - Specify the password for logging on to the FTP server.
User’s Manual Configuring the Document Server Specifying Authentication Settings Authentication makes it possible for the administrator to allow access to the Document Server for authenticated users only. Click the Edit button on the This Document Server page and then click the Authentication tag to modify the authentication parameters. 1.
Configuring the Document Server User’s Manual Note: The SMTP authentication method is also available, refer to “Specifying Network Settings” on page 43 for information on how to configure the Document Server to use this method. LDAP Server Authentication Parameter Description LDAP Server Specify the name or IP Address of the LDAP server Port Number Specify the number of the TCP/IP port used by the LDAP server Base DN Specify the Base Descriptive Name to use when binding to the LDAP server, e.g.
User’s Manual Configuring the Document Server Domain Specify the name of the domain where the AXIS 7000 belongs. Create a Computer Account in the Domain Add the AXIS 7000 to the domain. Check this box to create the account via this interface or use the Server Manager tool on a Windows NT server. Username & Password Specify the username and password of the NT administrator. Note: Treat the added computer name as a security element.
Configuring the Document Server User’s Manual Click Destinations from the admin page to display the Destinations page: From the Destinations page you can: • • • • • Services Overview list currently available e-mail, file and printer destinations edit and create new destinations create copies of existing destinations selectively delete destinations set a Quick Destination which is a specific permanent destination to be accessible through the F9 key on the keyboard The table below provides an overvie
User’s Manual Configuring the Document Server Product Button File Destination New >> Creates a new file destination. AXIS 7000 Printer Destination New >> Creates a new printer destination. URL for E-mail >> Defines the storage location for images sent as hyperlinks to e-mail destinations. E-mail Subjects >> Specifies the text to be displayed in the subject field when sending to e-mail destinations. Note: US ASCII characters only.
Configuring the Document Server User’s Manual 1. Click Destinations. 2. Previously added e-mail, file and printer destinations are listed in the table. Click Detailed to view the detailed settings. 3. If you want to edit an existing destination in the displayed list, click the Destination Name link and proceed to step 5. 4. Click E-mail Destination New >> to add a new destination to the list. 5. Specify a descriptive name for the e-mail destination in the Destination Name field.
User’s Manual Configuring the Document Server 8. With reference to the table below, select the amount of information to be attached with the image: Option Description Default value specified on the Destination Defaults page Information about the connected scanner device, the parameter settings used when scanning etc. Includes the image-related profile settings. Does not include any information. 9.
Configuring the Document Server Adding Permanent Destinations User’s Manual The Administrator can permit users to add temporary e-mail destinations using the New Destination button on the User|Destination page. If this privilege is enabled, the five most recently added temporary destinations will appear at the top of the table on the Destinations page. The Administrator can make these temporary destinations permanent simply by clicking the Make Permanent button.
User’s Manual Configuring the Document Server 2. Specify a descriptive name for the file destination in the Destination Name field. This is the name that will appear in the destination list. 3. From the drop-down Profile list, select the profile to be used as default for this destination. Note: The user can specify another profile from the AXIS 7000 control panel at the moment of scanning. is the default value specified on the Destination Defaults page. 4.
Configuring the Document Server User’s Manual 8. Specify the directory on the FTP server where the image will be stored. 9. Define the file name of the scanned image. Note: The filename defined in the Destination Defaults page is used if the Filename field is left blank. 10. With reference to “Filename Sequence Numbers and Extensions ”on page 64, optionally combine the filename with a sequence number and/or a file extension, e.g. . 11.
User’s Manual Configuring the Document Server The table below summarizes the available sequence numbers and extensions: Option Description Append sequence number to file name Adds a unique sequence number to the file name. Start sequence with: Store sequence number on FTP server: Creating and Editing New Printer Destinations Raw TCP Printing Selects the sequence number to be appended to the first image scanned to this destination.
Configuring the Document Server User’s Manual 3. Click Printer Destination New >> to display the New Printer Destination Page. 4. Enter a descriptive Destination Name for the printer. 5. Check the Raw TCP/IP radio button. 6. Type the IP Address or Host Name of the destination printer in the Printer field. 7. Specify the port number that the printer uses (normally 9100). 8. From the drop-down Profile list, select the profile to be used as the default for this destination.
User’s Manual Configuring the Document Server 10. If the target printer supports double sided printing, check the My Printer Supports Double Sided Printing checkbox and define your printing preferences by clicking the associated radio buttons, namely: Only Print Single Sided, Only Print Double Sided or Print As Scanned. 11. Check the appropriate check boxes to define the supported resolutions and paper sizes for the target printer. 12.
Configuring the Document Server User’s Manual 9. From the drop-down Profile list, select the profile to be used as the default for this destination. Note: The user can specify another profile from the AXIS 7000 control panel at the moment of scanning. is the default value specified on the Destination Defaults page. 10. Check the Include Page Header checkbox only if you want date, time, destination, Sent By and Page Number to appear on your printer output. 11.
User’s Manual Configuring the Document Server Specifying Profiles A profile defines the scanner device and image parameters to be used when scanning and is optionally part of the destination definition. Note: Although a profile is normally associated with a destination, the user can override that setting by choosing another profile from the AXIS 7000 control panel at the moment of scanning.
Configuring the Document Server Services Overview The table below provides an overview of the information and services provided by each button on this page Button Description Profile New>> Allows an administrator to create a new profile. See Creating new profiles below. PDF Options>> Enables the user to insert the document in the same orientation as when copying on a digital copier i.e. long-edge first.
User’s Manual Configuring the Document Server Notes: • When you have selected a new language you must go to the Profiles page and click Restore Predefined Profiles to change the language in the Profiles list. It is recommended that you select your preferred language before defining and modifying paper sizes and profiles. Note: All user-defined profiles (except the set default paper size) and modifications to predefined profiles will be lost when you click Restore Predefined Profiles.
Configuring the Document Server User’s Manual Parameter Options Instructions Paper Size • • • • A4, A5, B5, B5(JIS) Legal Letter (default) Photo Select the paper size from the drop-down dialog box. • Portrait: top along the short edge Landscape: top along the long edge Click the appropriate radio button to specify your chosen orientation. Paper Orientation • - Specify the resolution to be used for scanning for X and Y respectively, in dots per inch (DPI).
User’s Manual Configuring the Document Server Profiles Parameters AXIS 7000 Parameter Options Specify a descriptive name for the profile. This is the name that will appear in the profile list. Profile Name • Paper Size Duplex Scanning Paper Orientation Multipage Documents • • • • • • • A3, A4, A5, B4, B4 (JIS), B5, B5 (JIS) Business card Executive Ledger Legal Letter (default) Photo 3.
Configuring the Document Server User’s Manual Parameter Options Instructions • • • Black and White Grayscale Color Select the appropriate data type Data Type • TIFF - No compression TIFF - CCITT G.3 one dim TIFF - CCITT G.3 two dim TIFF - CCITT G.4 TIFF - Packbits PDF - No compression PDF - CCITT G.3 one dim PDF - CCITT G.3 two dim PDF - CCITT G.
User’s Manual Configuring the Document Server Notes: Predefined Profiles • High-resolution settings produce higher-quality scanning. However, your documents might take longer to scan. The resolutions used when scanning depend on your scanner's capabilities • Dithering - not all scanner devices support dithering • Duplex scanning- not all scanner devices support duplex scanning • TIFF viewers - not all TIFF viewers support multipage image files.
Configuring the Document Server User’s Manual Temporary Profiles If the Administrator allows users to add temporary profiles, the five most recently added profiles will appear in the profiles list. The Administrator can make temporary profiles permanent by clicking the Make Permanent button. Guidelines for Format and Compression In editing or creating a new profile it is necessary to specify the format and compression techniques that are to be employed.
User’s Manual Image Enhancement AXIS 7000 only Configuring the Document Server If supported by the connected scanner device, the image enhancement options will be available from the Profiles page. Image enhancement (IPC) is used to create a profile to capture text on poor quality originals or to capture text on a dark background. Image Enhancement 1. Click Image Enhancement>> 2. The previously added image enhancement profiles are listed in the table.
Configuring the Document Server User’s Manual 4. Profile Name - Specify a descriptive and unique name for the profile. This is the name that will appear in the profiles list. 5. Type - Select the image enhancement type that is compatible with your device driver. See the table “Image Enhancement Types” on page 78 for information on the available settings for each image enhancement type. 6. To complete this task do one of the following: • If you have added a new profile, click Add To List.
User’s Manual Configuring the Document Server Type Options • • • • Fujitsu DTC • • • • • • • • Fujitsu IPC • • • • Gamma Pattern - Gamma correction patterns are used to extend the availability of the built-in functions. See the manual of the scanner or device driver for more information. White Level Follower - used to scan a document with a colored background. Density - defines the level of smoothing as follows: Scan for image - less smoothing but includes noise reduction.
Configuring the Document Server Type User’s Manual Options • • Fujitsu Static Threshold • • • • Gamma Pattern - Gamma correction patterns are used to extend the availability of the built-in functions. See the manual of the scanner or device driver for more information White Level Follower - used to scan a document with a colored background.
User’s Manual Configuring the Document Server Specifying Paper Sizes The Paper Sizes parameter defines the size of the scanned image and is optionally part of the profile. Note: A user can override the Paper Size setting used by a profile by choosing another paper size from the Document Server control panel at the moment of scanning. Predefined Paper Sizes The Document Server includes predefined standard paper sizes to cover most needs.
Configuring the Document Server User’s Manual (AXIS 7000 only) Follow the instructions below to optionally edit any of the predefined paper sizes listed above, or create new ones to suit your specific needs: Note: When a new language is selected you must go to the Paper Sizes page and click Restore Predefined Paper Sizes to change the language in the Paper sizes list. It is recommended that you select your preferred language before defining and modifying paper sizes and profiles.
User’s Manual Configuring the Document Server Note: PDF rotation and TIFF rotation are automatic for scanners with an RADF (Reversing Automatic Document Feeder). However, the image viewer must also support rotated images. See the documentation supplied with your image viewer for more information. Configuring Using a Text Editor and FTP The Document Server configuration file includes all the system parameter settings regarding network protocols, profiles, paper sizes and destinations.
Configuring the Document Server User’s Manual 4. Edit the file using your preferred text editor. In Windows 95 and Windows NT environments, you can for example use Notepad. Note: Do not use MS Word or other similar word processor. 5. Type put config.ini to download the file to the Document Server and save it permanently. 6. To exit FTP, type the command quit, bye, or exit. Notes: • The configuration file can be used as a template when configuring multiple document servers.
User’s Manual Configuring the Document Server Note: We strongly recommend that the default password is changed by the Service user to prevent unauthorized access to the Service page and counter settings. 3. The Service page presents general information about the counter functionality: Service Page Overview Total number of pages - counts the total number of pages scanned and sent using the AXIS 7000. This counter cannot be reset.
Configuring the Document Server User’s Manual 2. Click the Mail/Print button to access the page where you can: • Click SendMailNow to send a scan counter report to the specified e-mail destination • Select a printer from the printer drop-down list and click PrintNow to print a scan counter report to the selected printer. • Click Close to close the dialog box 3. Click Reset to reset the counter Mail/Print Scan Counter To send a scan counter report, go to admin | Support and click the Scan Counter link.
User’s Manual Scan Counter Report Configuring the Document Server The scan counter report contains the following information: • General information i.e. date, host name, host address and connected scanner • Counter information i.e.
Using the Document Server User’s Manual Using the Document Server This section describes how to use the Document Server and includes the following information, given from the perspective of a user: Note: The information in this manual applies to all Axis Document Server models unless otherwise stated.
User’s Manual Using the Document Server The AXIS 7000 allows document information from network attached document distribution devices, such as scanners or digital copiers to be distributed to e-mail, file and printer destinations. In addition to the resident profiles and destinations established by your Administrator, users can also create both temporary e-mail destinations and profiles, using either the Web-based user interface or user keyboard (if connected by your administrator).
Using the Document Server Send-to-E-mail AXIS 70/70U/7000 User’s Manual This allows document images to be distributed to any e-mail address defined in the destination list. This service is often referred to as Internet faxing. E-mail transfer uses the Simple Mail Transfer Protocol (SMTP) whereby the document image is sent as a MIME-encoded e-mail attachment, or stored on a file server as an accessible hyperlink within an e-mail notification.
User’s Manual Send-to-Web Browser AXIS 7000 Using the Document Server This is a convenient method for users that do not have an e-mail address. It is also useful if you want to try a number of different profiles. Simply place the document in your scanner device and access the AXIS 7000 from a standard Web browser. Scanning is triggered directly from your Web browser and the image is saved within the Web browser dialog.
Using the Document Server User’s Manual 4. The following message will appear: Login in progress 5. If the following message appears the authentication process has failed. Press Cancel (on the control panel) or press Esc (on the keyboard) to try again. Login failed! 6. If the authentication process is successful the following message is displayed informing you that you can log out by pressing Cancel for two seconds (on the control panel) or Esc (on the keyboard). To logout press Cancel 2 sec. 7.
User’s Manual Using the Document Server 1. The Document Server display shows “Send to: xxxxxx” when it is ready for use. For example: Send to: Accounting Dept 2. Use scrolling keys to find your required destination from the list. Press and hold the key to autorepeat scrolling. If you want to add a temporary E-mail destination, refer to “Adding Temporary Destinations” on page 95. Note: If a keyboard is connected you can easily search the list by pressing the first letter of the required destination. 3.
Using the Document Server User’s Manual One single page or a stack of paper in the sheet feeder: a. Press Send one step. to scan and send the image to the destination in Several separate pages or stacks of paper: a. Press Add to scan each page or stack. b. Insert the next page or stack and press Add again. Repeat the procedure until all the pages have been scanned. c. Press Send to transmit the image to the destination.
User’s Manual Using the Document Server Notes: • The JFIF format sends each page as one separate image file. • The PCL format sends several pages in a single PCL file. • Web browsers not supporting multipage image files require that the Multipage Documents parameter is set to Separate file for each page. Alternatively, scan each page using the Send button. • Double-sided is only available if the scanner device supports duplexing.
Using the Document Server Using a standard PC Keyboard User’s Manual Connecting a standard keyboard to your Document Server will allow you to quickly search any destination within the resident list. You can do this by simply typing in the first couple of characters of the destination you wish to search for. The Document Server message display will automatically show the destination that best matches the keyboard input.
User’s Manual Using the Document Server Please refer to the following table for information on additional keyboard functions: Key Function Tab and Right arrow To scroll the menu Enter To select multiple destinations To complete an address or subject entry Up / Down arrows Esc F1 F2 F3 F4 F5 F6 F9 Space Insert Delete Backspace Left arrow Page Up Page Down Home End From a Web browser: AXIS 7000 only To scroll and select menu options To cancel the scanning process at any stage To clear any selection mad
Using the Document Server User’s Manual 1. Start the Web browser. 2. Enter the name or IP address of your Document Server on the location/address line. Example: http://172.16.253.80 This displays the Document Server Home Page 3. Click Destinations. The table lists the available destinations. 4. Click New Destination and specify the settings for the new destination. 5. Click OK to save the destination temporarily.
User’s Manual Using the Document Server Adding Temporary Profiles (AXIS 7000 only) If you have tried all the available profiles but are still not satisfied with the result of your scanned image, you can add a temporary profile from the Web browser interface. 1. Start the Web browser. Note: The Administrator might not allow the user to add temporary profiles. 2. Enter the name or IP address of your Document Server on the location/address line. Example: http://172.16.253.80 3.
Using the Document Server User’s Manual Changing the Name of the Scanned Image Files (AXIS 7000 only) To change the name of the scanned image file perform these instructions from the Document Server control panel and keyboard: 1. Select one or more file destinations. Example: Send to: +1 Accounting Dept 2. Press Tab and use the Left and Right arrows on the keyboard to navigate in the menu list.
User’s Manual Using the Document Server Adding a Temporary E-mail Subject There is a list of pre-defined e-mail subjects resident within the Document Server. If you want to send a scanned document with an alternative e-mail subject, you can add a temporary e-mail subject using either: • standard PC keyboard (AXIS 70/70U/7000) • standard Web browser (AXIS 7000) Follow the instructions below to add a temporary e-mail subject to the list: 1.
Using the Document Server User’s Manual Scanning Parameters From the Document Server control panel, press Menu to scroll through the scanning menu. Use to find the desired value. If a keyboard is connected, press Tab and use the UP/Down arrow keys to find the desired value or search the menu by typing the parameter name (or the first letters in the parameter name). The table below describes the available parameters for each destination type.
User’s Manual Using the Document Server Scanning color images to JPEG/JFIF can be time consuming due to the amount of computation performed by the AXIS 7000. You should therefore avoid using a higher resolution than is really needed. “Color low” (75 dpi) is normally sufficient for web publishing of color images. If you intend to manipulate a scanned color image using an image editor, it is recommended that you use uncompressed TIFF. Note: Uncompressed TIFF may generate very large files.
Using the Document Server Double-sided User’s Manual If supported by the attached scanner device, you can select Double-sided to scan both sides of a page simultaneously. This option is also known as duplex and may be referred to by that term in the scanner device documentation. Note: By default the double-sided (Duplex) parameter is set to off. Sending to your Web Browser (AXIS 7000 only) Follow these steps to scan to your Web browser: 1. Place the material in your scanner device. 2.
User’s Manual Using the Document Server 6. Click Scan and wait for the image to appear in your Web browser. Depending on the image format specified by the profile, the Web browser will display the image in an associated viewer or ask you to save the file. For further processing, you must save the image from within the viewer as the Web browser will normally use a temporary file name. 7.
Using the Document Server User’s Manual Viewing Image Files The AXIS 7000 generates standard TIFF, JPEG/JFIF and PDF formats that are supported by most image-related applications; and PCL format, that is supported by most printers. Although the AXIS AXIS 7000 does not rely on any product-specific software installed on each client, tools for viewing and manipulating the images are required.
User’s Manual Using the Document Server Notes: Associating Image Formats with Applications • When using the “Text” profiles for scanning documents, make sure that the viewing tool supports multipage CCITT G.4-compressed TIFF; the TIFF format is the most common standard for imaging and archiving of scanned documents. If your application does not support multipage documents, you can create a profile that generates single page documents, or scan each page as a separate job.
Meta Information User’s Manual Meta Information AXIS 7000 only The Meta Information functionality allows the Developer, System Integrator, Administrator etc. of the AXIS 7000 Network Document Server to define a list of information to be requested (it can be required or optional information) from the user at the moment of scanning. The user will be prompted for this information before the document is scanned and sent over the network.
User’s Manual Meta Information The administrator specifies these messages by writing an XML DD (Document Description) file in a text editor. This file is then saved on an FTP server and the AXIS 7000 will be configured to retrieve the XML DD file from the specified FTP server. See “Retrieving the XML DD file” on page 127. Note: You can write the XML DD file in any text editor although it is recommended that you download a Freeware XML writer with XML validation.
Meta Information Example: Archiving User’s Manual You have an electronic archive (file server) for your scanned documents and you want to store certain information together with each document.
User’s Manual Meta Information 4. Version Number 5. Classification 6. Level of Importance In this example the information is always asked and is not associated with any specific destination. The XML DD file generates the required messages (1 to 6) in this example. XML DD file 1. Document Identification Number: (Required information)
Meta Information User’s Manual 3. Name of the Issuer: (This information is not required) 4. Document Version Number: (This information is not required) 5. The user will not see the classification as the information is hidden and used by the archiving system only.
User’s Manual Meta Information The information file will be sent to the “Archiving System” destination with the entered value - in this case the archiving system would be set to archive the document corresponding to the specified level of importance.
Meta Information Information File User’s Manual The destination selected by the user will receive the image and the information file. The “Archiving System” destination will receive the following information file containing the information entered by the user.
User’s Manual Meta Information 1. The following prompt will appear on the message display when the Add/Send key has been pressed. The user is prompted to enter the information and then press Enter. The star indicates that this is required Meta Information and that the user cannot scan without entering the requested information. Doc Id No: * . If the entered information is invalid the following display will be shown. The user must press Enter and try again to be able to scan. Wrong Id! abcdef 2.
Meta Information User’s Manual 5. The user is prompted to enter the level of importance by which the document is to be archived. The specified default value appears in the display. Using the UP/Down arrows the other values can be selected.
User’s Manual Meta Information Here is the same XML DD file in full: PAGE 118Meta Information User’s Manual Example: Invoice Handling Invoice The administrator wants to send the following information with the scanned image (as specified in the “Invoice” example above): The information is associated with the destination. When a destination with associated Meta Information is selected the user will be prompted to enter the requested information. The XML DD file generates the required messages (1 to 3) in this example. 1. Invoice Number 2. Date of Payment 3.
User’s Manual XML DD file Meta Information 1. Invoice number: (Required Information) 2.
Meta Information Information File User’s Manual The destination selected by the user will receive the image and the Information File. The Information File will contain the following Meta Information. MetaData] INVOICE_NO = 12345 DUE_DATE = 05/05/2000 ORDERER = Name XML DD file Here is the same XML DD file in full:
User’s Manual Meta Information 1. The user is requested to enter the number of the invoice and press Enter. Invoice No: * If the entered value is incorrect according to the pattern the following display will be shown for two seconds before returning to the previous prompt. Wrong No! abcdef 2. The user is requested to enter the date and then press Enter. Due Date: 08/05/0000 * 3. The user is requested to enter the name of the orderer, then press Enter.
Meta Information XML DD file User’s Manual 1. Job Description: (Required information) 2.
User’s Manual Meta Information 5. The user will be prompted to enter the type of job. There are listed options but the user can also enter a specific value, for example Manager. PAGE 124Meta Information User’s Manual Note: The administrator has the option to specify the extension of the Information File when saving the file on the FTP server under admin|Destinations|new File Destination. If the extension is not specified the default value will be used.
User’s Manual Meta Information 3. The user is prompted to enter the name of the applicant and then press Enter. The star indicates that this is required Meta Information and that the user can not proceed without entering the requested information. Name: . * 4. The user is prompted to enter the date of birth of the applicant. This information is not required and can be ignored by pressing Menu. Birth Date: 5. The user is prompted to enter the type of job the application is for.
Meta Information XML DD file User’s Manual Here is the same XML DD file in full:
User’s Manual Meta Information Retrieving the XML DD file To download the XML file to the AXIS 7000, you must access the AXIS 7000 embedded web pages using a standard Web browser such as Netscape Navigator or Internet Explorer: 1. Start your Web browser. 2. Enter the name or IP address of your AXIS 7000 in the location/address field. Example: http://172.16.253.80 3. This brings you to the AXIS 7000 Home Page. Click admin. Log on as described in “Accessing the Tools” on page 37. 4.
Meta Information User’s Manual 5. Click one of the radio buttons to disable/enable the Meta Information handling: • Click None to disable Meta Information (disabled by default). • Click XML DD file via FTP to enable the Meta data functionality. Specify the parameter settings as described in the table below. Parameter Description FTP Server Specify the name or IP Address of the FTP server where the file is stored.
User’s Manual Meta Information Example: • • Prompt=”Due Date:” Pattern= “0-9]{2}/0-9]{2}/0-9]{2}” Prompt=”Orderer name:” Pattern= “.+” The format is enclosed into a string delimited by the quote (““) character, new lines are not accepted in the regular expression. The regular expressions are described here: Character Description "" empty string only . matches any character except new line.
Meta Information User’s Manual "i{5}" only "iiiii" correct "i{2,}" only "ii", "iii", "iiii", ... "i{,2}" only "" "i" and "ii" "^qwerty" "qwerty" correct but not "aqwerty" "qwerty$" "qwerty" correct but not "qwertyu" Notes: • infix notation: Structure notation where the operator is located between the operands, e.g. (A+B). • postfix notation: Structure notation where the operator follows the operands, e.g. (A,B)-. • *The upper limit for repetitions is set to 48.
User’s Manual Internally Defined Variables Meta Information There are several internal variables defined by the AXIS 7000 that can be output in the Information File. These internal variables are listed below. Example: The image is located at $INT_FILE_URL$ The time at the moment of scanning was $INT_TIME$ This table contains a list of these internal variables: Character Description INT_FILE_URL Specifies the URL of the image file.
Meta Information More Information User’s Manual INT_BITS_PER_PIXEL Specifies the number of bits per pixel of the image file. INT_DATA_TYPE Specifies the data type of the image file. INT_PAPER_ORIENTATION Specifies the paper orientation of the image file. INT_FORMAT Specifies the format of the image file. INT_DOUBLE_SIDED Specifies the orientation of the image file. INT_INTENSITY Specifies the intensity of the image file. INT_CONTRAST Specifies the contrast of the image file.
User’s Manual Troubleshooting Troubleshooting This appendix helps you to: • • • • Restore factory default settings to the AXIS 70/70U/7000 Interpret the Document Server front panel indicators Interpret the Document Server error messages Display the log file Restoring Factory Default Settings The factory default settings can be restored using one of the following methods: • • • Push button Web browser FTP Important! When you restore the factory default settings, all your current settings including the
Troubleshooting User’s Manual 1. Turn off the Document Server by disconnecting the power supply. 2. Press and hold the Push button while you connect the Document Server. Keep the Push button pressed until the Status indicator flashes at regular two second intervals. Push button Example AXIS 7000 3. Release the Push button and wait at least two seconds (one flash of the indicators). 4. Press and hold the Push button for at least five seconds until the Status indicator remains constantly lit. 5.
User’s Manual Troubleshooting FTP Follow these steps to restore the default settings using FTP: 1. Log in to the Document Server with the command ftp , where is the name or IP address assigned to your Document Server. 2. You will be prompted for user id and password. Use the user id root, which has the default password pass. 3. Issue the command get defaults to restore the default settings. The unit now restarts automatically. 4.
Troubleshooting Error Conditions User’s Manual This table lists a summary of error conditions: Event Power up Idle Error in FLASH PROM Error in SRAM Error in DRAM/DIMM DRAM/DIMM configuration error SW-HW combination error Illegal serial no. Flash load failed Status LED On Off On Busy LED Off Off Off Network LED Off Off Off Remarks Flash Off Flash Check SCSI cable to scanner device Check RJ45 cable to network Check RJ45 cable to network. If known network traffic, the Network LED should flash.
User’s Manual Troubleshooting Message A value specified for XML Meta Data XX ignored: the value has illegal format Could not connect to LDAP server Description Check that the XML values correspond with the specified pattern. The DNS name or the IP address may be wrong. The server may be unreachable. Could not connect to Windows NT The name or the IP address may be incorrect or the domain controller server may be unreachable. Device is busy Please try again later.
Troubleshooting User’s Manual Message No info file on: Description The information file could not be stored on the FTP server. Possible reasons are lack of memory or naming conflicts. The image file will be removed. No paper in scanning device No paper in the sheet feeder. Applies to scanners and digital copiers without a flatbed. No valid mail recipient found All the selected e-mail destinations were incorrect.
User’s Manual Troubleshooting Message xxx is an invalid SMTP Authentication protocol SMTP Authentication needs an authenticated user The ADF cover is open, please check and retry The user specified for LDAP is invalid Unresolved name: USB Device not supported Description Check that the xxx file supports the SMTP Authentication protocol The user must enter a valid username and password in order to access the Document Server Check that the ADF cover is properly closed and try again.
Troubleshooting Web Browser User’s Manual Follow these steps to display the log file from a Web browser: 1. Start the Web browser. 2. Enter the name or IP address of the Document Server in the location/address field: Example http://172.16.253.80 3. The Document Server Home Page is displayed. Click admin. 4. Click Event Log. The event log is displayed.
User’s Manual LDAP LDAP Introduction LDAP (Lightweight Directory Access Protocol) is used to program directory-enabled applications. It is a directory service that allows people to locate other users, resources, services and information. LDAP allows resources and services to be selected with ease and accessed with location-independence. Note: LDAP works differently depending on the organization and the structure of the system.
LDAP User’s Manual Attribute Type Matches objectClass Describes the kind of object which the entry represents. cn Contains the name of an object. If the object is a person, it is typically the person’s full name. sn Contains the family name of a person. c Contains a two-letter country code. l Contains the name of a locality, such as a city, county or other geographic region. st Contains the full name of a state or province.
User’s Manual LDAP Filter Type Format Example Matches (sn=*smith) Surnames ending with “smith”. (sn=s*mi*th) Surnames starting with “s”, containing “mi” and ending with “th”. Greater than or equal (>=) (sn>=Smith) Surnames lexicographically greater than or equal to Smith. Less or equal than (<=) (sn<=Smith) Surnames lexicographically less than or equal to Smith. Presence (=*) (sn=*) All surnames.
LDAP User’s Manual Note: The way you construct your filter will has a large impact on how fast the search is conducted. If you create a filter involving structures that the directory server can not evaluate efficiently, performance is likely to suffer. Apart from being familiar with the administrator and/or the inner workings of the server itself, only trial and error can tell you whether your filter is working efficiently or not.
User’s Manual Meta Information DTD Meta Information DTD (AXIS 7000 only) The DTD (Document Type Definition) is a specific definition of the rules and syntax that the DD (Document Description) file must follow. It contains the definition of the element hierarchy and relation between these elements in the hierarchy. When your XML document is processed, it is compared to its associated DTD to be sure that it is structured correctly and that all tags are correctly used.
Meta Information DTD User’s Manual DESCRIPTION:This entity contains the domain of this DTD.=========================================== -->