
User`s manual


Print Server Management Methods
48 AXIS OfficeBasic USB & AXIS OfficeBasic Parallel User’s Manual
Notes:
The example on the next page shows how to upload and download the
config file using FTP from a Command window.
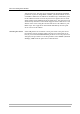
Example:
Viewing
the Account File
The account file contains data concerning the 10 last print jobs. It
specifies an internal job number, the user that initiated the job, the
protocol used, current status (Completed, Off-line, or Printing), number of
bytes printed, elapsed time and off-line time.
Follow the instructions below to view the account file using FTP:
1. Log in to the print server by typing:
ftp <host name> or ftp <IP address> in a Windows Command
window.
2. Enter user id and password. (The default entries are
root and pass.)
3. Download the account file to your host by typing
get account
4. View the account file using your preferred text editor.
• It is important that the destination file is specified in capital letters. Otherwise the edits
are temporary and will be lost once the print server has been powered down.
• To edit the config file on a older MacOS verions (pre-MacOSX) you will need FTP support
such as MacTCP, Fetch or Anarchie. The procedure for editing the file is the same as
described above.
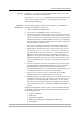
> ftp npserver
connected to npserver.
220 Axis OffceBasic USB FTP Network Print Server
v7.00 October 04 2004 ready.
Name (npserver:thomas): root
331 User name ok, need password
Password: pass
(not visible)
230 User logged in
ftp> get config
200 PORT command successful.
150 Opening data connection for config
(192,36,253,4,13,223), (mode ascii).
226 Transfer complete.
8588 bytes received in 0.24 seconds (35.63 kbytes/s)
ftp> put config CONFIG
200 PORT command successful.
150 Opening data connection for CONFIG
(192,36,253,4,13,223), (mode ascii).
226 Transfer complete.
8588 bytes received in 0.45 seconds (19.04 kbytes/s)
ftp> bye
221 Goodbye.
>