AXIS OfficeBasic USB User’s Manual AXIS OfficeBasic USB User’s Manual 1
Safety Notices Important: Take some time to read through the safety notices before installing the print server. Please observe all safety markings and instructions when using this product. Observe “Important:” in the text to avoid operational impairment. Do not proceed until you have fully understood the implications. Electromagnetic Compatibility (EMC) USA This equipment has been tested and found to comply with the limits for a Class B digital device, pursuant to Part 15 of the FCC Rules.
Table of Contents Section 1 Introduction ............................................................................ About this Manual ............................................................... About Axis ........................................................................... Support Services .................................................................. Supported Environments ..................................................... Section 2 Product Overview ..................................
Upgrading the Firmware .................................................... 47 Obtaining the firmware ..................................................... 48 4 Section 10 The Test Button ..................................................................... 49 Section 11 Technical Specification .......................................................... 50 Section 12 The Parameter List ................................................................. 52 Section 13 Glossary ..........................
Introduction Section 1 Introduction Thank you for purchasing the AXIS OfficeBasic USB. This product has been developed to connect your printers anywhere in your network, allowing all network users access to shared printer resources. About this Manual This manual is applicable for an AXIS OfficeBasic USB with firmware version 6.40 or later, providing introductory information as well as detailed instructions on how to set up and manage the print server in various network environments.
Introduction Supported Environments Network Printing 6 • • Windows Macintosh AXIS OfficeBasic USB User’s Manual
Product Overview Section 2 Product Overview Package Contents Verify that nothing is missing from the AXIS OfficeBasic USB package by using the check list below. Please contact your dealer if anything is missing or damaged. All packing materials are recyclable. AXIS OfficeBasic USB Hardware Model Part Number Network Print Server AXIS OfficeBasic USB print server 0171-001 Adhesive Holder & Clip ACC CLIPS K 20119 USB Cable Length: 70 cm, 28 inches 20208 Model PS-H Part No.
Product Overview AXIS Network Product CD The AXIS Network Product CD provides an easy-to-use electronic catalog, that includes Axis software, firmware and user documentation. It also contains free Adobe Acrobat Reader software. 8 Start-up Procedures for Windows If your computer is configured to autostart CDs, the AXIS Network Product CD will start automatically when inserted into a local CD drive on Windows 98, Me, NT, 2000 and XP platforms.
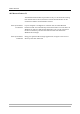
Product Overview Physical Description AXIS OfficeBasic USB Test button Test button Network indicator Ethernet connector USB printer port (USB1) Power Adapter connector Power indicator Backside of print server MAC address (Ethernet address) ss) example Network Connector AXIS OfficeBasic USBs are designed for 10 Mbps or 100 Mbps Ethernet networks and connect to the network via a twisted pair category 5 cable (10baseT and 100baseTX) or better. Printer Ports AXIS OfficeBasic USB is USB 1.
Product Overview Test Button The test button is used for: • printing a test page to check the connection to the printer • printing the parameter list showing the print server settings • performing a Factory Default of the print server, which will restore most of the parameters and settings to factory default values Network Indicator Power Indicator The network indicator flashes to indicate network activity. The power indicator is lit while power is applied.
Product Overview Installation Methods Installation and Integration Refer to the table below to select the appropriate installation method. All Axis client software is available on the AXIS Network Product CD or from Axis’ Web site.
Product Overview Features and Benefits Reliability The print server provides high performance and reliability combined with low power consumption. The electronic circuits are based on the AXIS ETRAX 100 LX chip, which comprises an integrated 32 bit RISC processor and associated network controllers. Flexibility The print server supports printing in all major computer systems and environments, including five different print methods in the TCP/IP environment.
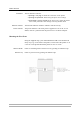
Basic Installation Section 3 Basic Installation Connecting the Hardware Test button Network indicator Ethernet connector USB printer port (USB1) Power Adapter connector Power indicator 1. Make sure that your printer is switched off and that the print server’s Power Adapter is disconnected. 2. Locate the serial number, found on the underside label of the print server, and write it down. You will need this number to configure the print server. Example: S/N: 00408c181cf0 3.
Basic Installation Assigning an IP Address to the Print Server Before you Start • • System Privileges If you have a DHCP server on your network, your print server will receive an IP address automatically. The IP address will then appear on the test page you printed earlier. If you are not working in a DHCP network, you need to set the IP address of the print server manually.
Basic Installation Methods for Setting the IP Address Automatic IP Address Assignment Manual IP Address Assignment You can set the IP address of your AXIS OfficeBasic USB using one of the following methods, depending on your network operating environment: Method Server required Comment DHCP DHCP server Dynamic assignment of IP addresses. See “Set the IP Address using DHCP” on page 16 AutoIP Windows environment Automatic assignment of IP addresses.
Basic Installation DDNS Host Name Rules DDNS supports 47 character long host names and can only consist of the characters ‘A-Z’, ’a-z’, ’0-9’ and ‘-’. If your host name consists of any other characters, they are converted to ‘-’ when registering with a DDNS server. You can view which host name that is registered at a DDNS server in the print server’s Web interface. Refer to “Print Server Management Methods” on page 34.
Basic Installation you have connected it to the network. In the absence of a DHCP server, your print server will automatically be assigned an IP address through integrated AutoIP. The AutoIP address structure is: 169.254.xxx.xxx. The AutoIP function will only work when DHCP is enabled in your print server. This function is enabled automatically upon installation of a brand new print server. The easiest way to make sure DHCP and AutoIP are enabled is to reset your print server (to Factory Default).
Basic Installation You have now successfully set the IP address of the print server. Continue to “Adding a Network Printer to your workstation” on page 19. Notes: • If the host name has not been mapped to an IP address, simply replace the host name entry with the IP address. • When you execute the ping command for the first time, you may experience a significantly longer response time than is usual.
Basic Installation Note: If your print server does not appear in the serial number list, refer to the AXIS IP JumpStarter online help files. Adding a Network Printer to your workstation Configuration Methods Once you have set the IP address of your print server, your network printer can be added to any computer on your network. The method that you choose should be dictated by your printing requirements and your supported network environments.
Adding Printers in Windows Section 4 Overview of Installation Methods Adding Printers in Windows This section describes how to add network printers to a computer in Windows. Refer to the table below to determine the most appropriate installation method according to your computer environment: Windows Platform Printing Protocol Method See...
Adding Printers in Windows Adding Printers in Windows 2000 and XP over TCP/IP Follow the instructions below to use the standard Windows method for adding a network printer in Windows NT, 2000 and XP: Windows XP: Windows 2000: 1. Go to Start | Printers and Faxes and click the Add a Printer icon to start the Add Printer Wizard. Click Next. 1. Go to Start | Settings | Printers and click the Add Printer icon to start the Add Printer Wizard. Click Next. 2.
Adding Printers in Windows If the USB port option does not appear: If the USB port option does not appear when adding printers in Windows 2000 and XP, follow these instructions to emulate a USB port: Windows XP: 1. Go to Start | Printers and Faxes and click the Add a Printer icon to start the Add Printer Wizard. Click Next. Windows 2000: 1. Go to Start | Settings | Printers and click the Add Printer icon to start the Add Printer Wizard. Click Next. 2.
Adding Printers in Windows Adding NetBIOS/NetBEUI Printers in Windows 2000 using AXIS Print Monitor See to it that the NetBEUI protocol is installed on your client. Follow the procedure below to install Axis Printer Ports from a Windows 2000 workstation: 1. To start the Add Printer Wizard, select Settings | Printers from the Start menu and double-click the Add Printer icon. Start the installation by clicking Next. 2. The Wizard asks you to select Local printer or Network printer.
Adding Printers in Windows 1. Open the Control Panel and double-click the Network icon. 2. Select Protocols. 3. Add TCP\IP Protocol. 4. Select Services. 5. Add Microsoft TCP\IP Printing. Installing an LPR Printer 1. Go to Start | Settings | Printers | Add Printer. Select My Computer (for peer-to-peer printing) and click Next. 2. From the Available Ports list, choose the appropriate printer port, which will appear as the host name or IP address of the print server. Skip to step 7. 3.
Adding Printers in Windows Adding NetBIOS/NetBEUI Printers in Windows NT 4 using AXIS Print Monitor See to it that the NetBEUI protocol is installed on your client. Follow the procedure below to install Axis Printer Ports from a Windows NT 4.0 workstation: 1. To start the Add Printer Wizard, select Settings | Printers from the Start menu and double-click the Add Printer icon. 2. The Wizard asks you to select My Computer or Network printer server. Select My Computer, click Next. 3. Click Add Port...
Adding Printers in Windows Adding Printers in Windows 98 and Me over TCP/IP using AXIS Print Monitor AXIS Print Monitor AXIS Print Monitor is the recommended tool to use for network printing in Windows 98 and Me environments. AXIS Print Monitor is available on the AXIS Network Product CD and from the Axis Web site. AXIS Print Monitor Overview AXIS Print Monitor allows a print server to be connected in the same simple fashion as connecting a local printer.
Adding Printers in Windows 5. Select the type of printer you want to install from the diskette/CD and click Next. 6. Select the Printers@TCP/IP Port and click Next. 7. Enter an appropriate name for your printer and choose whether you want it to be the default printer. Click Next. 8. In the next window, do not order a Test Page to be written, just click Finish. 9. AXIS Print Monitor now informs you that the printer has to be connected to another port. Click OK. 10.
Adding Printers in Windows Adding Printers in Windows 98 and Me over NetBIOS/NetBEUI using AXIS Print Monitor Follow the procedures below to install Axis NetBIOS/NetBEUI printer ports on a Windows 98 workstation, using AXIS Print Monitor: 1. To start the Add Printer Wizard, select Settings | Printers from the Start menu and double-click the Add Printer icon. 2. After clicking Next in the first dialog, the Wizard asks you to select Local printer or Network printer. Select Local printer and click Next. 3.
Adding Printers in Macintosh Section 5 Adding Printers in Macintosh Having connected the AXIS OfficeBasic USB to your network, this section now describes how to set up your print server for printing in Mac OS X and earlier Macintosh environments using AppleTalk. If you intend to use the print server in a multi-protocol environment, refer to the chapters pertaining to the respective operating systems in this manual.
Adding Printers in Macintosh Choosing a Printer Selecting a Printer The method for choosing a printer varies depending on which version of LaserWriter printer driver you are using. • • Autodetect Printer Type The LaserWriter 7.0 driver assumes that you use a standard PostScript driver, and cannot take advantage of any printer specific features. The LaserWriter 8.0 driver uses PPD files that contain printer descriptions. This gives you full control over any features your printer might have.
Adding Printers in Macintosh 5. Click Setup... and then Auto Setup. If the selected printer supports bidirectional printing and the appropriate PPD file is available, the installation is performed automatically and you can therefore proceed directly to step 7 (if this is not the case, the PPD file must be selected manually, as described in step 6). 6. Choose the PPD file matching your printer, and click OK. If your printer does not appear in the PPD file list, please contact your printer vendor.
Adding Printers in Macintosh Notes: • If you have have set the Auto-Detect Printer Type parameter to YES, the text output format will be chosen automatically (Admin | Network Settings | Detailed View | Macintosh | Auto Detect Printer Type | Yes). • Some printers, e.g. Epson InkJet printers, can not be used when TBCP is enabled. Setting Parameters In AppleTalk, you can change a limited number of the parameters of the AXIS OfficeBasic USB.
Adding Printers in Macintosh 8. Open the Chooser and select the printer port you wish to use for printing documents. 9. Close the Chooser. Note: The _CFG port disappears 60 minutes after the AXIS OfficeBasic USB has been powered on. If you want it to reappear, you must restart your print server.
Print Server Management Methods Section 6 Print Server Management Methods The management and configuration tools that are supported by the AXIS OfficeBasic USB allow you to: • • • • • • Configuration Overview Change the print server parameters, i.e. editing the config file Receive extended information about the print jobs Receive printer port status Monitor your printers Perform a Factory Default of the print server Upgrade the AXIS OfficeBasic USB firmware. See Updating the Firmware, on page 47.
Print Server Management Methods Using a Web Browser for Print Server Management Once you have assigned a valid IP address to the print server, you are free to access the print server’s Web pages from any Web browser with Javascript enabled. The Web interface of the print server is divided into two modes of operation: User mode and Admin mode. User In User mode, you have no rights to change any parameters.
Print Server Management Methods Accessing the Web Pages Follow the steps below to access the internal home page of the AXIS OfficeBasic USB. 1. Start your Web browser. 2. In the Location/Address field, type the host name or the IP address of your print server. The User Mode Printer Overview page of the print server will appear in the browser window. 3. Click Admin to enter the Admin mode. If the management password is set to anything but pass, you must enter root as the user.
Print Server Management Methods Services available from the Admin Mode The following services are available from the Admin mode. An additional link to the Axis home page is available from this mode. This Print Server The This Print Server page contains a section that allows you to view and modify the general parameter settings of the AXIS OfficeBasic USB, including print server name, node address, password and base URL.
Print Server Management Methods with new firmware. A detailed index is also available. Parameter List Restart Factory Default Shows all print server parameters and their current settings. Restarts the print server. Will reset all print server parameters and settings to their factory default values except • Node Address (NODE_ADDR.) • IP Address (INT_ADDR.) • DHCP enabled or disabled (DHCP_ENB.) Firmware Upgrade 38 Upgrades the print server’s internal software.
Print Server Management Methods Using FTP for Print Server Management Having assigned an IP address to your AXIS OfficeBasic USB, as described earlier in this manual, you can change its parameter settings using the File Transport Protocol (FTP). Editing the config File Follow the instructions below to edit the config file using FTP: 1. Log in to the AXIS OfficeBasic USB by typing: ftp - or - ftp in a Windows Command window. 2. Enter user id and password.
Print Server Management Methods Example: > ftp npserver connected to npserver. 220 Axis OffceBasic USB FTP Network Print Server vx.xx March 19 2003 ready. Name (npserver:thomas): root 331 User name ok, need password Password: pass (not visible) 230 User logged in ftp> get config 200 PORT command successful. 150 Opening data connection for config (192,36,253,4,13,223), (mode ascii). 226 Transfer complete. 8588 bytes received in 0.24 seconds (35.
Print Server Management Methods Viewing the Account File The account file contains data concerning the 20 last print jobs. It specifies an internal job number, the user that initiated the job, the protocol used, current status (Completed, Off-line, or Printing), number of bytes printed, elapsed time and off-line time. Follow the instructions below to view the account file using FTP: 1. Log in to the AXIS OfficeBasic USB by typing: ftp or ftp in a Windows Command window. 2.
Configuration Possibilities Section 7 Configuration Possibilities This section describes some special features offered by the AXIS OfficeBasic USB: Autodetect Printer Type, on page 42 AutoIP, on page 42 Network Speed, on page 42 Autodetect Printer Type The print server can automatically detect the type of printer you are using if you enable Autodetect Printer Type. The print server can then recognize Epson and Hewlett Packard InkJet printers.
Configuration Possibilities Change. From here, you have the option of setting the network speed to: Network Speed Comment AUTO_SENSE This is the default value where the print server detects which speed is optimal for each network package you transfer.
Troubleshooting Section 8 Troubleshooting This section provides useful information to help you resolve difficulties you may experience with your AXIS OfficeBasic USB. Fault symptoms, possible causes and remedial actions are provided within a quick reference table. Please visit the Axis Web site for latest troubleshooting tips, more support and additional help through the FAQ database or to fill in and submit a Support question. General The USB port in an AXIS OfficeBasic USB only supports USB printers.
Troubleshooting IP Address Check with Ping By sending a data packet to a specific IP address and waiting for a reply, Ping can determine whether that IP address is accessible. Ping can also help you to determine IP address conflicts with your AXIS OfficeBasic USB and troubleshoot TCP/IP problems on the network. Follow the instructions below to diagnose your problem. 1. Start a Command window/Terminal. 2. Type "ping x.x.x.x", where x.x.x.
Troubleshooting Axis Support Server Report In order to obtain optimal support from Axis support technicians, please follow these instructions when filling in and submitting a support question: 1. Go to the print server’s Web pages by typing the print server’s IP address in the Address/Location field of your Web browser. 2. Go to Admin | Support. Click the Server Report link. A new window will open. 3. Save the Server report as an HTML file (with an .html file extension) and go to the Axis Web site. 4.
Updating the Firmware Section 9 Updating the Firmware Upgrading the Firmware You can upgrade the AXIS OfficeBasic USB firmware using one of the following methods: • • Upgrading from the Print Server’s Internal Web Pages From the print server’s internal Web pages (TCP/IP) FTP (TCP/IP) Follow these instructions to upgrade the firmware of your print server from its internal Web pages (flash loading over the Web): 1. Open your Web browser, enter the IP address of your print server and press Enter.
Updating the Firmware 6. Log out using the command: quit (or bye or exit depending on your FTP version). Obtaining the firmware You can obtain all the print server firmware as well as the latest utility software from the following locations: • • • 48 http://www.axis.
The Test Button Section 10 The Test Button The test button is located on the front right hand side of the AXIS OfficeBasic USB and is used for: • Printing a test page to check the connection to the printer. • Printing a parameter list to see the print server’s current settings. Performing a Factory Default of the print server. The Test Page Press the test button once to print a test page. The test page contains basic information about the AXIS OfficeBasic USB.
Technical Specification Section 11 Supported Printers Technical Specification USB printers. Not compatible with Windows GDI printers. Supported Systems Microsoft Windows: Windows NT ver 4.0, Windows 98, Windows 2000, Windows Me, Windows XP. Print Methods: NetBEUI, LPR, Raw TCP. Additional Systems: All computers supporting the TCP/IP suite of protocols. Apple EtherTalk: WWW: Print Method: AppleTalk Phase 2. Netscape Communicator 4.7 and above, Internet Explorer 4.0 and above, Mozilla 1.0 and above.
Technical Specification Power Consumption: Maximum 5.6 W Power provided by Power Adapter type PS-H: 5.1V DC 2000 mA Dimensions Height x Width x Depth: 1.1in (29 mm), 2.4in (62 mm), 5.1in (130 mm) Weight: 0.
The Parameter List Section 12 The Parameter List This section provides an overview of the AXIS OfficeBasic USB print server parameters. Please refer to the Axis Communications Technical Reference for a complete description of the parameters. Alternatively, you can access the Axis Web site where you can download the latest technical information. The config File See Using FTP for Print Server Management, on page 39 for information on how to fetch the print server’s config file.
The Parameter List config file: • • • • • • • General Menu General Menu on page 53 TCP/IP Menu on page 53 SNMP Menu on page 54 NetBIOS/NetBEUI Menu on page 54 NetBIOS/NetBEUI Menu on page 54 AppleTalk Menu on page 55 USB1 Menu on page 55 In the print server’s Web interface, select Admin | General Settings => Change. Parameter Default value (Possible values) Comments NODE_ADDR. xx xx xx xx xx xx Node Address and serial number of the print server NETWORK_SPEED.
The Parameter List RARP_ENB. YES (YES, NO) RARP Enabled WINS_ENB. YES (YES, NO) WINS Enabled WINS_ADDR1. xxxx Primary WINS server address WINS_ADDR2. xxxx Secondary WINS server address Defines the NetBIOS scope to be used with WINS name registration NBT_SCOPE_ID. DNS_ENB. YES (YES, NO) DNS Enabled DNS_ADDR1. xxxx Primary DNS server address DNS_ADDR2. xxxx Secondary DNS server address Domain name, defining the domain to which this AXIS OfficeBasic USB belongs DOMAIN_NAME.
The Parameter List AppleTalk Menu In the print server’s Web interface, select Admin | Network Settings | Detailed View | Macintosh. Parameter Default value (Possible values) Comments ATLK_ENB. YES (YES, NO) AppleTalk Enabled ATK_ZONE. AppleTalk Zone ZONER_EN. YES (YES, NO) HP Zoner Enabled ATK_FONT. DEFAULT (DEFAULT, 35N, ALL) Font (PostScript Font Set) AUTO_DT_PRIN. NO (YES, NO) Autodetect Printer Enabled APRINT_1.
Glossary Section 13 Glossary AppleTalk ARP AutoIP config File DHCP A local area network protocol for communication between Apple Computer products and other computers and peripherals. Address Resolution Protocol. A protocol within the TCP/IP suite of network protocols that allows a host to find the physical address of a node on the same network. ARP cannot be used across routers. A method to automatically set an IP address in the absence of a DHCP server.
Glossary IP Internet Protocol. The TCP/IP network layer protocol that regulates packet forwarding by tracking IP addresses, routing outgoing messages and recognizing incoming messages. LAN Local Area Network. LED Light Emitting Diode. NetBIOS/NetBEUI PCL Peer-to-Peer Printing RISC Network Basic Input Output System, a network protocol with special functions for local area networks. NetBIOS Enhanced User Interface is an enhanced version of NetBIOS.
Glossary 58 AXIS OfficeBasic USB User’s Manual
A Account File 41 Admin Mode 36 Services 37 AppleTalk 29, 56 Assistance 5 Autodetect 30 Auto-Detect Printer Type 32 AutoIP 16, 42, 56 AXIS Print Monitor 26 B Basic setup TCP/IP 14 BCP and TBCP 31 Binary Protocol for Printer 31 BOOTP 34 C Character Set 36 Config File 34, 52, 56 Configuration Overview 34 Configuration methods FTP 39 Web Browser 36 Configuration Wizard 36 D DDNS 15 Default Password 36 Default User Login 36 Default Values 52 Description 9 DNS 56 Dynamic DNS 56 E Ethernet Address 14 F
HTML 56 HTTP 56 I Indicators 10, 44 IP 57 IP Address 14 Automatic Assignment Methods 15 Checking, using Ping 45 Manual Assignment Methods 15 Setting - Macintosh 32 Setting, using ARP 17 Setting, using AutoIP 16 Setting, using AXIS IP JumpStarter 18 Setting, using DHCP 16 Setting, using RARP 16 L LAN 57 Language Settings 36 LED 44, 57 Local Printer 21 M Macintosh Choosing a Printer 30 Installing the Print Server 29 N NDS 57 NetBIOS/NetBEUI 57 Network Connector 9 Indicator 10, 44 Settings 37 Speed 42
Printer Autodetect 30 Overview 36 Ports 9 Printing Parameter List 49 Peer-to-Peer 57 Test Page 49 R Remotehelp 41 Reset 49 Restart 38 Rhelp 41 RISC 57 S Server Report 46 Settings Character Set 36 Language 36 SNMP 57 Statistics 37 Support 5, 37, 46 T TCP 57 Technical Assistance 5, 46 Test Button 10, 49 Test Page 49 TFTP 34, 57 Troubleshooting 44 U Upgrading 47 URL 57 USB 57 W WINS 15 Wizard 57 AXIS OfficeBasic USB User’s Manual 61