Döner-Grillmachine INSTALLATION - USER MAINTENANCE MANUAL YEAR OF MANUFACTURE: SERIAL NR: AXIS EQUIPMENT ® MVP GROUP CORPORATION 5659 ROYALMOUNT MONTREAL, QC. CANADA H4P 2P9 Tel: (514)737-9701 Fax: (514)342-3854 www.mvpgroupcorp.com www.axis-equipment.com Issued on: 23.05.2007 VER . 07.
TABLE OF CONTENTS 1 – PREFACE 1.1 – Use of Installation – Operation & Maintenance Manual 2 – INSTALLATION INSTRUCTIONS 2.1 – Technical Instructions for Gas Connections 2.2 – Installation of the Appliance 2.3 – Technical Specifications 2.3.1 – Table of Burners Depending on the Injector Type of Gas Used 2.3.2 – Technical Specifications of Gas Döner-Grillmachine 2.3.3 – Instructions for Gas Conversions 2.3.4 – Gas System Diagram 2.4 – Motor 2.5 – Gas Connection Diagram 2.5.
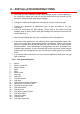
1 - PREFACE Dear User, Thank you for purchasing our AXIS product and for your confıdence in our company. Our appliances are produced in compliance with international standards. IMPORTANT: Please read and ensure that all users read this manual in order to achieve the desired performance that you expect; and to enable you to use this AXIS appliance for many years. ☞ Please read and ensure that your operation personnel read this user’s manual carefully before installing and using the appliance.
2 – INSTALLATION INSTRUCTONS 2.1 – Technical Instructions for Gas Connections Initial installation and operation of the appliance must be carried out by an Authorized Service in compliance with technical requirements and local directives related to gas connections. All gas connections of the appliance must comply with ISO 7 – 1 or ISO 228 – 1 standard.
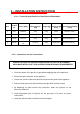
2 – INSTALLATION INSTRUCTONS GAS TYPE Propan 10” - 13” WC Natural Gas 7” – 8” WC 2.3.1 – Table of Burners Depending on the Injector Type of Gas Used POS Machine Type Burner Injector Diameter (mm) 1 3GD* 1,35 0,90 2 4GD* 1,35 0,90 3 4GUD* 1,35 0,90 4 44GUD* 1,35 0,90 * Each burner capacity: 3.25 kW Nominal power of the appliance cannot be changed upon customer’s request. Any modification made on valves and injectors, leaves the appliance out of warranty coverage.
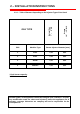
2 – INSTALLATION INSTRUCTONS 2.3.2 – Technical Specifications of Gas Döner-Grillmachines Poz. Product Nr. Power (BTU) Meat Capacity (Kg) 1 3GD 33268,38 40 kg 24 kg 28,98 2 4GD 44357.84 80 kg 27 kg 35,43 45,27x17,72x22,4 3 4GUD 44357.84 90 kg 34 kg 35,43 42,15x20,86x25,59 4 44GUD 44357.84+44357. 84 90+90 kg 68 kg 35,43/35,43 42,15x41,73x25,59 Weight (kg) Skewer length Dimensions (HxWxD) (inch) (inch) 38,85x17,72x22,4 2.3.
2 – INSTALLATION INSTRUCTONS Re-mount the tubes between the gas valve and the burners. (Smear gearing of the connection, where the collar on the tube and the tube are mounted to the gas valve, with gas paste against gas leakage.) Change the labels of the appliance according to the gas conversion type. Connect the appliance to appropriate type of gas according to the gas conversion. Check all connections for gas leakage. (Tests have to be carried out using leakage spray or foam.
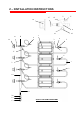
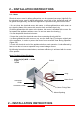
2 – INSTALLATION INSTRUCTONS 15 5 16 17 14 8 19 15 18 1 8 9 14 3 4 2 5 17 6 7 5 5 10 11 20 12 13 GAS SYSTEM DIAGRAM
2 – INSTALLATION INSTRUCTONS 2.4 – Motor Electrical motors used in döner-grillmachine can be operated two-ways (right/left). By the electrical motor used in döner-grillmachine, each side of the skewered meat can be grilled homogenously, and also the appliance is operated using less human effort. * Do not clean the electrical motor with water. In döner-grillmachines with motor on top, wipe the frame of the motor with a moist cloth, and then wipe it dry.
2.5 – Gas Connection Diagram 2.5.
2 – INSTALLATION INSTRUCTONS 2.5.2.
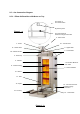
3 – OPERATION AND MAINTENANCE INSTRUCTIONS 3.1 – Installing the Appliance 3.1.1 – Motor on Top Type Döner-Grillmachine (Figure 1 – b) After installing the appliance in compliance with the regulations mentioned in the User’s Manual of the motor on top type of döner-grillmachines the fat tray and the motor (Figure 1–b) are inserted, making the appliance ready for use. In these types of appliances, unscrew upper and lower slide arms for the meat grilling.
3 – OPERATION AND MAINTENANCE INSTRUCTIONS Before operating the motor at bottom type döner-grillmachine, the frame (23) and bottom plate (21) must be installed first. In order to fix your appliance with bolts follow the instructions below: Install the bottom plate of the appliance as described in the User’s Manual. Place the frame onto the bottom plate, so that the connection openings on the rail mechanism coincide with the connection points on the bottom plate.
3 – OPERATION AND MAINTENANCE INSTRUCTIONS 3.2 – Purpose of Use This döner-grillmachine was designed and manufactured to grill any kind of döner meat for commercial purposes, and cannot be used for different purposes. 3.3 – Warnings * Before starting the appliance remove all protective PVC films and any other packaging material, from the appliance. * Do not leave the appliance unattended when operating. * The appliance should only be operated under a chimney hood.
3 – OPERATION AND MAINTENANCE INSTRUCTIONS By opening the main gas valve enable gas flow to the appliance. Press and hold the gas valve button, and turn it ninety degrees counter clockwise. At this point gas will flow to the burners. Keep the valve button pressed, light the burner connected to the gas valve from the front using a match, lighter etc. (use a long grip lighter or match for this purpose to avoid fire from your fingers).
3 – OPERATION AND MAINTENANCE INSTRUCTIONS 3.5 – Operation with Motor 3.5.1 – Döner-Grillmachine with Motor on Top Operating your appliance with motor will enable both a homogenous meat grilling and depending less on manual operation. Please follow the following procedure to operate your appliance with motor. (Figure 1-b) - Unscrew (T) shaped arms of upper (3) and lower slides (15) Depending on the diameter size of the meat, move these arms to the best position where the meat can easily be skewered.
3 – OPERATION AND MAINTENANCE INSTRUCTIONS 3.5.2 – Döner-Grillmachine with Motor at Bottom Operating your appliance with motor will enable both a homogenous meat grilling and depending less on manual operation. Please follow the following procedure to operate your appliance with motor. (Figure 2-b) Unscrew the fixing screw (5) of the telescopic skewer supporter. By doing this, the telescopic skewer supporter (1) will be raised up by a spring mechanism. Unscrew the skewer fixing screw (12).
3 – OPERATION AND MAINTENANCE INSTRUCTIONS - After doing this, ensure that both the bottom slide (15) and the upper slide (3) are aligned. Mount the original skewer turning arm to the top of the skewer, and rotate the skewer using this arm. Doing this, higher hygiene and safety will be maintained by enabling you to avoid the contact with the hot and fatty meat. 3.6.
3 – OPERATION AND MAINTENANCE INSTRUCTIONS 3.7 – Clean-Up For a longer and hygienic life of use, please clean your appliance up after daily operation. Do never use rubbing powders and abrasive chemicals for the clean-up of the appliance. Use liquid soap dissolved in some amount lukewarm water. Then wipe the appliance using a sponge immersed in soap water, and wipe it dry using a dry cloth. Carry out the clean-up after the appliance is cooled down completely and not operating.
4 – MANUFACTURERS LIMITED WARRANTY MVP Group Corporation (MVP), hereby warrants all new equipment bearing the name “AXIS” and installed within the continental United States of America or Canada to be free from defects in material and workmanship, under normal and regular usage and operation, for a period of one (1) year following the date of original installation; or to a maximum of eighteen (18) months from factory date of shipment.