
Installation manual


Application note Getting started with e100 AN00187-002
ABB Motion control products 18
www.abbmotion.com
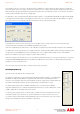
Choose MicroFlex e100 here as the device type.
The MicroFlex e100 node ID was set to 3 when the drive was setup
so set it to 3 here.
Note that other, non Baldor, device types can be added here. You
would select “Import Device” to do so although we won’t be doing
this in this application note.
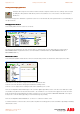
Click on “OK when everything is selected. The Resource Mapping
screen will follow.
Each device on EPL comes with many attributes or resources. These can be mapped
to the NextMove e100 on this screen.
Initially nothing is mapped (as indicated by the red crosses). The NextMove e100
reserves encoder channels 0,1 and 2 for its local encoder inputs so it is a good idea
to start the remote axis numbers from 3 onwards to avoid a conflict with local
encoders 0 to 2.
Double click on Axes->Axis 0 to map the drive as a controllable axis.
After clicking on Axes->Axis 0 on the Resource Mapping screen this popup shows
up. Set the Axis number as required (3 in this example).
We described the drive profiling options earlier (see the sub section on “Drive Profile
Parameters”). As we’re going to profile motion from our Nextmove e100 we’ll select
“Manager node Profiled”.
If you need to utilize a latched axis position
positionposition
position in the Nextmove’s Mint program (e.g. for
registration applications) you can map a MicroFlex e100 latch channel to a NextMove
e100 latch channel (allowing the fast capture position to be transferred to the
Nextmove). Latching over EPL is beyond the scope of this application note. It is
explained in more detail in application note “AN00177 Cut to registration”.
Click on OK. The resource mapping dialog will now show that we have mapped the
drive back to the Nextmove (i.e. a green tick is displayed). The drive itself considers
its own axis to be axis0, but as far as the Nextmove is concerned it is axis 3.