Preface Preface Thank you for purchasing the Axis NPS 550 Network Print Server. Our goal in developing this product is to enable you to connect your printers anywhere in your network, allowing all network users access to shared printer resources. About Axis Axis Communications, founded in 1984, is one of the world’s fastest growing companies in the printer interface and network print server market. The head quarters are located in Lund, Sweden, with subsidiaries in Boston, Tokyo, and Hong Kong.
Preface About this manual This manual will guide you through a simple step-by-step installation and configuration procedure. It is divided into four sections: Introduction Getting started Setup Advanced options The NPS 550 print server, how it works, where to use it, and its main features. How to connect your NPS 550 to your printers, and how to install it in your network. How to set up your NPS 550 for the NetWare, Windows, OS/2, Unix and Macintosh environments.
Preface Emission notices USA This equipment generates, uses, and can radiate radio frequency energy and if not installed and used in accordance with the instruction manual, may cause interference to radio communications. It has been tested and found to comply with the limits for a Class A computing device pursuant to Subpart B of Part 15 of FCC rules, which are designed to provide reasonable protection against such interference when operated in a commercial environment.
Table of contents Table of contents 1 2 Introduction 6 How It Works Where To Use it Main Features 7 7 9 Getting started Printer Installation Network Installation 3 Setup for NetWare Print Server Mode (Automatic) Print Server Mode (Parameter Controlled) Print Server Mode (File Server Controlled) Remote Printer Mode Verify the Communication 4 5 14 17 19 20 24 28 29 Windows 3.
Table of contents 7 8 Set up your NPS 550 Set up and attach a print queue Print methods 46 50 52 Setup for Macintosh 53 Choose a Printer Verify the Communication 54 55 Advanced Options 56 Logical Printers Character Set Conversion Strings Before and After Print Jobs String Substitutions PostScript Functions Action at Printer Busy Hex Dump Mode Telnet Login Accounting Status Logging Locally Administrated Address SNMP A The parameter list 57 59 60 61 62 64 64 65 66 67 68 69 70 NetWare, Windows,
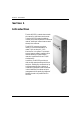
Section 1: Introduction Section 1 Introduction The Axis NPS 550 is a stand-alone network print server for the Ethernet environment. Using the NPS 550 makes it possible to connect your printers anywhere in an Ethernet network, allowing all network users access to shared printer resources. The NPS 550 connects your printer directly to your Ethernet network, no matter if you are using a PC, PS/2, Macintosh or Unix system.
Section 1: Introduction How It Works Ethernet network print data is transmitted as packets using a high-speed protocol very different from the standards used by serial or parallel printers. Each packet contains information about the sender, the receiver, how to unpack the packet, and the data itself. The NPS 550 acts as a node in the Ethernet network, with its own unique address. It receives the packets addressed to it, unpacks them, and converts the print data to a format suitable for standard printers.
Section 1: Introduction NetWare The NPS 550 has two different modes in the NetWare environment – Print Server Mode and Remote Printer Mode. In Print Server Mode, the NPS 550 emulates a NetWare Print Server. At power-on it will log in to each file server in the network to find out which print queues are to be serviced. Up to 16 file servers and up to 96 print queues are supported. In Remote Printer Mode, the NPS 550 appears as a NetWare Remote Printer.
Section 1: Introduction Main Features Reliability The Axis NPS 550 hardware provides high performance and reliability combined with low power consumption. It is based on the Axis ETRAX chip with an integrated 32 bit RISC CPU and Ethernet controller. Flexibility It supports NetWare, Microsoft and IBM networks, TCP/IP and Apple EtherTalk simultaneously. Five different print methods are supported for Unix systems. You may connect and print on up to three printers simultaneously.
Section 2: Getting started Section 2 Getting started Unpack and inspect all parts for damage. Contact your dealer if anything is missing. All packing materials are recyclable. The standard delivery • NPS 550 Print Server; part no. 0037-3 • NPS 550 User's Manual; part no. 13656 • NPS 550 Quick Installation Guide; part no. 13657 • Warranty registration form; part no. 13510 • Parallel Printer Cable, part no. 13360 • 3.5" disk with NPS Installation Utilities for NetWare, Windows and OS/2; part no.
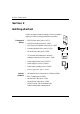
Section 2: Getting started BACK FRONT External Power Supply Connector 10base2 Connector Test Button POWER Indicator 10baseT Connector PACKET Indicator PRINTER Indicator STATUS Indicator LPT2 Printer Connector Parallel LPT1 Printer Connector Parallel COM1 Printer connector Serial The NPS 550 back and front panels Axis NPS 550 User’s Manual 11
Section 2: Getting started Printer Installation Before you begin: Make sure that the external power supply is marked with the correct mains voltage. Connect a parallel printer to NPS 550 and make a test printout: 1. Switch off the printer. 2. Connect the printer to the LPT1 port using the supplied printer cable. 3. Connect the external power supply. The indicators will flash during power-on and self-test. When the STATUS indicator stops flashing and remains unlit, the NPS 550 is ready for use. 4.
Section 2: Getting started Network Installation Before you begin: • Make sure that your network is ready to accept a new node. • Any network configuration should always involve the network manager. 1. Record the serial number of your NPS 550. You will need this number for the setup. 2. Connect your NPS 550 to the network using a twisted-pair (10baseT) or a thin-wire (10base2) Ethernet cable. Note: Each NPS print server is preconfigured with a unique Node Address (identical to the serial number).
Section 3: Setup for NetWare Section 3 Setup for NetWare The NPS 550 can run in either Print Server Mode, Remote Printer Mode or both simultaneously. The basic configuration is done using the PCONSOLE software supplied from Novell, and if you choose a setup other than the automatic print server mode, also with AXCFG supplied with the NPS 550. The overview on the following pages explains the advantages and limitations of each mode.
Section 3: Setup for NetWare Print Server Mode An NPS 550 in print server mode emulates a Novell print server (a workstation running PSERVER). This is the recommended mode for medium-sized to large networks.
Section 3: Setup for NetWare File Server Controlled Log-In The NPS 550 will first log in to the Configuration File Server, and then to any additional NetWare servers found in the file server configuration. See page 20 for setup procedures. Advantages High performance (typically 200 kbytes/s). Avoids the prolonged NPS power-up time caused by the automatic file server login. Simplifies the queue and printer set-up and maintenance, especially on larger networks.
Section 3: Setup for NetWare Print Server Mode (Automatic) The setup procedure involves adding a print server and linking it to one or more print queues. Both steps are carried out in PCONSOLE. Add a Print Server Follow these steps to add a print server to your NetWare environment: 1. Log in to a file server from a client workstation. 2. Start PCONSOLE. 3. NetWare 4.xx only: Press to switch to Bindery Mode. 4. Select Print Server Information (3.xx) or Print Servers (4.xx). 5.
Section 3: Setup for NetWare Link a Print Queue to the Print Server The next step is to link a print queue to the print server: 1. Start PCONSOLE according to steps 1-3 on the previous page. 2. Select Print Queue Information (3.xx) or Print Queues (4.xx). If you plan to use an existing queue, then skip to step 5. 3. Press to add a new queue. 4. Type a queue name, and press . (see note below) 5. Select the queue that you want the NPS 550 to service.
Section 3: Setup for NetWare Print Server Mode (Parameter Controlled) This is similar to the automatic print server mode, but the NPS 550 will not automatically log in to all file servers and scan for queues to service. Instead, the file servers and print queues are specified by a set of parameters in the NPS 550 configuration. This is the recommended method for medium-sized networks. NetWare Configuration The NetWare configuration is identical to the one described for automatic print server mode.
Section 3: Setup for NetWare 8. To specify more print queues, select LOGIN2 through LOGIN16 in consecutive order. Repeat step 7 for each print queue. 9. Select Save, then select Cancel until AXCFG closes down. Print Server Mode (File Server Controlled) This method uses a NetWare file server (the Configuration File Server) to hold the print queue information. The NPS 550 will not automatically log in to all file servers and scan for queues to service.
Section 3: Setup for NetWare NetWare 3.xx: 1. Log in as supervisor to the NetWare server, and start PCONSOLE. 2. Select Change Current File Server, then select the file server at which you want to keep the queue and printer configurations. Make a note of the configuration file server name, you will need it during the NPS 550 configuration. 3. Select Print Server Information, then add the new print server AXIS. See “Add a Print Server” (page 17) for details. 4. Select AXIS. 5.
Section 3: Setup for NetWare NetWare 4.xx: 1. Log in as supervisor to the NetWare server, and start PCONSOLE. 2. Press to switch to Bindery Mode. 3. Select Change Current NetWare Server, then select the file server at which you want to keep the queue and printer configurations. Make a note of the configuration file server name, you will need it during the NPS 550 configuration. 4. Select Print Servers, then add the new print server AXIS. See “Add a Print Server” (page 17) for details. 5.
Section 3: Setup for NetWare NPS 550 Configuration The configuration involves specifying the configuration file server. This is done using AXCFG, the Axis NPS installation software on the disk supplied with the NPS 550. Follow the instructions in the read.me file on the disk to install the software, then proceed as follows: 1. Start AXCFG, and select NetWare. 2. Select No at the ‘Look for old print servers’ prompt unless you are configuring an NPS 550 with software revision prior to 4.20. 3.
Section 3: Setup for NetWare Remote Printer Mode The configuration for remote printer mode comprises the following steps: 1. Add a Print Server 2. Create a Print Queue 3. Link a Remote Printer to the Print Queue 4. Configure the NPS 550 Add a Print Server The NetWare print server software is either installed on a file server (PSERVER.NLM), or a dedicated workstation (PSERVER.EXE).
Section 3: Setup for NetWare NetWare 3.xx: 1. Select Print Server Information from the PCONSOLE Main Menu. 2. Select the NetWare Print Server to which you want to link your NPS 550. 3. Select Print Server Configuration, and then Printer Configuration. 4. Select the first free slot in the Configured Printers list. 5. Make a note of the NetWare print server name and the Printer number; you will need it later during the configuration. (see notes below) 6.
Section 3: Setup for NetWare NetWare 4.xx: 1. Select Print Servers from the PCONSOLE Main Menu. 2. Select the NetWare Print Server to which you want to link your NPS 550. 3. Select Printers. 4. Press to add a remote printer to the Defined Printers list. (see notes below) 5. Type AXIS!n at the Printer: prompt. are the last six digits of the NPS 550 serial number, and n is the logical printer number 1–8. 6. Select AXIS!n.
Section 3: Setup for NetWare Configure the NPS 550 The configuration involves specifying which NetWare print servers and printer numbers the NPS 550 shall attach to. This is done using AXCFG, the Axis NPS installation software on the disk supplied with the NPS 550. Follow the instructions in the read.me file on the disk to install the software, then proceed as follows: 1. Start AXCFG, and select NetWare. 2. Select No at the ‘Look for old print servers’ prompt. 3.
Section 3: Setup for NetWare Verify the Communication To verify communication by making a test printout, just send a job to one of the print queues that NPS 550 will service. Use CAPTURE, NPRINT, or PCONSOLE. Example: Use CAPTURE from the DOS command line when you are logged into the network, to print out the autoexec.bat file from the root of drive C: CAPTURE /L=1 /Q=DESKTOP /NOTIFY /TI=30 /NT /FF /NB COPY C:\AUTOEXEC.
Section 4: Setup for Windows Section 4 Setup for Windows This section describes how to set up your NPS 550 for the Microsoft Windows environment. The following Windows platforms are supported: • Windows 3.1 (requires add-on network support) • Windows for Workgroups • Windows 95 • Windows NT The setup is done using Axis Print Utility for Windows. Install the utility if you haven’t already done so (see the instructions on the NPS 550 Setup disk label).
Section 4: Setup for Windows Requirements: 1. Microsoft Network must be running when installing and using Axis Print Utility. 2. Axis Print Utility must be running whenever you want to print to your network printer. Peer-to-peer vs. Client-Server printing Axis Print Utility supports both peer-to-peer and client-server printing. Peer-to-peer is the recommended print method for smaller networks. For more information on peer-to-peer and client-server printing, see the Axis Print Utility on-line help.
Section 4: Setup for Windows Windows for Workgroups Setup for peer-topeer printing Follow these steps to install your NPS 550 for peer-to-peer printing at a Windows for Workgroups workstation: 1. Double-click the Axis Print Utility icon. 2. In the Port menu, click Add. 3. In the NPS Port list, select the NPS 550 port you want to install. The ports appear as .LP1, .LP2 and .CM2, where is the NPS 550 print server name (AXIS... is abbreviated to AX...). Example: AX100086.
Section 4: Setup for Windows Client-Server printing: Server setup Follow these steps to install your NPS 550 for client-server printing at a Windows for Workgroups server: 1. Choose a workstation that you want to use as server for network printing. The server must be available at all times, and must have sufficient hard disk space for spooling print jobs. 2. Make sure that the printer sharing option is enabled. (Open Network Setup, click Sharing...
Section 4: Setup for Windows Windows 95 Setup for peer-topeer printing Follow these steps to install your NPS 550 for peer-to-peer printing at a Windows 95 workstation: 1. Double-click the Axis Print Utility icon. 2. In the Port menu, click Add. 3. In the NPS Port list, select the NPS 550 port you want to install. The ports appear as .LP1, .LP2 and .CM2, where is the NPS 550 print server name (AXIS... is abbreviated to AX...). Example: AX100086.LP1 AX100086.LP2 AX100086.CM1 4.
Section 4: Setup for Windows Client-Server printing: Server setup Follow these steps to install your NPS 550 for client-server printing at a Windows 95 server: 1. Choose a workstation that you want to use as server for network printing. The server must be available at all times, and must have sufficient hard disk space for spooling print jobs. 2. Install Axis Print Utility on the server. 3. Set up your NPS 550 as described on page 33. 4.
Section 4: Setup for Windows Windows NT Setup for peer-topeer printing Follow these steps to install your NPS 550 for peer-to-peer printing at a Windows NT workstation: 1. Double-click the Axis Print Utility. 2. In the Port menu, click Add. 3. In the NPS Port list, select the NPS 550 port you want to install. The ports appear as .LP1, .LP2 and .CM2, where is the NPS 550 print server name (AXIS... is abbreviated to AX...). Example: AX100086.LP1 AX100086.LP2 AX100086.CM1 4.
Section 4: Setup for Windows Client-Server printing: Server setup Follow these steps to install your NPS 550 for client-server printing at a Windows NT server: 1. Choose a workstation that you want to use as server for network printing. The server must be available at all times, and must have sufficient hard disk space for spooling print jobs. 2. Install Axis Print Utility on the server. 3. Set up your NPS 550 following steps 1 - 9 on page 35 (do not close Print Manager). 4.
Section 4: Setup for Windows Windows NT - LPD printing This section describes how to set up a Windows NT Server (ver. 3.5 or later) for LPD printing over the TCP/IP protocol. Install the TCP/IP Protocol Stack In the Control Panel, click the Network icon. If the TCP/IP Protocol entry appears, then TCP/IP is already installed. Close the Network folder and skip to Installing a Printer below. Follow these steps to install the TCP/IP protocol stack: 1. In the Network folder, select Add Software. 2.
Section 5: Setup for OS/2 Section 5 Setup for OS/2 The basic configuration in the OS/2 environment is done using the Axis Print Utility for OS/2 included on the disk supplied with the NPS 550. It comprises four steps: 1. Activate the NetBEUI protocol (if not already activated). 2. Install the Axis Print Utility for OS/2. 3. Install the NPS 550 using the Axis Print Utility. 4. Create print queues to be serviced by the NPS 550.
Section 5: Setup for OS/2 Activate the NetBEUI Protocol Activating the NetBEUI protocol is done using the LAN Server/LAN Manager Setup: • LAN Server Use MPTS/LAPS to activate NetBEUI (see the MPTS/LAPS documentation for details). • LAN Manager Use SETUP to activate NetBEUI (see the LAN Manager SETUP documentation for details). Install the Axis Print Utility for OS/2 The Axis Print Utility for OS/2 is included on the disk supplied with the NPS 550.
Section 5: Setup for OS/2 Install the NPS 550 Once the Axis Print Utility is installed and running, you can install the NPS 550 by clicking the Install entry on the action bar. The Install command initiates a search for Axis print servers on the network. Your new NPS 550 will appear in the list (together with any other Axis print servers) as three printer ports: AX100086.LP1 AX100086.LP2 AX100086.CM1 The digits following AX are the six last digits of the NPS 550 serial number (100086 in this example).
Section 5: Setup for OS/2 Create a Print Queue Each Axis print server port will be seen as a print queue destination by the OS/2 Print Manager. Print queue destinations are referred to as devices in OS/2 version 1.x and ports in version 2.x. They appear as pipe names, e.g. \PIPE\AX100086.LP1, etc. Assigning Axis print server ports as print queue destinations follow the standard procedures under OS/2. The procedures are identical for LAN Server and LAN Manager, but differ between OS/2 versions 1.x and 2.
Section 5: Setup for OS/2 OS/2 Version 2.x The print queue assignment procedure under OS/2 version 2.x is done in one operation – the definition of a printer will automatically create a queue. Follow these steps to create a print queue and assign it to an NPS 550 printer port: 1. Double-click the Templates folder. 2. Drag the Printer icon out to the Workplace Shell (or into a folder), while holding the right mouse button down. 3. Type a name in Printer Name field. 4.
Section 5: Setup for OS/2 Verify the Communication To verify communication by making a test printout, use the NET COPY command (or any other print method such as drag-and-drop, etc.) to send a job to one of the print queues that NPS 550 will service.
Section 6: Setup for Unix systems Section 6 Setup for Unix systems This section covers the setup for TCP/IP in a Unix environment. The steps described on the following pages are: 1. Prepare your system for a new TCP/IP node. Procedures: Find an unused Internet (IP) address and choose a unique host name for your NPS 550. Update your host table and alias name data bases. 2. Set up the NPS 550 as a TCP/IP node. Procedures: Down-load the IP address to your NPS 550 using the arp, rarp or bootp metod. 3.
Section 6: Setup for Unix systems Prepare your system Each node in a TCP/IP network must have a unique Internet (IP) address, and also a unique host name to be used as an alias for the IP address. Before you add your NPS 550 to a TCP/IP network, you must prepare your system for a new node. Find an unused IP address The IP addresses used in your network are listed in the system host table (/etc/hosts on most Unix systems). Find an unused IP address, and choose a unique host name for your NPS 550.
Section 6: Setup for Unix systems Set up your NPS 550 When you have prepared your system to accept a new TCP/IP node, you are ready to set up your NPS 550 as a node on your network. This is done by down-loading the new IP address to the NPS 550 using one of these three methods: • arp – the easiest method, but requires down-loading of the Internet address to each new device individually. • rarp – down-loads the Internet address to each device automatically.
Section 6: Setup for Unix systems The arp method The arp command associates your NPS 550’s node address with an IP address. The IP address is then down-loaded by the ping command. The arp command syntax depends on your Unix system (see examples below). This is the syntax for System V and some BSD-type systems: arp -s temp ping The node address is the serial number found at the back of the NPS 550. Each pair of digits must be separated by colons as in examples below.
Section 6: Setup for Unix systems The rarp method The rarp method uses a daemon to establish and maintain communication between the hosts listed in a Ethernet address table (/etc/ethers on most systems). Rarp daemons are normally only used on BSD-type and System V Unix systems. If you are an IBM AIX user, use the arp or bootp methods instead. Follow these steps to use the rarp method: 1. Open the Ethernet address table using a text editor (e.g.
Section 6: Setup for Unix systems The bootp method The bootp method uses a daemon to establish and maintain communication between the hosts listed in a boot table (/etc/bootptab on most systems).Follow these steps to use the bootp method: 1. Open the boot table using a text editor (e.g.
Section 6: Setup for Unix systems Set up and attach a print queue The final step is done using the axinstall script, which is up-loaded from the NPS 550 to your host using FTP. You don’t need any technical knowledge about your Unix system; axinstall will automatically detect your system’s characteristics, and guide you through the setup procedure. Below is a list of Unix systems that are supported by axinstall: * BSD (Berkley Unix) SunOS 4 (Sun BSD, Solaris 1.
Section 6: Setup for Unix systems Example: Below is a sample FTP session showing how to up-load axinstall (user entries appear in bold): > ftp salesdept Connected to salesdept. 220 Axis NPS 550 FTP Print Server V5.00 ready. Name (salesdept:thomas): root 331 User name ok, need password Password: pass (not visible) 230 User logged in ftp> get axinstall 200 PORT command successful. 150 Opening data connection for axinstall (192,36,253,4,13,223) 226 Transfer complete.
Section 6: Setup for Unix systems Print methods The NPS 550 supports several different print methods for printing under TCP/IP. Axinstall will suggest a print method suitable for your particular Unix system, but you might want to use another method depending on your printing requirements (banner pages, status logging, etc.
Section 7: Setup for Macintosh Section 7 Setup for Macintosh The basic setup for Macintosh is done by opening the Chooser window and clicking a printer. Before configuring your Macintosh system, you may want to configure the NPS 550 (e.g. logical printer definitions). See Appendix A for details. If you intend to operate your NPS 550 in a multi-protocol environment, you should also proceed according to the other “Setup for...” sections as appropriate.
Section 7: Setup for Macintosh Choose a Printer Choosing a printer is slightly different depending on which version of LaserWriter printer driver you are using. The LaserWriter 7.0 driver assumes that you use a standard PostScript driver, and cannot take advantage of any printer specific features. The LaserWriter 8.0 driver uses PPD files that contain printer descriptions. This gives you full control over any features your printer might have. LaserWriter 7.
Section 7: Setup for Macintosh LaserWriter 8.0 Printer Driver Open the Chooser window by clicking Chooser in the Apple menu. Follow these steps to choose a printer: 1. Click the LaserWriter 8.0 icon. 2. If your network has more than one zone, click on the zone you want. If your network has no zones, this box does not appear. 3. Click the name of the printer you want.
Section 8: Advanced Options Section 8 Advanced Options This section takes you beyond the “plug-and-print” concept and into the area of Print Server Configuration and Print Management. This section provides an overview of the unique functions that make the NPS 550 more than ’just another print server’. For a complete description of these functions, please refer to the NPS Print Server Technical Reference.
Section 8: Advanced Options Logical Printers One of the most powerful features of the NPS 550 is the Logical Printer concept. A logical printer is a configurable device driver acting as an interface between the network and the physical printer. You may specify up to eight logical printers, each with different properties, even if you have only one physical printer attached.
Section 8: Advanced Options The following properties can be configured individually for each logical printer: • Physical Printer Port (see table below) • Character Set Conversion (page 59) • Strings Before and After Print Jobs (page 60) • String Substitutions (page 61) • PostScript Functions (page 62) • Action at Printer Busy (page 64) • Hex Dump Mode (page 64) The table below shows the default logical printer configuration: Logical Printer PR1 PR2 PR3 PR4 PR5 PR6 PR7 PR8 Note: Printer port LPT1 LPT2 CO
Section 8: Advanced Options Character Set Conversion A common problem in a multiple host environment is that different hosts use different ASCII character sets. As a result of this, language specific characters (such as å ü ô ñ) are sometimes printed incorrectly. The NPS 550 solution to this problem is to assign a character set conversion filter to a logical printer, and link that logical printer to the host causing the problem.
Section 8: Advanced Options Strings Before and After Print Jobs These string functions provide a way to send printer control commands before and after each print job. They may be specified individually for each logical printer. All strings are entered as hexadecimal byte values. Example 1: Assume that the logical printer PR5 is configured as a PostScript printer. To append the PostScript End of File character (ctrl-D, hex 04) after each print job, edit the following entry in your config file: PR5_AFT.
Section 8: Advanced Options String Substitutions The string substitution function performs search-and-replace operations on the print data. The primary application is to replace printer control commands. Up to 20 string substitutions may be specified individually for each logical printer. All strings must be entered as hexadecimal byte values, and each match and substitute string must be preceded by a count byte.
Section 8: Advanced Options PostScript Functions The NPS 550 can translate standard ASCII print data into PostScript format. This makes it possible to print with a PostScript printer from a host that doesn’t support PostScript. The PostScript functions are controlled by a number of parameters described below. ASCII to PostScript Conversion Example: The conversion is selected by activating a filter that converts ASCII data into PostScript.
Section 8: Advanced Options PostScript Page Orientation When the ASCII to PostScript filter is active, a page orientation must be specified. The default page orientation is Portrait, and may be specified individually for each logical printer. See the example below on how to change the page orientation. The page orientation setting is ignored when the ASCII to PostScript filter is inactive. PostScript Page Format When the ASCII to PostScript filter is active, a page format must be specified.
Section 8: Advanced Options Action at Printer Busy If the printer is busy when NPS 550 receives a new print job, you have the choice between sending the print job to another logical printer, and make the host wait until the printer is ready. The default selection is ‘wait until printer is ready’. You may redirect print jobs by specifying a secondary logical printer assigned to a different printer port.
Section 8: Advanced Options Telnet Login The Telnet support makes it possible to log in to the NPS 550 and execute various commands as shown in the example below. Use the telnet command to log in. Example: This sample telnet session illustrates the help command: > telnet salesdept Trying 192.36.253.96 ... Connected to salesdept. Escape character is '^]'. Axis NPS 550R TELNET Print Server V5.00 NPS 550 network login: root Password: pass (not visible) Axis NPS 550R TELNET Print Server V5.
Section 8: Advanced Options Accounting The accounting file contains data concerning the ten last print jobs. It specifies an internal job number, the user that initiated the job, the protocol and logical printer that was used, current status (Completed, Offline, or Printing), number of bytes printed, elapsed time and off-line time. The file can be accessed using FTP, Telnet, or AXCFG. Example: This sample telnet session illustrates the account command: > telnet salesdept Trying 192.36.253.96 ...
Section 8: Advanced Options Status Logging The status command shows which printer port the logical printers are assigned to, and their current status. Example: This sample telnet session illustrates the status command: > telnet salesdept Trying 192.36.253.96 ... Connected to salesdept. Escape character is '^]'. Axis NPS 550R TELNET Print Server V5.00 NPS 550R network login: root Password: pass (not visible) Axis NPS 550R TELNET Print Server V5.
Section 8: Advanced Options Locally Administrated Address Each NPS 550 is preconfigured with a unique Node Address (indentical to the serial number). You may change the node address to a Locally Administrated Address by editing the Node Address entry in your config file. Important: Always consult your network manager before changing the Node Address. The Node Address consists of six hexadecimal numbers in the range 00 FF. The numbers are separated by spaces.
Section 8: Advanced Options SNMP You may use SNMP (Simple Network Management Protocol) for remote monitoring of the NPS 550. All major functions applicable to print servers are supported. SNMP actually refers to a set of standards for network management, including a protocol, a database structure specification, and a set of data objects. The NPS 550 SNMP implementation runs in the TCP/IP environment.
Appendix A: The parameter list Appendix A The parameter list This appendix contains an overview of the NPS 550 parameters and how to edit them. Please refer to the NPS Print Server Technical Reference for a complete description of the parameters. The current parameter settings are stored in the NPS 550 config file. Editing parameter values involve three steps: Up-load the config file to your system, edit the parameter values, and down-load the modified file to the NPS 550.
Appendix A: The parameter list Unix (TCP/IP) Use FTP to change the config file: 1. Log in to the NPS 550. Command: ftp Enter root as user id and pass as password. 2. Up-load the config file. Command: get config 3. Edit the file using your favorite text editor. 4. Down-load the config file. Command: put config CONFIG The NPS 550 will automatically activate the new settings.
Appendix A: The parameter list Factory Default Settings If you should need to reset the NPS 550 to factory default conditions, the best way to do this is to use the TEST button. This procedure involves switching the NPS 550 off and on. If you use an external power supply, unplug the power cord to switch off the NPS 550, otherwise use the printer’s power switch. 1. Switch off the NPS 550. 2. Press and hold the TEST button while you switch on the NPS 550.
Appendix A: The parameter list The Config File The remainder of this appendix contains the complete NPS 550 parameter list. The left column shows the parameters and their default values as they appear in the config file, and the right column contains brief descriptions of the parameters. For a full description of the parameters, please refer to the NPS Print Server Technical Reference. --- CONFIG MENU NODE_ADDR. : 00 40 8C 10 00 86 ROOT_PWD. USERS. : pass : --- TCP/IP MENU TCP_ENB. : YES INT_ADDR.
Appendix A: The parameter list --- NETWARE MENU NETW_ENB. : YES PS_NAME. : AXIS100086 CONFSERV. : PS_POLL. : 5 AUTO_SCAN. : BOTH (OFF PSERVER RPRINTER BOTH) FR_802_3. : YES FR_ETH_2. : YES FR_802_2. : YES FR_SNAP. : YES LOGIN1. : LOGIN2. : LOGIN3. : LOGIN4. : LOGIN5. : LOGIN6. : LOGIN7. : LOGIN8. : LOGIN9. : LOGIN10. : LOGIN11. : LOGIN12. : LOGIN13. : LOGIN14. : LOGIN15. : LOGIN16. : RPRINT1. : RPRINT2. : RPRINT3. : RPRINT4. : RPRINT5. : RPRINT6. : RPRINT7. : RPRINT8.
Appendix A: The parameter list --- APPLETALK ATLK_ENB. ATK_ZONE. ZONER_EN. ATK_FONT. BINARY. APRINT_1. ATYPE_1. ALOGIC_1. APRINT_2. ATYPE_2. ALOGIC_2. APRINT_3. ATYPE_3. ALOGIC_3. MENU : YES : : YES : DEFAULT (DEFAULT 35N ALL) : NO : AXIS100086_LPT1 : LaserWriter : PR1 (PR1 PR2 PR3 PR4 PR5 PR6 PR7 PR8) : AXIS100086_LPT2 : LaserWriter : PR2 (PR1 PR2 PR3 PR4 PR5 PR6 PR7 PR8) : AXIS100086_COM1 : LaserWriter : PR3 (PR1 PR2 PR3 PR4 PR5 PR6 PR7 PR8) --- PRINTER1 MENU PR1_OUT. : LPT1 PR1_SCND. : PR1 PR1_WAIT.
Appendix A: The parameter list --- PRINTER3 MENU PR3_OUT. : COM1 PR3_SCND. : PR3 PR3_WAIT. PR3_IN. PR3_BEF. PR3_STR. PR3_CSET. : YES : NONE : : : NONE PR3_FILT. PR3_AFT. PR3_DUMP. PR3_SIZE. PR3_ORNT. PR3_FORM. PR3_FONT. : : : : : : : NONE PR4_WAIT. PR4_IN. PR4_BEF. PR4_STR. PR4_CSET. : YES : NONE : : : NONE PR4_FILT. PR4_AFT. PR4_DUMP. PR4_SIZE. PR4_ORNT. PR4_FORM. PR4_FONT. : : : : : : : NONE PR5_FILT. PR5_AFT. PR5_DUMP. PR5_SIZE. PR5_ORNT. PR5_FORM. PR5_FONT.
Appendix A: The parameter list --- PRINTER6 MENU PR6_OUT. : COM1 PR6_SCND. : PR6 PR6_WAIT. PR6_IN. PR6_BEF. PR6_STR. PR6_CSET. PR6_FILT. PR6_AFT. PR6_DUMP. PR6_SIZE. PR6_ORNT. PR6_FORM. PR6_FONT. : : : : : YES NONE PR7_FILT. PR7_AFT. PR7_DUMP. PR7_SIZE. PR7_ORNT. PR7_FORM. PR7_FONT. : : : : : YES NONE PR8_FILT. PR8_AFT. PR8_DUMP. PR8_SIZE. PR8_ORNT. PR8_FORM. PR8_FONT.
Appendix A: The parameter list --- OUTPUT MENU L1_CENTR. : STNDRD (IBM_PC STNDRD FAST HISPEED) L1_BSYTM. : 60 C1_READT. : 3 C1_HNDSH. : ROBUST-BOTH (NONE XON/XOFF ROBUST RDY/BSY BOTH ROBUST-BOTH) C1_BAUDR. : 9600 (300 600 1200 2400 4800 9600 19200 38400 57600 115200) C1 STOPB. : 2 (1 2) C1_PARIT. : NONE (NONE ODD EVEN) C1_NBITS. : 8 (7 8) C1_BSYTM. : 60 L2_CENTR. : STNDRD (IBM_PC STNDRD FAST HISPEED) L2_BSYTM. : 60 --- PANEL MENU DEF_OUT. : PR1 LOCK_KEY.
Appendix B: Internal printouts Appendix B Internal printouts There are three different internal printouts that can be printed using the TEST button on the NPS 550 front panel: The Test Page The test page shows the software revision and the basic configuration of the NPS 550. To print the test page, press the TEST button until the STATUS indicator starts to flash, then release the button. The Parameter List The parameter list (or the config file) shows the complete NPS 550 configuration.
Appendix C: Technical specifications Appendix C Technical specifications Network environments • NetWare 3.11, 3.12, 4.0x and 4.10 using bindery emulation • Windows for Workgroups, Windows 95, Windows NT ver. 3.5 and above • LAN Server 1.3 and above • LAN Manager 2.
Appendix C: Technical specifications NetWare features • Standard installation using PCONSOLE • Print Server Mode for high-speed printing • Remote Printer Mode for up to 16 printers per NetWare user licence • Up to 96 print queues on 16 file servers • Port Status monitoring Windows features • Automatic installation software (Axis Print Utility for Windows) • Printing through Windows Print Manager • Both peer-to-peer and client-server printing OS/2 features • Automatic installation software (Axis Print Utili
Appendix D: How to contact Axis Appendix D How to contact Axis If you need technical support, please contact your dealer. If they can’t help you, they will forward your request to us. Axis on-line service Use the Axis on-line service at any time to retrieve electronically distributed items. The material available include the NPS Print Server Technical Reference, the Adobe Acrobat Reader (required for all Axis on-line documentation), company and product presentations, etc.
Appendix D: How to contact Axis The Axis offices If you want to contact an Axis office, choose the one nearest to your region: Europe, Middle East, South America, Africa Axis Communications AB Scheelevägen 16, S-223 70 Lund, Sweden Phone: +46 46 19 18 00 Fax: +46 46 13 61 30 Email: info@axis.se URL: http://www.axis.se/ North & Central America Axis Communications Inc. 4 Constitution Way, Woburn, MA 01801-1030, USA Phone: 1-800-444-AXIS, (617) 938-1188 Fax: (617) 938-6161 Email: info@axisinc.
Index Index A Accounting 66 alias 45 Anonymous FTP 82 arp 47 ASCII-to-PostScript Conversion 62 AXCFG 14 Axis offices 83 Axis Print Utility for OS/2 39 Axis Print Utility for Windows 29 B Bin control 60 bootp 49 Bulletin Board 82 Busy Action at 64 C CAPTURE 28 Character Set Conversion 59 config file 58, 70 E External power supply 12 F Factory Default Settings 72 FTP 52 H Hex Dump Mode 64 host name 45 Host Table 45 I IBM OS/2 84 Parameter editing 70 Internal Printouts 79 Internet 82 Internet address
Index NPS Manager 38 P Page Format 63 Page Orientation 63 Page Size 62 Parameter editing 70 Factory Defaults 72 Parameter List 70, 79 PostScript Font 63 Page Format 63 Page Orientation 63 Page Size 62 Postscript functions 62 Power Supply 12 Print Methods 51 PROS 52 R rarp 48 read.