
User`s manual

Section 3: Setup for NetWare
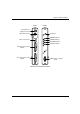
18 Axis NPS 550 User’s Manual
Link a Print
Queue to the
Print Server
The next step is to link a print queue to the print server:
1. Start PCONSOLE according to steps 1-3 on the previous page.
2. Select Print Queue Information (3.xx) or Print Queues (4.xx). If you
plan to use an existing queue, then skip to step 5.
3. Press <Insert> to add a new queue.
4. Type a queue name, and press <Enter>.
(see note below)
5. Select the queue that you want the NPS 550 to service. The Print
Queue Information menu appears.
6. Select Queue Servers (3.xx) or Print Servers (4.xx).
7. Press <Insert> to display the Queue Server Candidates list.
8. Select AXIS<nnnnnn>.
9. Press <Escape> repeatedly to return to the main menu.
Repeat this procedure for every queue you want the NPS 550 to service.
The NPS 550 supports up to 96 print queues, defined on up to 16 file
servers.
Note: Assuming that you have the default Logical Printer settings, output from
the print queue will be directed to the LPT1 output of the NPS 550. If
you want to print to LPT2, the queue name must end with ‘
!2
’. When
printing to NPS 550 serial port, the queue name must end with ‘
!3
’.
Example: The Print Queue is called ‘
DESKTOP!2
’. Printouts will be directed to
LPT2 (with the default logical printer settings).
Note that the number after the exclamation mark refers to the logical
printer number rather than the port number. You can bypass any queue
name restrictions by using one of the alternative print server modes
described on the following pages.