AXIS P13 Network Camera Series AXIS P1364 Network Camera AXIS P1365 Mk II Network Camera User Manual
AXIS P13 Network Camera Series Table of Contents About this manual . . . . . . . . . . . . . . . . . . . . . . . . . . . . . . . . . . . . . . . . . . System overview . . . . . . . . . . . . . . . . . . . . . . . . . . . . . . . . . . . . . . . . . . . . Product overview . . . . . . . . . . . . . . . . . . . . . . . . . . . . . . . . . . . . . . . . . . . How to access the product . . . . . . . . . . . . . . . . . . . . . . . . . . . . . . . . . . . . How to access the product from a browser . . . . . . . .
AXIS P13 Network Camera Series About this manual About this manual This user manual describes multiple products. Some of the instructions may not be relevant for your product.
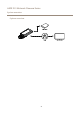
AXIS P13 Network Camera Series System overview System overview 4
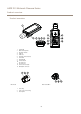
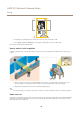
AXIS P13 Network Camera Series Product overview Product overview 1 2 3 4 5 6 7 8 9 10 11 12 13 Status LED Built-in microphone microSD card slot Audio in Audio out Network connector (PoE) Power LED Network LED Control button I/O connector Iris connector Power connector (DC) RS485/422 connector AXIS P1364 AXIS P1365 Mk II 1 2 3 Focus ring Lock screw for focus ring Zoom puller 5
AXIS P13 Network Camera Series How to access the product How to access the product AXIS IP Utility and AXIS Camera Management are recommended methods for finding Axis products on the network and assigning them IP addresses in Windows®. Both applications are free and can be downloaded from axis.
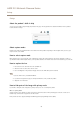
AXIS P13 Network Camera Series How to access the product The default root account has full privileges and should be reserved for administrative tasks. Always create a user account with limited privileges for daily use. This reduces the exposure of the administrative account. 1. Make sure to follow the instructions about secure passwords, see About secure passwords on page 6 . 2. Type a password and then retype it to confirm the spelling. 3. Click Create login. The password has now been configured.
AXIS P13 Network Camera Series Setup Setup About the product's built-in help You can access the built-in help through your product’s web page. The help provides more detailed information on the product’s features and their settings. About capture modes Capture mode defines the maximum frame rate available in the Axis product. Depending on which capture mode you select, you may not be able to use WDR.
AXIS P13 Network Camera Series Setup Important If you add many privacy masks, this may affect the product’s performance. How to create a privacy mask To create or edit a privacy mask, go to Settings > Privacy mask . How to reduce noise in low-light conditions To reduce noise in low-light conditions, you can adjust one or more of the following settings: • Make sure that the exposure mode is automatic. Note Increasing the max shutter value can result in motion blur.
AXIS P13 Network Camera Series Setup 1. Depending on your product, turn the camera or the 3–axis lens in the camera 90° or 270°. 2. Go to Settings > Stream > Orientation on the product’s webpage and rotate the view 90° or 270°. Find out more at axis.com/axis-corridor-format How to enhance facial recognition To better recognize the face of a person passing by the camera, you can set the optimal pixel resolution with the camera’s pixel counter. 1.
AXIS P13 Network Camera Series Setup When you set up a view area, we recommend you to set the video stream resolution to the same size as or smaller than the view area size. If you set the video stream resolution larger than the view area size it implies digitally scaled up video after sensor capture, which requires more bandwidth without adding image information. How to handle scenes with strong backlight Use WDR to make both dark and bright areas of the image visible. 1. Go to Settings > Image. 2.
AXIS P13 Network Camera Series Setup 2. Enter #D in the text field. 3. Choose alignment, text size and appearance. 4. Include the text overlay. 5. Go to System > Events > Action rules. 6. Create an action rule with AXIS Video Motion Detection as trigger. 7. From the list of actions, select Overlay text. 8. Type “Motion detected”. 9. Set the duration.
AXIS P13 Network Camera Series Setup How to set up network storage To store recordings on the network, you need to set up network storage: 1. Go to Settings > System > Storage. 2. Click Setup under Network storage. 3. Enter the IP address of the host server. 4. Enter the name of the shared location on the host server. 5. Move the switch if the share requires a login, and enter username and password. 6. Click Connect.
AXIS P13 Network Camera Series Setup 2. Start the application if it is not already running. 3. Make sure you have set up the application according to your needs. Create an action rule: 4. Go to Settings > System > Events and add an action rule. 5. Type a name for the action rule. 6. From the list of triggers, select Applications and then select AXIS Video Motion Detection (VMD). 7. From the list of actions, select Record video. 8. Select an existing stream profile or create a new one. 9.
AXIS P13 Network Camera Series Troubleshooting Troubleshooting How to reset to factory default settings Important Reset to factory default should be used with caution. A reset to factory default resets all settings, including the IP address, to the factory default values. To reset the product to the factory default settings: 1. Disconnect power from the product. 2. Press and hold the control button while reconnecting power. See Product overview. 3.
AXIS P13 Network Camera Series Troubleshooting 4. The upgrade takes a while, don't break the power to the product. When the upgrade is finished, the product restarts automatically. AXIS Camera Management can be used for multiple upgrades. Find out more at axis.com/products/axis-camera-management Technical issues, clues and solutions If you can’t find what you’re looking for here, try the troubleshooting section at axis.
AXIS P13 Network Camera Series Troubleshooting Problems with streaming Multicast H.264 only accessible by local clients Check if your router supports multicasting, or if the router settings between the client and the product need to be configured. The TTL (Time To Live) value may need to be increased. No multicast H.264 displayed in the client Check with your network administrator that the multicast addresses used by the Axis product are valid for your network.
AXIS P13 Network Camera Series Specifications Specifications To find the latest version of the product’s datasheet, go to axis.com > [product] > Support & Documentation. LED indicators Note • The Status LED can be configured to flash while an event is active. Status LED Indication Green Steady green for normal operation. Amber Steady during startup. Flashes when restoring settings. Red Firmware upgrade failure. Network LED Indication Green Steady for connection to a 100 Mbit/s network.
AXIS P13 Network Camera Series Specifications Buttons Control button The control button is used for: • Enabling the Focus Assistant. Press and very quickly release the Control button. • Resetting the product to factory default settings. See How to reset to factory default settings on page 15. • Connecting to an AXIS Video Hosting System service. To connect, press and hold the button for about 3 seconds until the status LED flashes green.
AXIS P13 Network Camera Series Specifications Power connector 2-pin terminal block for DC power input. Use a Safety Extra Low Voltage (SELV) compliant limited power source (LPS) with either a rated output power limited to ≤100 W or a rated output current limited to ≤5 A. RS485/RS422 connector Two 2-pin terminal blocks for RS485/RS422 serial interface used to control auxiliary equipment such as pan-tilt devices.
User Manual AXIS P13 Network Camera Series © Axis Communications AB, 2017 Ver. M1.11 Date: June 2017 Part No.