USER MANUAL AXIS P7210 Video Encoder
About this Document This manual is intended for administrators and users of the AXIS P7210 Video Encoder, and is applicable to firmware 5.50 and later. It includes instructions for using and managing the product on your network. Previous experience of networking will be of use when using this product. Some knowledge of UNIX or Linux-based systems may also be beneficial, for developing shell scripts and applications. A later version of this document will be posted to the Axis website, as required.
The battery should not be replaced unless required, but if the battery does need replacing, contact Axis support at www.axis.com/techsup/ for assistance. WARNING • Risk of explosion if the battery is incorrectly replaced. • Replace only with an identical battery or a battery which is recommended by Axis. • Dispose of used batteries according to local regulations or the battery manufacturer's instructions.
AXIS P7210 Video Encoder Table of Contents Hardware Overview . . . . . . . . . . . . . . . . . . . . . . . . . . . . . . . . . . . . . . . . . . Connectors and Buttons . . . . . . . . . . . . . . . . . . . . . . . . . . . . . . . . . . . . . . . . . . LED Indicators . . . . . . . . . . . . . . . . . . . . . . . . . . . . . . . . . . . . . . . . . . . . . . . . . . Accessing the Product . . . . . . . . . . . . . . . . . . . . . . . . . . . . . . . . . . . . . . . Access from a Browser . . . . . . . . . . .
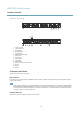
AXIS P7210 Video Encoder Hardware Overview Hardware Overview 1 2 3 4 5 6 10 11 12 1 2 3 4 5 6 7 8 9 10 11 12 13 14 15 7 8 9 13 14 15 Power connector microSD card slot I/O connector RS-485/RS-422 Control button Network connector (PoE) Audio input 1 Audio input 2 Audio output 1 Video inputs LED indicators Group 1 (4 video input connectors) Group 2 Group 3 Group 4 Connectors and Buttons For technical specifications, see page 56.
AXIS P7210 Video Encoder Hardware Overview NOTICE The product shall be connected using a shielded network cable (STP). All cables connecting the product to the network switch shall be shielded (STP) and intended for their specific use. Make sure that the network switch is properly grounded. For information about regulatory requirements, see Regulatory Information, on page 2 . I/O Connector Use in applications for e.g. motion detection, event triggering, time lapse recording and alarm notifications.
AXIS P7210 Video Encoder Hardware Overview LED Indicators LED Color Indication Network Green Steady for connection to a 100 MBit/s network. Flashes for network activity. Amber Steady for connection to a 10 MBit/s network. Flashes for network activity. Unlit No network connection. Green Steady green for normal operation. Amber Steady during startup and when restoring settings. Red Slow flash for failed upgrade. Green Normal operation. Amber Flashes green/amber during firmware upgrade.
AXIS P7210 Video Encoder Accessing the Product Accessing the Product To install the Axis product, refer to the Installation Guide supplied with the product. The product can be used with most operating systems and browsers. The recommended browsers are Internet Explorer with Windows, Safari with Macintosh and Firefox with other operating systems. See Technical Specifications, on page 56. To view streaming video in Internet Explorer, allow installation of AXIS Media Control (AMC) when prompted.
AXIS P7210 Video Encoder Accessing the Product Access from the Internet Once connected, the Axis product is accessible on your local network (LAN). To access the product from the Internet you must configure your network router to allow incoming data traffic to the product. To do this, enable the NAT-traversal feature, which will attempt to automatically configure the router to allow access to the product. This is enabled from Setup > System Options > Network > TCP/IP Advanced.
AXIS P7210 Video Encoder Accessing the Product 2. Enter a password and then re-enter it to confirm the spelling. 3. Click OK. The password has now been configured. The Live View Page The controls and layout of the Live View page may have been customized to meet specific installation requirements and user preferences. Consequently, some of the examples and functions featured here may differ from those displayed in your own Live View page. The following provides an overview of each available control.
AXIS P7210 Video Encoder Accessing the Product AMC Audio Controls AMC audio buttons control the speakers and microphone connected to the client computer. The buttons are only visible when audio is enabled. Speaker button — Click to turn the speakers on or off. Microphone button – Click to mute or unmute the microphone. In Simplex - speaker only mode, the Microphone and Talk buttons must both be active to send audio to the Axis product. Click either button to stop audio transmission.
AXIS P7210 Video Encoder Accessing the Product The PTZ controls can be disabled under PTZ > Advanced > Controls, see Controls, on page 28.
AXIS P7210 Video Encoder Media Streams Media Streams The Axis product provides several audio and video stream formats. Your requirements and the properties of your network will determine the type you use. The Live View page in the product provides access to H.264 and Motion JPEG video streams, audio streams and to the list of available stream profiles. Other applications and clients can access video and audio streams directly, without going via the Live View page. How to Stream H.
AXIS P7210 Video Encoder Media Streams The AMC Control Panel can be used to configure various video and audio settings. Please see the AXIS Media Control User’s Manual for more information. The AMC Control Panel is automatically installed on first use, after which it can be configured. Open the AMC Control Panel from: • Windows Control Panel (from the Start menu) • Alternatively, right-click the video image in Internet Explorer and click Settings.
AXIS P7210 Video Encoder Media Streams Note • = IP addess • The Axis product supports QuickTime 6.5.1 and later. • QuickTime adds latency to the video stream. • It may be possible to use other players to view the H.264 stream using the paths above, although Axis does not guarantee this.
AXIS P7210 Video Encoder Setting Up the Product Setting Up the Product The Axis product can be configured by users with administrator or operator rights. To open the product’s Setup pages, click Setup in the top right-hand corner of the Live View page. • Administrators have unrestricted access to all settings. • Operators have access to all settings except System Options See also the online help .
AXIS P7210 Video Encoder Video and Audio Video and Audio The video and audio settings can be used to optimize video and audio quality. You can configure the following: • Video stream settings. See page 17. • Stream profiles. See page 19. • Camera settings. See page 19. • Overlay image. See page 20. • Privacy mask. See page 21. • Audio settings. See page 22. • Audio clips. See page 23. Video Stream You can define the following video stream settings from Video & Audio > Video Stream: • Image.
AXIS P7210 Video Encoder Video and Audio Pixel Counter The pixel counter shows the number of pixels in an area of the image. The pixel counter is useful in situations where there is a requirement that the image is a certain size, for example in face recognition. The pixel counter can be accessed from: • Video & Audio > Video Stream. Under Preview, click Open and select the Show pixel counter option to enable the rectangle in the image.
AXIS P7210 Video Encoder Video and Audio size optimizes bandwidth and storage usage, but may give poor image quality. To prevent increased bandwidth and storage usage, the maximum frame size should be set to an optimal value. Quad stream A Quad view displays images from all four channels on a single screen; where the images from each camera take up a quarter of the display area. It is possible to define settings for the video stream in quad view.
AXIS P7210 Video Encoder Video and Audio to be connected in parallel with other equipment, for optimum video quality, it is recommended that termination be enabled for only the last device in the video signal chain. Image Settings Noise reduction - Set to On to enable noise reduction. Noise reduction may increase the amount of motion blur. Overlay Overlays are used to provide extra information, for example for forensic video analysis or during product installation and configuration.
AXIS P7210 Video Encoder Video and Audio 2. Under Overlay Settings, select Include overlay image at the coordinates and enter the X and Y coordinates. 3. Click Save. For information about supported image formats, see the online help . Using Overlay Text in an Action Rule Action rules, see page 33, can display an overlay text when the rule is triggered.
AXIS P7210 Video Encoder Video and Audio Audio Settings The audio functionality for each video stream is enabled under Video & Audio > Video Stream > Audio. Select the desired audio channel from the drop-down list. Audio Modes The Axis product supports the following audio modes: Full duplex - Simultaneous two-way audio allowing the Axis product to transmit and receive audio at the same time. There is no echo cancellation; if feedback loops appear, try moving the microphone or the speaker.
AXIS P7210 Video Encoder Video and Audio For more information about these settings, please see the online help . Audio Output An external speaker can be connected to the Audio-out connector (a built-in amplifier is required for this). The output can be connected to another amplifier with speakers. A stereo connector must be used for the audio out. Configure the audio output settings under Video & Audio > Audio Settings. Output gain - Control the volume (dB Full Scale) of the line audio output.
AXIS P7210 Video Encoder Live View Config Live View Config You can customize the Live View page and alter it to suit your requirements. It is possible to define the following features of the Live View page. • Stream Profile. See page 19. • Default Viewer for Browser. See page 25. • Viewer Settings. See page 25. • Action Buttons. These are the buttons described in Controls on the Live View Page, on page 10. • User Defined Links. See page 25. • Output Buttons. See page 25.
AXIS P7210 Video Encoder Live View Config Default Viewer for Browsers From Live View Config > Default Viewer select the default method for viewing video images in your browser. The product attempts to show the video images in the selected video format and viewer. If this is not possible, the product overrides the settings and selects the best available combination. Browser Viewer Description Windows Internet Explorer AMC Recommended viewer in Internet Explorer (H.264/Motion JPEG). QuickTime H.264.
AXIS P7210 Video Encoder Live View Config 1. Go to Setup > Live View Config. 2. Under Output Buttons, select the type of control to use: - Pulse activates the output for a defined period of time. The pulse time can be set from 1/100 second to 60 seconds. - Active/Inactive displays two buttons, one or each action. To configure the active and inactive states, go to System Options > Ports & Devices > I/O Ports and set the port’s Normal state.
AXIS P7210 Video Encoder PTZ (Pan Tilt Zoom) PTZ (Pan Tilt Zoom) The PTZ menu is available if a PTZ driver has been uploaded. See Installing a PTZ driver, on page 29. Preset Positions A preset position is a predefined view that can be used to quickly steer the camera to a specific location. Preset positions can be accessed in several ways: • By selecting the preset from the Preset positions drop-down list in the Live View Page. • When setting up action rules. See page 33. • When setting up Guard Tour.
AXIS P7210 Video Encoder PTZ (Pan Tilt Zoom) Guard Tour A guard tour displays the video stream from different preset positions, one-by-one, in a predetermined order or at random and for configurable time periods. The enabled guard tour will keep running after the user has logged off or closed the browser. To add a guard tour: 1. Go to PTZ > Guard Tour and click Add. 2. Enter a descriptive name. 3. Specify the pause length between runs. 4. Select an available preset position and click Apply. 5.
AXIS P7210 Video Encoder PTZ (Pan Tilt Zoom) Deselect the options under Enable/Disable controls to disable the pan, tilt, zoom, focus and iris controls. Note Disabling PTZ controls will not affect preset positions. For example, if the tilt control is disabled, the product can still move to preset positions that require a tilt movement. Installing a PTZ driver This Axis product supports several PTZ devices. Please see www.axis.com for a complete list of supported devices, and to obtain the correct driver.
AXIS P7210 Video Encoder Detectors Detectors Camera Tampering Camera Tampering can generate an alarm whenever the camera is repositioned, or when the lens is covered, sprayed or severely defocused. To send an alarm, for example an email, an action rule must be set up. To configure tampering: 1. Go to Detectors > Camera Tampering. 2. Set the Minimum duration, that is, the time that must elapse before an alarm is generated. This can help prevent false alarms for known conditions that affect the image. 3.
AXIS P7210 Video Encoder Detectors Note • Using the motion detection feature may decrease the product’s overall performance. • The position of the Motion Detection Window is relative to the orientation of the Camera. Changing the orientation of the camera will also change the position of the Motion Detection Window. Set Up Motion Detection Windows To set up a motion detection Include Window, follow these instructions: 1. Go to Detectors > Motion Detection. 2.
AXIS P7210 Video Encoder Detectors A large difference in luminance is required to trigger motion detection. Medium level (50%) Low level (0%) Even very small objects trigger motion detection. An object that appears in the window triggers motion detection only for a very short time before it is considered as non-moving. Only very bright objects on a dark background trigger motion detection.
AXIS P7210 Video Encoder Events Events The Axis product can be configured to perform actions when different events occur, for example, start a recording when motion is detected. The set of conditions that defines how and when the action is triggered is called an Action Rule. Available Action Rule triggers and conditions include: • • • • • Detectors - Audio Detection — trigger the rule when audio is detected, see Audio Detection, on page 32.
AXIS P7210 Video Encoder Events • Time - Recurrence — trigger the rule periodically, see Recurrences, on page 36. This can for example be used to upload an image every 5 minutes. - Use Schedule — trigger the rule according to the selected schedule, see Schedules, on page 36. Available actions include: • Output Port — activate an I/O port to control an external device. • Overlay Text — display an overlay text, see Using Overlay Text in an Action Rule, on page 21.
AXIS P7210 Video Encoder Events To add additional criteria, select the Additional conditions option and add additional triggers. To prevent an action from being triggered repeatedly, a Wait at least time can be set. Enter the time in hours, minutes and seconds, during which the trigger should be ignored before the action rule can be activated again. The recording Duration of some actions can be set to include time immediately before and after the event.
AXIS P7210 Video Encoder Events Setting Up an Email Recipient Email recipients can be configured by selecting one of the listed email providers, or by specifying the SMTP server, port and authentication used by, for example, a corporate email server. Note Some email providers have security filters that prevent users from receiving or viewing large amount of attachments, from receiving scheduled emails and similar.
AXIS P7210 Video Encoder Recordings Recordings The Axis product can be configured to record video continuously or according to an action rule: • To start a continuous recording, see page 37. • To set up action rules, see page 34. • To access recordings, see Recording List, on page 37. • To configure camera controlled storage, see Storage, on page 46. Recording List Recorded videos are listed on the Recordings > List page.
AXIS P7210 Video Encoder Languages Languages Multiple languages can be installed in the Axis product. All web pages including the online help will be displayed in the selected language. To switch languages, go to Setup > Languages and first upload the new language file. Browse and locate the file and click the Upload Language button. Select the new language from the list and click Save.
AXIS P7210 Video Encoder System Options System Options Security Users User access control is enabled by default and can be configured under System Options > Security > Users. An administrator can set up other users by giving them user names and passwords. It is also possible to allow anonymous viewer login, which means that anybody may access the Live View page.
AXIS P7210 Video Encoder System Options 2. Select an HTTPS certificate from the list of installed certificates. 3. Optionally, click Ciphers and select the encryption algorithms to use for SSL. 4. Set the HTTPS Connection Policy for the different user groups. 5. Click Save to enable the settings. To access the Axis product via the desired protocol, enter https:// or http:// in the address field in a browser. The HTTPS port can be changed on the System Options > Network > TCP/IP > Advanced page. IEEE 802.
AXIS P7210 Video Encoder System Options To install a self-signed certificate: 1. Go to System Options > Security > Certificates. 2. Click Create self-signed certificate and provide the requested information. To create and install a CA-signed certificate: 1. Create a self-signed certificate as described above. 2. Go to System Options > Security > Certificates. 3. Click Create certificate signing request and provide the requested information. 4.
AXIS P7210 Video Encoder System Options Network Basic TCP/IP Settings The Axis product supports IP version 4 and IP version 6. Both versions can be enabled simultaneously, and at least one version must always be enabled. IPv4 Address Configuration By default, the Axis product is set to use IPv4 (IP version 4) and to obtain the IP address automatically via DHCP. The IPv4 settings are configured under System Options > Network > TCP/IP > Basic.
AXIS P7210 Video Encoder System Options To register the Axis product with AXIS Internet Dynamic DNS Service, go to System Options > Network > TCP/IP > Basic. Under Services, click the AXIS Internet Dynamic DNS Service Settings button (requires access to the Internet). The domain name currently registered at AXIS Internet Dynamic DNS service for the product can at any time be removed.
AXIS P7210 Video Encoder System Options To enable HTTPS, go to System Options > Security > HTTPS. For more information, see HTTPS, on page 39. NAT traversal (port mapping) for IPv4 A network router allows devices on a private network (LAN) to share a single connection to the Internet. This is done by forwarding network traffic from the private network to the “outside”, that is, the Internet.
AXIS P7210 Video Encoder System Options QoS (Quality of Service) QoS (Quality of Service) guarantees a certain level of a specified resource to selected traffic on a network. A QoS-aware network prioritizes network traffic and provides a greater network reliability by controlling the amount of bandwidth an application may use. The QoS settings are configured under System Options > Network > QoS.
AXIS P7210 Video Encoder System Options The RTP port range defines the range of ports from which the video/audio ports are automatically selected. For multicast streams, only certain IP addresses and port numbers should be used. Select Always Multicast Video and/or Always Multicast Audio to start multicast streaming without opening an RTSP session. Bonjour The Axis product includes support for Bonjour.
AXIS P7210 Video Encoder System Options Network Share Network share allows you to add network storage such as a NAS (Network Attached Storage) or any server that uses CIFS (Common Internet File System) and use them for storage of recordings. To add a network share: 1. Go to System Options > Storage. 2. Click Network Share. 3. Enter the IP address, DNS or Bonjour name to the host server in the Host field. 4. Enter the name of the share in the Share field. Sub folders cannot be used. 5.
AXIS P7210 Video Encoder System Options Maintenance The Axis product provides several maintenance functions. These are available under System Options > Maintenance. Click Restart to perform a correct restart if the Axis product is not behaving as expected. This will not affect any of the current settings. Click Restore to reset most settings to the factory default values.
AXIS P7210 Video Encoder System Options Parameter List - Shows the product's parameters and their current settings. This may prove useful when troubleshooting or when contacting Axis Support. Connection List - Lists all clients that are currently accessing media streams. Crash Report - Generates an archive with debugging information. The report takes several minutes to generate. The log levels for the System Log and the Access Log are set under System Options > Support > Logs & Reports > Configuration.
AXIS P7210 Video Encoder System Options 3. Keep the control button pressed for about 15–30 seconds until the status LED indicator flashes amber. 4. Release the control button. The process is complete when the status LED indicator turns green. The product has been reset to the factory default settings. If no DHCP server is available on the network, the default IP address is 192.168.0.90 5.
AXIS P7210 Video Encoder Troubleshooting Troubleshooting Checking the Firmware Firmware is software that determines the functionality of network devices. One of your first actions when troubleshooting a problem should be to check the current firmware version. The latest version may contain a correction that fixes your particular problem. The current firmware version in the Axis product is displayed in the page Setup > Basic Setup and in Setup > About.
AXIS P7210 Video Encoder Troubleshooting arp -s temp ping -l 408 In Windows, type the following from a command/DOS prompt (this may require that you run the command prompt as an administrator): arp -s ping -l 408 -t 2. If the product does not reply in 30 seconds, restart it and wait for a reply. Press CTRL+C to stop Ping. 3. Open a browser and type in the product’s IP address.
AXIS P7210 Video Encoder Troubleshooting The IP address has been changed by DHCP IP addresses obtained from a DHCP server are dynamic and may change. If the IP address has been changed, use AXIS IP Utility or AXIS Camera Management to locate the product on the network. Identify the product using its model or serial number, or by the DNS name (if the name has been configured). If required, a static IP address can be assigned manually.
AXIS P7210 Video Encoder Troubleshooting Lower frame rate than expected See Performance Considerations, on page 59. Reduce the number of applications running on the client computer. Limit the number of simultaneous viewers. Check with the network administrator that there is enough bandwidth available. Check in the AMC Control Panel (H.264 tag) that video processing is NOT set to Decode only key frames. Lower the image resolution.
AXIS P7210 Video Encoder Troubleshooting Storage and disk management problems Storage disruption A storage disruption alarm is sent if a storage device is unavailable, removed, full, locked or if other read or write problems occur. To identify the source of the problem, check the System Log under System Options > Support > Logs & Reports. Depending on the problem, it might be necessary to re-mount the storage device. For information on how to set up a storage disruption alarm, see Events, on page 33.
AXIS P7210 Video Encoder Technical Specifications Technical Specifications Function/group Item Specifications Video Encoder Model AXIS P7210 (16 channels) Pan/Tilt/Zoom Wide range of analog PTZ cameras supported (drivers available for download at www.axis.com) 100 presets/camera, guard tour, PTZ control queue Supports Windows compatible joysticks Video compression H.
AXIS P7210 Video Encoder Technical Specifications Function/group Item Specifications System Integration Application Programming Interface Open API for software integration, including VAPIX® from Axis Communications available at www.axis.com Includes the ONVIF Profile S; specification at www.onvif.
AXIS P7210 Video Encoder Technical Specifications Connectors I/O Connector 6-pin configurable terminal block for: • • • • Auxiliary power (DC output) Digital Input Digital Output 0 V DC (-) Function Pin 0 V DC (-) 1 DC output Configurable (Input or Output) 1 2 3 4 5 6 Notes Specifications 2 Can be used to power auxiliary equipment. Note: This pin can only be used as power out. 3.
AXIS P7210 Video Encoder Technical Specifications Power Connector 2-pin terminal block for power input. Use a Safety Extra Low Voltage (SELV) compliant limited power source (LPS) with either a rated output power limited to ≤100 W or a rated output current limited to ≤5 A. DC power input Audio Connector 3.
AXIS P7210 Video Encoder Technical Specifications The following factors are among the most important to consider: • High image resolution and/or lower compression levels result in images containing more data. Bandwidth affected. • Access by large numbers of Motion JPEG and/or unicast H.264 clients. Bandwidth affected. • Simultaneous viewing of different streams (resolution, compression) by different clients. Effect on frame rate and bandwidth. • Accessing Motion JPEG and H.
User Manual AXIS P7210 Video Encoder © Axis Communications AB, 2013 Ver. M3.8 Date: October 2013 Part No.