INSTALLATION GUIDE ENGLISH AXIS Q1614–E Network Camera
Legal Considerations Support Video and audio surveillance can be regulated by laws that vary from country to country. Check the laws in your local region before using this product for surveillance purposes. This product includes one (1) H.264 decoder license and one (1) AAC decoder license. To purchase further licenses, contact your reseller. Should you require any technical assistance, please contact your Axis reseller.
television reception, which can be determined by turning the equipment off and on, the user is encouraged to try to correct the interference by one or more of the following measures: • Reorient or relocate the receiving antenna. • Increase the separation between the equipment and receiver. • Connect the equipment into an outlet on a circuit different from that to which the receiver is connected. • Consult the dealer or an experienced radio/TV technician for help.
AXIS Q1614–E Network Camera Safety Information Hazard Levels DANGER Indicates a hazardous situation which, if not avoided, will result in death or serious injury. WARNING Indicates a hazardous situation which, if not avoided, could result in death or serious injury. CAUTION Indicates a hazardous situation which, if not avoided, could result in minor or moderate injury. NOTICE Indicates a situation which, if not avoided, could result in damage to property.
AXIS Q1614–E Network Camera Safety Instructions WARNING • The Axis product shall be installed by a trained professional. NOTICE • The Axis product shall be used in compliance with local laws and regulations. • Store the Axis product in a dry and ventilated environment. • Avoid exposing the Axis product to shocks or heavy pressure. • Do not install the product on unstable brackets, surfaces or walls. • Use only applicable tools when installing the Axis product.
AXIS Q1614–E Network Camera WARNING • Risk of explosion if the battery is incorrectly replaced. • Replace only with an identical battery or a battery which is recommended by Axis. 7 ENGLISH • Dispose of used batteries according to local regulations or the battery manufacturer's instructions.
AXIS Q1614–E Network Camera Installation Guide Installation Steps 1. Make sure the package contents, tools and other materials necessary for the installation are in order. See page 9 . 2. Study the hardware overview. See page 10. 3. Study the specifications. See page 16. 4. Install the hardware. See page 18. 5. Access the product. See page 20. 6. Set the focus. See page 20.
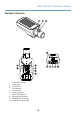
AXIS Q1614–E Network Camera Hardware Overview 1 2 3 10 4 5 1. 2. 3. 4. 5. 6. 7. 8. 9. 10.
AXIS Q1614–E Network Camera Control button (1) Function button (2) microSD Card slot Audio in Audio out ENGLISH 11. 12. 13. 14. 15. 1 2 3 4 5 6 7 15 1. 2. 3. 4. 5. 6. 7. 14 13 12 10 11 8 9 Sunshield adjustment screw (2x) Sunshield Product number (P/N) & Serial number (S/N). The serial number may be required during installation. Top Cover De-humidifying membrane.
AXIS Q1614–E Network Camera 8. 9. 10. 11. 12. 13. 14. 15. Cable holes with cable gland Bottom cover screws (4x) Cable cover Cable cover screws (2x) Network connector Bottom cover Heater. Caution! May be hot. Heater. Caution! May be hot. 1 2 3 4 1. 2. 3. 4. 5.
AXIS Q1614–E Network Camera LED Indicators Color Indication Network Green Steady for connection to a 100 MBit/s network. Flashes for network activity. Amber Steady for connection to a 10 MBit/s network. Flashes for network activity. Unlit No network connection. Green Steady green for normal operation. Amber Steady during startup and when restoring settings. Red Slow flash for failed upgrade. Green Normal operation. Amber Flashes green/amber during firmware upgrade.
AXIS Q1614–E Network Camera Note This status LED referred to in the table above is located in the housing. Status LED Behavior for Focus Assistant Color Indication Green Focus Assistant is enabled The lens is optimally adjusted Amber The camera has been moved, or an object has been inserted in front of the lens. Exit and restart the Focus Assistant. The lens is less optimally adjusted. Red The camera has been moved, or an object has been inserted in front of the lens.
AXIS Q1614–E Network Camera NOTICE Audio in (pink) - 3.5 mm input for a mono microphone, or a line-in mono signal (left channel is used from a stereo signal). Audio out (green) - 3.5 mm output for audio (line level) that can be connected to a public address (PA) system or an active speaker with a built-in amplifier. A stereo connector must be used for audio out. SD card slot - A standard or high-capacity microSD card (not included) can be used for local recording with removable storage.
AXIS Q1614–E Network Camera output will show as active (shown under System Options > Ports & Devices) if the alarm device is activated. Digital input – An alarm input for connecting devices that can toggle between an open and closed circuit, for example: PIRs, door/window contacts, glass break detectors, etc. When a signal is received the state changes and the input becomes active (shown under System Options > Ports & Devices).
AXIS Q1614–E Network Camera 3 Connect to GND to activate, or leave floating (unconnected) to deactivate. 0 to +30 V DC Digital Output 4 Internal connection to ground when activated, floating (unconnected) when deactivated. If used with an inductive load, e.g. a relay, a diode must be connected in parallel with the load, for protection against voltage transients. Max load =100 mA Max voltage = +30 V DC 1 12 V max 15 mA 2 3 4 Audio connector 3.
AXIS Q1614–E Network Camera Audio Input Audio Output 1 Tip Balanced Microphone Hot (+) In/Unbalance Microphone In/Line In Line out (mono) 2 Ring Balanced Microphone Cold (-) In 3 Sleeve Ground Ground RS485/422 connector Two 2-pin terminal blocks for RS485/RS422 serial interface.
AXIS Q1614–E Network Camera Note • The weight of the camera is 3525 g (7.7 lb). Check that the material is strong enough to support this weight. • Always use a shielded network cable (STP) intended for outdoor use between the Axis product and the end point and ensure that the end point is properly grounded. Installations of Axis products using a shielded network cable (STP) and a properly grounded end point have been tested to comply with industry immunity standard levels such as surge protection.
AXIS Q1614–E Network Camera 7. Optionally insert an SD memory card (not included) into the SDHC (Secure Digital High Capacity) card slot. A standard or high capacity SD card is required to store images locally in the camera. Connect the Cables 1. Optionally connect external input/output devices. See Connectors, on page 16. 2. Connect the network cable to the network connector in the housing.
AXIS Q1614–E Network Camera 8. If needed, make further adjustments under the Advanced tab. See the online help for more information. Note • The view in front of the camera should not be changed during focus adjustment (steps 5 and 6). If the camera is moved, or if a finger or other object is placed in front of the lens, steps 3 - 7 will have to be repeated. • If movements in front of the camera cannot be avoided, the Focus Assistant should not be used.
AXIS Q1614–E Network Camera 3. Attach and screw on the new lens. Reset to Factory Default Settings Important Reset to factory default should be used with caution. A reset to factory default will reset all settings, including the IP address, to the factory default values. To reset the product to the factory default settings: 1. Disconnect power from the product. 2. Press and hold the control button and reconnect power. See Hardware Overview, on page 10. 3.
Installation Guide AXIS Q1614–E Network Camera © Axis Communications AB, 2013 Ver. M2.2 Date: October 2013 Part No.