INSTALLATION GUIDE AXIS Camera Station S1048 Recorder ENGLISH AXIS Camera Station S1032 Recorder FRANÇAIS DEUTSCH ITALIANO ESPAÑOL 日本語
About this Document This document includes instructions for installing AXIS Camera Station S1032 Recorder and AXIS Camera Station S1048 Recorderon your network. Previous experience of networking will be beneficial when installing the product. Legal Considerations Video and audio surveillance can be regulated by laws that vary from country to country. Check the laws in your local region before using this product for surveillance purposes.
AXIS S1032/AXIS S1048 Installation Guide Page 3 AXIS S1032/AXIS S1048 Installation Guide This installation guide provides instructions for installing AXIS Camera Station S1032 Recorder and AXIS Camera Station S1048 Recorder. For more information about how to use the product, go to www.axis.com 1. Hardware overview. See page 4. 2. Connect the cables: • AXIS S1032. See page 6. • AXIS S1048. See page 8. 3. Set up software. See page 10. 4. Network configuration. See page 10. 5. Get Started. See page 10.
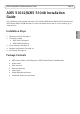
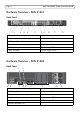
Page 4 AXIS S1032/AXIS S1048 Installation Guide Hardware Overview - AXIS S1032 Back Panel 1 PCIe expansion card slot 1 7 Ethernet connectors (2) 2 vFlash media card slot (Optional) 8 USB connectors (2) 3 iDRAC port (Optional) 9 System identification connector 4 Serial connector 10 System identification button 5 PCIe expansion card slot 2 11 Power supply (PSU1) 6 Video connector 12 Power supply (PSU2) Hardware Overview - AXIS S1048 Back Panel 4 5 1 2 7 9 8 6 3 10 11 1 vFlash media c
AXIS S1032/AXIS S1048 Installation Guide Page 5 Unpack and Install the Recorder Unpack your system and identify each item, see Package Contents on page 3. Assemble the rails and install the Axis recorder in the rack following the safety instructions and the rack installation instructions provided with your system.
Page 6 AXIS S1032/AXIS S1048 Installation Guide Connect the Cables - AXIS S1032 Warning: Before you begin any of the procedures in this section, read the safety information that shipped with your computer. For additional information, see www.axis.com NOTE: Some devices may not be included if you did not order them. 1. Connect the keyboard, mouse and monitor. The connectors on the back of your system have icons indicating which cable to plug into each connector.
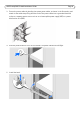
AXIS S1032/AXIS S1048 Installation Guide Page 7 3. Secure the power cables by bending the system power cables, as shown in the illustration, and attach to the cable straps. Plug the other end of the power cables into a grounded electrical outlet or a separate power source such as an uninterruptible power supply (UPS) or a power distribution unit (PDU). ENGLISH 4. Press the power button to turn on the recorder. The power indicator should light up. 5. Install the bezel.
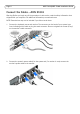
Page 8 AXIS S1032/AXIS S1048 Installation Guide Connect the Cables - AXIS S1048 Warning: Before you begin any of the procedures in this section, read the safety information that shipped with your computer. For additional information, see www.axis.com NOTE: Some devices may not be included if you did not order them. 1. Connect the keyboard, mouse and monitor. The connectors on the back of your system have icons indicating which cable to plug into each connector.
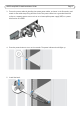
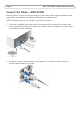
AXIS S1032/AXIS S1048 Installation Guide Page 9 3. Secure the power cables by bending the system power cables, as shown in the illustration, and attach to the cable straps. Plug the other end of the power cables into a grounded electrical outlet or a separate power source such as an uninterruptible power supply (UPS) or a power distribution unit (PDU). ENGLISH 4. Press the power button to turn on the recorder. The power indicator should light. 5. Install the bezel.
Page 10 AXIS S1032/AXIS S1048 Installation Guide iDRAC Express This product includes the Integrated Dell Remote Access Controller (iDRAC) Express. iDRAC Express can be used to manage, update and deploy servers in large installations. iDRAC allows you to remotely monitor the health of this product in order to discover problems, such as failing hard drives as soon as possible and to avoid system downtime. For more information, go to www.dell.
AXIS S1032/AXIS S1048 Installation Guide Page 11 First install the AXIS S1032/S1048 recorder. Then install AXIS S9001 and start AXIS Camera Station Client. From AXIS S9001, log in to the AXIS Camera Station Server installed in the AXIS S1032/S1048 recorder. It is not recommended to use AXIS S1032/S1048 for accessing video. The preinstalled AXIS Camera Station Client is intended for initial configuration and not for active use.
Page 12 AXIS S1032/AXIS S1048 Installation Guide Physical: AXIS S1032 AXIS S1048 Height 42.8 mm (1.68 inch) 86.8 mm (3.41 inch) Width With rack latches 482.4 mm (18.99 inch) With rack latches 482.4 mm (18.99 inch) Without rack latches 434.0 mm (17.09 inch) Without rack latches 434.0 mm (17.09 inch) Depth (excludes bezel) 607.0 mm (23.9 inch) 646 mm (25.4 inch) Weight 13.6 kg (30.0 lb) 18.9 kg (41.
AXIS S1032/AXIS S1048 Installation Guide Page 13 Relative humidity AXIS S1032 AXIS S1048 Operating 10% to 80% (noncondensing) 10% to 80% (noncondensing) Storage 5% to 95% (noncondensing) 5% to 95% (noncondensing) ENGLISH
Page 14 AXIS S1032/AXIS S1048 Installation Guide Further information For more information about the product visit www.axis.com Visit Axis learning center www.axis.com/academy for useful trainings, webinars, tutorials and guides. Warranty For information about Axis’ product warranty and thereto related information, see www.axis.
AXIS S1032/AXIS S1048 Guide d'installation Page 15 AXIS S1032/AXIS S1048 Guide d'installation Ce guide d’installation explique comment installer l'AXIS Camera Station S1032 Recorder et l'AXIS Camera Station S1048 Recorder. Pour en savoir plus, sur l'utilisation du produit, consultez www.axis.
Page 16 AXIS S1032/AXIS S1048 Guide d’installation Aperçu du matériel - AXIS S1032 Panneau arrière 1 Fente pour carte d'extension PCIe (1) 7 Connecteurs Ethernet (2) 2 Fente pour carte multimédia vFlash (En option) 8 Connecteurs USB (2) 3 Port iDRAC (En option) 9 Connecteur d'identification du système 4 Connecteur série 10 Bouton d'identification du système 5 Fente pour carte d'extension PCIe (2) 11 Alimentation (Bloc d'alimentation 1) 6 Connecteur vidéo 12 Alimentation (Bloc d'alimentation 2)
AXIS S1032/AXIS S1048 Guide d'installation Page 17 Déballage et installation de l'enregistreur Déballez votre système et identifiez chaque élément, reportez-vous au Contenu de l’emballage à la page 15. Assemblez les rails et installez l'enregistreur Axis dans le rack en suivant les instructions de sécurité et les instructions d'installation du rack fournies avec votre système.
Page 18 AXIS S1032/AXIS S1048 Guide d’installation Branchement des câbles - AXIS S1032 Avertissement : Avant d'exécuter une procédure de la présente section, lisez les informations relatives à la sécurité fournies avec votre ordinateur. Pour obtenir des informations supplémentaires, reportez-vous à www.axis.com REMARQUE : Certains périphériques peuvent ne pas être fournis si vous ne les avez pas commandés. 1. Branchez le clavier, la souris et le moniteur.
AXIS S1032/AXIS S1048 Guide d'installation Page 19 3. Fixez les câbles d'alimentation en pliant les câbles d'alimentation système, comme illustré, et fixez-les aux attaches de câbles. Branchez l'autre extrémité des câbles d'alimentation sur une prise électrique mise à la terre ou sur une source d'alimentation distincte comme une alimentation sans interruption (ASI) ou un bloc d'alimentation. 5. Installez le cache. FRANÇAIS 4. Appuyez sur le bouton d'alimentation pour mettre l'enregistreur sous tension.
Page 20 AXIS S1032/AXIS S1048 Guide d’installation Branchement des câbles - AXIS S1048 Avertissement : Avant d'exécuter une procédure de la présente section, lisez les informations relatives à la sécurité fournies avec votre ordinateur. Pour obtenir des informations supplémentaires, reportez-vous à www.axis.com REMARQUE : Certains périphériques peuvent ne pas être fournis si vous ne les avez pas commandés. 1. Branchez le clavier, la souris et le moniteur.
AXIS S1032/AXIS S1048 Guide d'installation Page 21 3. Fixez les câbles d'alimentation en pliant les câbles d'alimentation système, comme illustré, et fixez-les aux attaches de câbles. Branchez l'autre extrémité des câbles d'alimentation sur une prise électrique mise à la terre ou sur une source d'alimentation distincte comme une alimentation sans interruption (ASI) ou un bloc d'alimentation. 5. Installez le cache. FRANÇAIS 4. Appuyez sur le bouton d'alimentation pour mettre l'enregistreur sous tension.
Page 22 AXIS S1032/AXIS S1048 Guide d’installation iDRAC Express Ce produit inclut le contrôleur d'accès distant Dell intégré (iDRAC) Express. iDRAC Express peut être utilisé pour gérer, mettre à jour et déployer des serveurs dans des installations de grande taille. iDRAC vous permet de gérer à distance l'état de ce produit afin de détecter ses problèmes comme les défaillances des disques durs le plus rapidement possible et d'éviter ainsi les pannes du système.
AXIS S1032/AXIS S1048 Guide d'installation Page 23 enregistrements. La carte graphique du terminal de bureau est optimisée pour visualiser une vidéo en direct et enregistrée à partir de plusieurs caméras. Commencez par installer l'enregistreur AXIS S1032/S1048. Installez ensuite AXIS S9001 et lancez AXIS Camera Station Client. À partir de AXIS S9001, connectez-vous à AXIS Camera Station Server installé sur l'enregistreur AXIS S1032/S1048.
Page 24 AXIS S1032/AXIS S1048 Guide d’installation Remarque : La dissipation de la chaleur est calculée par rapport à la puissance nominale de l'alimentation.
AXIS S1032/AXIS S1048 Guide d'installation Stockage Page 25 – 40 °C à 65 °C (– 40 °F à 149 °F) avec une gradation de température maximale de 20 °C par heure – 40 °C à 65 °C (– 40 °F à 149 °F) avec une gradation de température maximale de 20 °C par heure AXIS S1032 AXIS S1048 En fonctionnement 10 % à 80 % (sans condensation) 10 % à 80 % (sans condensation) stockage.
Page 26 AXIS S1032/AXIS S1048 Guide d’installation Informations complémentaires Pour en savoir plus sur l'utilisation le produit, visitez www.axis.com Visitez le centre d'apprentissage en ligne www.axis.com/academy pour en savoir plus sur les formations, les webinaires, les tutoriels et les guides. Garantie Pour plus d'informations à propos de la garantie du produit Axis et des informations s'y rapportant, voir www.axis.
AXIS S1032/AXIS S1048 Installationsanleitung Seite 27 AXIS S1032/AXIS S1048 Installationsanleitung Diese Installationsanleitung enthält Anweisungen zur Installation von AXIS Camera Station S1032 Recorder und AXIS Camera Station S1048 Recorder. Weitere Informationen zur Verwendung des Produkts finden Sie unter www.axis.com. Installationsschritte 1. Übersicht über die Hardware. Siehe Seite 28. 2. Anschließen der Kabel: • AXIS S1032. Siehe Seite 30. • AXIS S1048. Siehe Seite 32. 3. Einrichten der Software.
Seite 28 AXIS S1032/AXIS S1048 Installationsanleitung Hardware-Übersicht – AXIS S1032 Rückseite 1 Steckplatz für PCIe-Erweiterungskarte 1 7 Ethernetanschlüsse (2) 2 Kartensteckplatz für vFlash-Medien (optional) 8 USB-Anschlüsse (2) 3 iDRAC-Port (optional) 9 Systemidentifizierungsanschluss 4 Serieller Anschluss 10 Systemidentifizierungstaste 5 Steckplatz für PCIe-Erweiterungskarte 2 11 Stromversorgung (PSU1) 6 Videoanschluss 12 Stromversorgung (PSU2) Hardware-Übersicht – AXIS S1048 Rückseite 1
AXIS S1032/AXIS S1048 Installationsanleitung Seite 29 Auspacken und Installieren des Recorders Packen Sie Ihr System aus und ermitteln Sie die einzelnen Artikel, siehe Lieferumfang auf Seite 27 Montieren Sie die Schienen und installieren Sie den AXIS Recorder im Rack. Befolgen Sie dabei die mitgelieferten Sicherheitshinweise und Anweisungen zur Rackmontage.
Seite 30 AXIS S1032/AXIS S1048 Installationsanleitung Anschließen der Kabel – AXIS S1032 Warnung: Lesen Sie die Sicherheitsinformationen, die Sie mit dem Computer erhalten haben, bevor Sie die Anweisungen in diesem Abschnitt durchführen. Weitere Informationen finden Sie unter www.axis.com. HINWEIS: Einige Geräte sind nur nach gesonderter Bestellung enthalten. 1. Schließen Sie die Tastatur, die Maus und den Monitor an.
AXIS S1032/AXIS S1048 Installationsanleitung Seite 31 3. Sichern Sie die Netzkabel, indem Sie sie führen wie abgebildet und mit den Kabelbindern sichern. Schließen Sie das andere Ende der Netzkabel an eine geerdete Netzsteckdose oder eine unabhängige Stromquelle an, z. B. an eine unterbrechungsfreie Stromversorgung (USV) oder einen Verteiler (PDU). 4. Drücken Sie die Netztaste, um den Recorder einzuschalten. Der Netzindikator sollte aufleuchten. DEUTSCH 5. Bringen Sie die Blende an.
Seite 32 AXIS S1032/AXIS S1048 Installationsanleitung Anschließen der Kabel – AXIS S1048 Warnung: Lesen Sie die Sicherheitsinformationen, die Sie mit dem Computer erhalten haben, bevor Sie die Anweisungen in diesem Abschnitt durchführen. Weitere Informationen finden Sie unter www.axis.com. HINWEIS: Einige Geräte sind nur nach gesonderter Bestellung enthalten. 1. Schließen Sie die Tastatur, die Maus und den Monitor an.
AXIS S1032/AXIS S1048 Installationsanleitung Seite 33 3. Sichern Sie die Netzkabel, indem Sie sie führen wie abgebildet und mit den Kabelbindern sichern. Schließen Sie das andere Ende der Netzkabel an eine geerdete Netzsteckdose oder eine unabhängige Stromquelle an, z. B. an eine unterbrechungsfreie Stromversorgung (USV) oder einen Verteiler (PDU). 4. Drücken Sie die Netztaste, um den Recorder einzuschalten. Der Netzindikator sollte aufleuchten. DEUTSCH 5. Bringen Sie die Blende an.
Seite 34 AXIS S1032/AXIS S1048 Installationsanleitung iDRAC Express Dieses Produkt enthält den Integrated Dell Remote Access Controller (iDRAC) Express. iDRAC Express kann zum Verwalten, Aktualisieren und Bereitstellen von Servern in großen Installationen verwendet werden. iDRAC ermöglicht die Fernüberwachung der Integrität dieses Produkts, um Probleme, z. B. den Ausfall von Laufwerken, schnellstmöglich zu erkennen und zu beheben. Dies verhindert Ausfallzeiten. Weitere Information finden Sie unter www.
AXIS S1032/AXIS S1048 Installationsanleitung Seite 35 Station Client. Nutzen Sie AXIS S9001 zum Zugriff auf Live- und aufgezeichnete Videos sowie zur Verwaltung von Kameras und Aufzeichnungen. Die Grafikkarte des Desktop-Terminals ist für die Anzeige von Live- und aufgezeichneten Videos von mehreren Kameras optimiert. Installieren Sie zuerst den AXIS S1032/S1048 Recorder. Installieren Sie anschließend AXIS S9001 und starten Sie den AXIS Camera Station Client.
Seite 36 Batterie Knopfzelle AXIS S1032/AXIS S1048 Installationsanleitung Lithium-Knopfzelle (3 V, CR2032) Lithium-Knopfzelle (3 V, CR2032) Hinweis: Die Wärmeableitung wird mithilfe der Nennleistungsaufnahme des Netzteils berechnet. Abmessungen: AXIS S1032 AXIS S1048 Höhe 42,8 mm 86,8 mm Breite 482,4 mm (inkl. Rackverriegelung) 482,4 mm (inkl.
AXIS S1032/AXIS S1048 Installationsanleitung Lagerung -40 °C bis 65 °C mit einer maximalen Temperaturschwankung von 20 °C pro Stunde. Seite 37 -40 °C bis 65 °C mit einer maximalen Temperaturschwankung von 20 °C pro Stunde.
Seite 38 AXIS S1032/AXIS S1048 Installationsanleitung Weitere Informationen Weitere Informationen zu diesem Produkt finden Sie unter www.axis.com. Im Axis Schulungszentrum unter www.axis.com/academy finden Sie nützliche Schulungen, Webinare, Tutorien und Anleitungen. Garantie Weitere Informationen zur Produktgarantie von Axis usw. finden Sie unter www.axis.
AXIS S1032/AXIS S1048 Guida all'installazione Pagina 39 AXIS S1032/AXIS S1048 Guida all'installazione La presente guida contiene istruzioni per l'installazione di AXIS Camera Station S1032 Recorder e AXIS Camera Station S1048 Recorder. Per ulteriori informazioni su come utilizzare il prodotto andare sul sito www.axis.com Procedure di installazione 1. Panoramica dell'hardware. Vedere pagina 40 2. Collegare i cavi: • AXIS S1032. Vedere pagina 42 • AXIS S1048. Vedere pagina 44 3. Installare il software.
Pagina 40 AXIS S1032/AXIS S1048 Guida all'installazione Panoramica dell'hardware: AXIS S1032 Pannello posteriore 1 Slot 1 per scheda di espansione PCIe 7 Connettori Ethernet (2) 2 Slot per scheda supporto vFlash (facoltativo) 8 Connettori USB (2) 3 Porta iDRAC (facoltativo) 9 Connettore identificazione di sistema 4 Connettore di serie 10 Pulsante identificazione di sistema 5 Slot 2 per scheda di espansione PCIe 11 Alimentatore (PSU1) 6 Connettore video 12 Alimentatore (PSU2) Panoramica dell'h
AXIS S1032/AXIS S1048 Guida all'installazione Pagina 41 Spacchettare e installare il registratore Spacchettare il sistema e identificare tutti gli elementi, vedere il contenuto del pacchetto a pagina 39. Assemblare le guide e installare il registratore Axis nel rack seguendo le istruzioni di sicurezza e le istruzioni di installazione del rack fornite con il sistema.
Pagina 42 AXIS S1032/AXIS S1048 Guida all'installazione Collegare i cavi: AXIS S1032 Avviso: prima di iniziare le procedure riportate in questa sezione, leggere le informazioni di sicurezza spedite con il computer. Per ulteriori informazioni, vedere www.axis.com NOTA: alcuni dispositivi potrebbero non essere inclusi se non sono stati ordinati. 1. Collegare la tastiera, il mouse e il monitor. I connettori sul lato posteriore del sistema hanno icone che indicano i cavi da collegare a ogni connettore.
AXIS S1032/AXIS S1048 Guida all'installazione Pagina 43 3. Fissare i cavi di alimentazione piegandoli come illustrato nel disegno e fissarli con le cinghie del cavo. Inserire l'altra estremità dei cavi di alimentazione in una presa elettrica con messa a terra o in una fonte di alimentazione diversa, ad esempio un gruppo di continuità (UPS) o un'unità di distribuzione dell'alimentazione (PDU). 4. Premere il pulsante di alimentazione per accendere il registratore.
Pagina 44 AXIS S1032/AXIS S1048 Guida all'installazione Collegare i cavi: AXIS S1048 Avviso: prima di iniziare le procedure riportate in questa sezione, leggere le informazioni di sicurezza spedite con il computer. Per ulteriori informazioni, vedere www.axis.com NOTA: alcuni dispositivi potrebbero non essere inclusi se non sono stati ordinati. 1. Collegare la tastiera, il mouse e il monitor. I connettori sul lato posteriore del sistema hanno icone che indicano i cavi da collegare a ogni connettore.
AXIS S1032/AXIS S1048 Guida all'installazione Pagina 45 3. Fissare i cavi di alimentazione piegandoli come illustrato nel disegno e fissarli con le cinghie del cavo. Inserire l'altra estremità dei cavi di alimentazione in una presa elettrica con messa a terra o in una fonte di alimentazione diversa, ad esempio un gruppo di continuità (UPS) o un'unità di distribuzione dell'alimentazione (PDU). 4. Premere il pulsante di alimentazione per accendere il registratore.
Pagina 46 AXIS S1032/AXIS S1048 Guida all'installazione iDRAC Express In questo prodotto è incluso Integrated Dell Remote Access Controller (iDRAC) Express. iDRAC Express può essere utilizzato per gestire, aggiornare e distribuire i server in installazioni ampie. iDRAC consente di controllare in modo remoto lo stato di questo prodotto per rilevare problemi, ad esempio errori nel disco fisso, il prima possibile e per evitare tempi di inattività del sistema.
AXIS S1032/AXIS S1048 Guida all'installazione Pagina 47 S9001 per accedere ai video dal vivo e registrati e per gestire le telecamere e le registrazioni. La scheda grafica del terminale desktop è ottimizzata per la visualizzazione di video dal vivo e registrati da più telecamere. Installare prima il registratore AXIS S1032/S1048. Installare quindi AXIS S9001 e avviare AXIS Camera Station Client. Da AXIS S9001, accedere ad AXIS Camera Station Server installato in AXIS S1032/S1048 Recorder.
Pagina 48 AXIS S1032/AXIS S1048 Guida all'installazione Nota: La dissipazione del calore viene calcolata utilizzando la classificazione della potenza dell'alimentazione.
AXIS S1032/AXIS S1048 Guida all'installazione Funzionamento Pagina 49 Funzionamento continuo: Da 10 °C a 35 °C, con umidità relativa dal 10% all'80% con un punto di condensazione massimo di 26 °C. Ridurre la temperatura a bulbo secco massima consentita a 1 °C/ 300 sopra ai 900 m (1°F per 550 piedi). Funzionamento continuo: Da 10 °C a 35 °C, con umidità relativa dal 10% all'80% con un punto di condensazione massimo di 29 °C.
Pagina 50 AXIS S1032/AXIS S1048 Guida all'installazione Ulteriori Informazioni Per ulteriori informazioni sul prodotto andare sul sito www.axis.com Visitare il centro di apprendimento Axis alla pagina www.axis.com/academy per utili servizi di formazione, webinar, tutorial e guide. Garanzia Per informazioni sulla garanzia del prodotto Axis e relative informazioni, consultare la pagina www.axis.
AXIS S1032/AXIS S1048 Guía de instalación Página 51 AXIS S1032/AXIS S1048 Guía de instalación Esta Guía de instalación incluye las instrucciones necesarias para instalar AXIS Camera Station S1032 Recorder y AXIS Camera Station S1048 Recorder. Para obtener información acerca de cómo se utiliza este producto, vaya a www.axis.com Pasos de la instalación 1. Descripción general del hardware. Vea página 52. 2. Conexión de los cables: • AXIS S1032. Vea página 54. • AXIS S1048. Vea página 57. 3.
Página 52 AXIS S1032/AXIS S1048 Guía de instalación Descripción general del hardware - AXIS S1032 Panel posterior 1 Ranura de tarjeta de expansión PCIe 1 7 Conectores Ethernet (2) 2 Ranura para tarjeta de medios vFlash (opcional) 8 Conectores USB (2) 3 Puerto iDRAC (opcional) 9 Conector de identificación de sistema 4 Conector en serie 10 Botón de identificación del sistema 5 Ranura de tarjeta de expansión PCIe 2 11 Fuente de alimentación (PSU1) 6 Conector de vídeo 12 Fuente de alimentación (PS
AXIS S1032/AXIS S1048 Guía de instalación Página 53 Desembale e instale la grabadora Desembale el sistema e identifique cada artículo, vea Contenido del paquete en página 51. Monte los carriles e instale la grabadora AXIS en el bastidor tal y como indican las instrucciones de seguridad y las de instalación del bastidor, suministradas con el sistema.
Página 54 AXIS S1032/AXIS S1048 Guía de instalación Conexión de los cables - AXIS S1032 Advertencia: Antes de iniciar ninguno de los procedimientos de esta sección, lea la información de seguridad suministrada con su ordenador. Para obtener más información, vea www.axis.com NOTA: Puede que no se incluyan algunos dispositivos si no los ha pedido. 1. Conecte el teclado, el ratón y el monitor.
AXIS S1032/AXIS S1048 Guía de instalación Página 55 3. Fije los cables de alimentación doblando los cables de alimentación del sistema, como muestra la ilustración, y enganchándolos con las bridas. Enchufe el otro extremo de los cables de alimentación a una salida de corriente conectada a tierra o a una fuente de alimentación independiente, como un sistema de alimentación ininterrumpida (SAI) o una unidad de distribución eléctrica (PDU). 4. Pulse el botón de alimentación para encender la grabadora.
Página 56 5. Instale el bisel.
AXIS S1032/AXIS S1048 Guía de instalación Página 57 Conexión de los cables - AXIS S1048 Advertencia: Antes de iniciar ninguno de los procedimientos de esta sección, lea la información de seguridad suministrada con su ordenador. Para obtener más información, vea www.axis.com NOTA: Puede que no se incluyan algunos dispositivos si no los ha pedido. 1. Conecte el teclado, el ratón y el monitor.
Página 58 AXIS S1032/AXIS S1048 Guía de instalación 3. Fije los cables de alimentación doblando los cables de alimentación del sistema, como muestra la ilustración, y enganchándolos con las bridas. Enchufe el otro extremo de los cables de alimentación a una salida de corriente conectada a tierra o a una fuente de alimentación independiente, como un sistema de alimentación ininterrumpida (SAI) o una unidad de distribución eléctrica (PDU). 4. Pulse el botón de alimentación para encender la grabadora.
AXIS S1032/AXIS S1048 Guía de instalación Página 59 iDRAC Express Este producto incluye el Controlador de acceso remoto (iDRAC) Express de Dell. El iDRAC Express puede utilizarse para gestionar, actualizar y desplegar servidores en grandes instalaciones. El iDRAC le permite supervisar de forma remota el estado de su producto para poder descubrir problemas como fallos en los discos duros lo antes posible y evitar, así, que el sistema se quede inactivo. Para obtener más información, visite www.dell.
Página 60 AXIS S1032/AXIS S1048 Guía de instalación gestionar las cámaras y las grabaciones. La tarjeta gráfica del terminal de escritorio se ha optimizado para la visualización de vídeos grabados y en directo de múltiples cámaras. Instale primero la grabadora AXIS S1032/S1048. Luego, instale el AXIS S9001 e inicie AXIS Camera Station Client. Desde el AXIS S9001, inicie sesión en el servidor AXIS Camera Station Server instalado en la grabadora AXIS S1032/S1048.
AXIS S1032/AXIS S1048 Guía de instalación Página 61 Nota: La disipación del calor se calcula a partir de la potencia nominal de la fuente de alimentación.
Página 62 Funcionamiento AXIS S1032/AXIS S1048 Guía de instalación Funcionamiento continuo: De 10 °C a 35 °C con una humedad relativa (HR) del 10 % al 80 %, con punto de condensación máx. a 26 °C. Descenso de temperatura seca máxima permitida de 1 °C/300 m por encima de los 900 m (1 °F por 550 pies) para evitar deterioro del funcionamiento. Funcionamiento continuo: De 10 °C a 35 °C con una humedad relativa (HR) del 10 % al 80 %, con punto de condensación máx. a 29 °C.
AXIS S1032/AXIS S1048 Guía de instalación Página 63 Más información Para obtener información acerca de este producto, vaya a www.axis.com Visite el centro de aprendizaje de Axis en www.axis.com/academy/ para consultar guías, tutoriales, seminarios web y cursos que pueden resultarle útiles. Garantía Para obtener más detalles sobre la garantía del producto Axis y la información relacionada con ella, vea www.axis.
Página 64 AXIS S1032/AXIS S1048 Guía de instalación
AXIS S1032/AXIS S1048 インストールガイド 65 AXIS S1032/AXIS S1048 インストールガイド このインストールガイドでは、AXIS Camera Station S1032 Recorder および AXIS Camera Station S1048 Recorder を設置する手順について説明します。製品の使用方法に関する詳細については、 www.axis.com を参照してください。 設置手順 1. ハードウェアの概要。66 ページを参照してください。 2. ケーブルの接続 : ・ AXIS S1032。68 ページを参照してください。 ・ AXIS S1048。70 ページを参照してください。 3. ソフトウェアをセットアップします。72 ページを参照してください。 4. ネットワークを設定します。72 ページを参照してください。 5.
AXIS S1032/AXIS S1048 インストールガイド 66 ハードウェアの概要 - AXIS S1032 バックパネル 1 PCIe 拡張カードスロット 1 7 イーサネットコネクタ ×2 2 vFlash メディアカードスロット ( オプション ) 8 USB コネクタ ×2 3 iDRAC ポート ( オプション ) 9 システム識別コネクタ 4 シリアルコネクタ 10 システム識別ボタン 5 PCIe 拡張カードスロット 2 11 外部電源 (PSU1) 6 ビデオコネクタ 12 外部電源 (PSU2) ハードウェアの概要 - AXIS S1048 バックパネル 4 5 1 2 7 9 8 6 3 10 1 vFlash メディアカードスロット ( オプション ) 7 USB コネクタ ×2 2 iDRAC ポート ( オプション ) 8 システム識別コネクタ 3 PCIe 拡張カードスロット ×3 9 システム識別ボタン 4 シリアルコネクタ 10 外部電源 (PSU2) 5 ビデオコネクタ 11 外部電源 (PSU1)
AXIS S1032/AXIS S1048 インストールガイド 67 レコーダーの取り出しと設置 システムを箱から取り出し、内容を確認します。パッケージの内容については、65 ページを参照 してください。 システムに付属の安全手順書とラック設置手順書に従ってレールを組み立て、ラックにレコー ダーを設置します。 日本語
AXIS S1032/AXIS S1048 インストールガイド 68 ケーブルの接続 - AXIS S1032 警告 : このセクションの手順を実行する前に、ご使用のコンピューターに付属の安全情報をお読 みください。詳細については、www.axis.com を参照してください。 注 : 注文内容によっては、一部のデバイスが付属していない場合があります。 1. キーボード、マウス、モニターを接続します。システム背面の各コネクタには、どのケーブ ルを接続するかを示すアイコンが付いています。モニターのケーブルコネクタのネジがある 場合、しっかりと締めてください。 2.
AXIS S1032/AXIS S1048 インストールガイド 3. 69 システムの電源ケーブルを図のように曲げて固定し、ケーブルストラップを取り付けます。 電源ケーブルのもう一方の端を、アース付コンセント、または無停電電源 (UPS)、配電器 (PDU) などの電源に差し込みます。 4. 電源ボタンを押してレコーダーをオンにします。電源インジケーターが点灯します。 5.
AXIS S1032/AXIS S1048 インストールガイド 70 ケーブルの接続 - AXIS S1048 警告 : このセクションの手順を実行する前に、ご使用のコンピューターに付属の安全情報をお読 みください。詳細については、www.axis.com を参照してください。 注 : 注文内容によっては、一部のデバイスが付属していない場合があります。 1. キーボード、マウス、モニターを接続します。システム背面の各コネクタには、どのケーブ ルを接続するかを示すアイコンが付いています。モニターのケーブルコネクタのネジがある 場合、しっかりと締めてください。 2.
AXIS S1032/AXIS S1048 インストールガイド 3. 71 システムの電源ケーブルを図のように曲げて固定し、ケーブルストラップを取り付けます。 電源ケーブルのもう一方の端を、アース付コンセント、または無停電電源 (UPS)、配電器 (PDU) などの電源に差し込みます。 4. 電源ボタンを押してレコーダーをオンにします。電源インジケーターが点灯します。 5.
AXIS S1032/AXIS S1048 インストールガイド 72 iDRAC Express 本製品には、Integrated Dell Remote Access Controller (iDRAC) Express が付属しています。iDRAC Express は、大規模な設置におけるサーバーの管理、更新、配置に利用できます。iDRAC を使用 して、本製品の健全性をリモート監視し、ハードドライブの故障などの問題を可能な限り速やか に検知して、システムのダウンタイムの発生を防止することができます。詳細については、 www.dell.
AXIS S1032/AXIS S1048 インストールガイド 73 AXIS S1032/S1048 を使用してビデオにアクセスするのはお勧めしません。プリインストールされ ている AXIS Camera Station Client は初期設定用であり、実際の運用を想定していません。 AXIS S1032/AXIS S1048 の仕様 注意 : 以下の仕様は、システムの出荷時にする際に法律により必要とされる項目のみを記載して います。システムの現在のすべての仕様については、 www.axis.
AXIS S1032/AXIS S1048 インストールガイド 74 奥行き ( ベゼルを除く ) 607.0 mm 646 mm 重量 13.6 kg 18.9 kg AXIS S1032 AXIS S1048 連続動作 :10 ~ 35 ℃ ( 相対湿 度 (RH) 10 ~ 80%、最大露点 26 ℃ )。最大許容乾球温度は、 900m 以上では 300m ごとに 1 ℃低下。 連続動作 :10 ~ 35 ℃ ( 相対湿 度 (RH) 10 ~ 80%、最大露点 29 ℃ )。最大許容乾球温度 は、950m 以上では 300m ごと に 1 ℃低下。 注意 : 注意 : 環境仕様 : 温度 動作温度 拡張動作温度範囲と構成 については、 support.dell.com/manuals を 拡張動作温度範囲と構成 については、 support.dell.
AXIS S1032/AXIS S1048 インストールガイド 75 関連情報 製品の詳細については、www.axis.com を参照してください。 Axis ラーニングセンター (www.axis.com/academy/) にアクセスしてください。役に立つトレーニン グ、Web セミナー、チュートリアル、ガイドを用意しています。 保証 Axis の製品保証と関連情報については、www.axis.
AXIS S1032/AXIS S1048 インストールガイド
Installation Guide AXIS Camera Station S1032 Recorder, AXIS Camera Station S1048 Recorder © 2015 Axis Communications AB © 2013 Dell Inc. Ver.2.0 Printed: March 2015 Part No.