8" Bench Grinder User Manual AW8G2 W 2005 AXMINSTER W H I T E Part no: 200214 w w w. a x m i n s t e r. c o .
Index of Contents... Page No. Index of Contents.......................................................................................................................02 Declaration of Conformity....…………………………………................................................. ......03 What’s in the Box.......................................................................................................................04 General Instruction for the 230v Machines.............................................................
Declaration of Conformity... W AXMINSTER W H I T E Copied from E8 05 02 55256 006 The undersigned, L. Geng authorised by Yancheng Baoding Electrical Tools Co., Ltd. No.
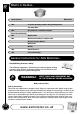
W What’s in the Box... AXMINSTER W H I T E Model Number: 1 No: MD3220HD 8" Grinder Grinding machine with grinding wheels and lamp fitted 2 No. Spark Guards assembled complete Plastic Bag Containing, 2 No. M8 Star Bolts 2 No. M4 Raised Head Bolts complete with M4 Anti Vibration Washer M4 Washers M4 Nut 1 No. Guarantee Card 1 No. Instruction Manual General Instructions for 230v Machines...
General Instructions for 230v Machines... W AXMINSTER W H I T E Work Place/Environment The machine is designed for indoor use, do not use when or where it is liable to get wet. If the tool is to be used outside and it starts to rain (unusual though this would be in U.K.), stop work and move it inside. If tool has got wet; dry it off as soon as possible, with a cloth or paper towel. Do not use 230Va.c.
W AXMINSTER W H I T E Specific Safety Precautions for Grinding Machines... 1. DO NOT operate your machine until it is completely assembled and installed according to the instructions. 2. If you are not familiar with the operation of grinding machines obtain advice from your supervisor or instructor or another qualified person. 3. Only use grinding wheels or attachments rated higher than 3600 rpm with a 5/8" (16mm) arbor on this machine. 4. NEVER use a chipped or cracked wheel.
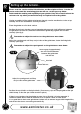
Initial Assembly... W AXMINSTER W H I T E Carefully unpack the machine and all the loose items from the box. Check the contents against the "What’s in the box" list. If any items are missing please contact our technical services department using the telephone numbers that you will find in our catalogue. Having removed all the items from the box, please dispose of your unwanted packaging responsibly. A lot of the packaging is biodegradable. Remove the protective coating from all unpainted parts.
W AXMINSTER W H I T E Setting up the Grinder... Please read the section entitled Identification and Description of Parts, in order for you to understand the terminology that we will use, so that you may better understand the working and capability of your grinder. Keep this manual to hand for reference for any other personnel that may be required to use the grinder. Having assembled all the grinder attachments loosely, now the machine has to be set up correctly and all the attachments securely fastened.
Setting up the Grinder... Carry out a final check e.g. start the machine, check it runs smoothly. On each side, check that the spark guard is adjusted down to the stone, check the gap between the tool rest and the stone is correct, check the stone is not badly deformed (rounded edges, grooved face, etc; unless you have specifically shaped the stone to these profiles) check the eye shield is correctly positioned.
W Identification and Description of the Grinder... AXMINSTER W H I T E Grinding machine Essentially a double ended motor, with a mounting base, the motor flanges mount the wheel guards. The motor base contains the NVR switch and mounts the machine lamp. The base also has four 15mm holes cast into it to facilitate mounting the grinder to a stand or bolting it down to a bench. Wheel guards Two formed metal guards that enclose the grinding wheels. They are each formed in two parts.
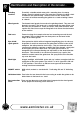
Illustration and Parts Description of the Grinder...
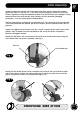
W Changing a grinding wheel... AXMINSTER W H I T E ! ENSURE THAT THE GRINDER IS DISCONNECTED FROM THE MAINS SUPPLY. Undo the nuts and bolts that secure the outer shell of the wheel guard to the inner shell. Remove the outer shell and place it and the nuts, bolts and washers carefully aside. (See figs 6 & 7) Fig 6 Fig 7 Loosen the nut holding the grinding wheel to the shaft. Carefully remove the left handed nut, the plate flange and the soft washer that is clamping the grindstone in place.
Changing a grinding wheel... Reset the spark guards & tool rest for “setting up the grinder” instructions. Reconnect the grinder to the mains supply, give the grinder a 'short burst', by switching it on and off quickly. Check the grinder is not subject to any undue vibration . If the grinder does vibrate, strip it down again and check that the bush (if fitted) is correctly positioned and is the correct size for the stone and the spindle. Check the bore of the stone is correct.
W Parts Breakdown for the Grinder... AXMINSTER W H I T E 14 www.axminster.co.
Parts List for the Grinder...
W AXMINSTER W H I T E Part no. 200214 Axminster Devon EX13 5PH UK FREEPHONE 0800 371822 2005 www.axminster.co.