
Operating instructions


27
Operating Instructions (Overhand Planing)
Note. There is an electronic braking system on your machine, which works by switching
the ‘run’ capacitor. When you stop the machine after it has been running, you will hear a
“click, click” sound as the brake activates, and the motor will slow down quite quickly.
Please be aware that the effectiveness of the braking action is dependent on the ‘run’
capacitor being fully charged; this takes a finite time after the motor has been started.
If you start and then stop the machine very quickly, without allowing sufficient time for
the ‘run’ capacitor to charge fully, the switching occurs (i.e. you will hear the clicking
sound) but there is no apparent braking action.
Additional Note. To carry out the overhand planing operation; the interlocks are set such
that you require the dust extraction hood and the outfeed table fitted correctly.
1.Make sure you have read and fully understood the General Instructions and safety
precautions that are printed in the preceding pages of this manual.
2.Before connecting the machine to the supply; check for obvious signs of damage, paying
particular attention to the plug and the power cable. Rectify or have rectified any damage you
discover. Check the blades are not damaged; that they are clean and sharp. Change the blades if
necessary.
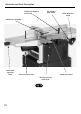
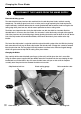
3. Set the thicknessing table to approximately 100mm and insert the dust extraction hood. Raise
the bed so that the hood is held in place and correctly operates the safety microswitch as shown
in figs 1 & 2. Connect up your dust extraction system (if available).
4. Set the fence, leaving sufficient exposed width of planer blades for you to machine the largest
dimension of the workpiece.
5. Check that all accessories, tools etc., which have been used to set the machine up, are
removed and set carefully aside or stowed away correctly.
6. Lower the infeed table to give the required cut, (e.g. maximum to work badly distorted or very
roughly finished timber, minimum to ‘finish’ a fine straight cut off a saw?). Put the workpiece onto
the infeed table and advance to the cutter block, set the upper guard to ‘just’ clear the workpiece,
covering the whole of the exposed part of the cutter block.
7. Check the workpiece. Select the ‘face’. (The first planing operation). Ensure that, if
possible, you are not planing against the grain, and that if the stuff is bent, that the back of the
bow is uppermost.
8. Check (especially on site), that there are no foreign objects e.g. old nails, screws, small
stones etc. embedded in the material you are about to cut.
9. Plug the power cable into a correctly rated switched socket outlet. If extension leads are being
used, check these for damage, do not use if damaged; if you are working outside, check that any
extension cables in use are rated for outside work
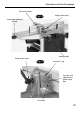
10. Press the start button, allow the machine to run up to speed. Put the workpiece onto the
infeed table and advance over the cutter block, maintain a constant downward pressure on the
stuff whilst feeding, and ‘skip’ your hands over the upper guard when you reach it. Make as
many passes as required to render the stuff flat and straight, let the machine run to a stop. Put
the stuff aside, and if dust extraction has not been available, clear away any chips/shavings
that have built up, particularly in the dust extraction hood.
Continues Over....