
Operating instructions


29
Operating Instructions (Thicknessing)
Additional Note. To carry out the thicknessing operation; the interlocks are set such that
you require the dust extraction hood removed from the thicknessing table void and the
outfeed table removed, (which allows the chip deflecting hood to be swung up and over
the table to act as the cutter block guard as well as the chip deflector).
1. Make sure you have read and fully understood the General Instructions and safety
precautions that are printed in the preceding pages of this manual.
2. Before connecting the machine to the supply; check for obvious signs of damage, paying
particular attention to the plug and the power cable. Rectify or have rectified any damage you
discover.
3. Check the blades are not damaged; that they are clean and sharp. Change the blades if
necessary.
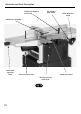
4. Raise the blade guard to its maximum height. Undo the two side clamps and remove the
outfeed table. Lower the thicknesser bed and swing the chip deflection hood up and over the
table.
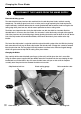
5. Remove the dust extraction pan and, if you are using dust extraction, fit to the deflection hood
(see fig 6).
6. Hold it in place by lowering the Upper blade guard onto it. Connect up your dust extraction.
7. Measure the size of the wood you want to thickness. Set the thicknesser bed to this
dimension against the depth scale on the side of the machine (see fig 6).
8. Press the start button and allow the cutter block to run up to full speed.
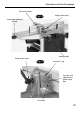
9. Take up the wood and orientate the material so that the ‘marked’ face or edge of the
pre-measured dimension is down, i.e. will be in contact with the thicknessing bed, and you are
not cutting against the grain. Push the material firmly into the machine until the feed roller ‘picks
up’ the material and moves it through the machine.
Move around to the ‘back’ of the machine and take hold of the stuff to prevent it falling to the
floor when the machining pass is complete. Measure the dimension you have just cut and
calculate how much more material you have to remove to reach the required size. Raise the
thicknessing bed for the new cut.
NOTE. One complete turn of the crank handle raises (or lowers) the bed 3mm. Repeat the
process. REMEMBER you will want to ‘clean up’ your marked surface as well (to remove
possible imperfections, e.g. planing ripples, small ‘dips’ that didn’t clean perfectly during
the overhand phase, etc).
10. Continue until you have achieved the correct size, and then reset the bed to machine the
other dimension. Proceed as in 6. above.