
Operating instructions

07
Assembly
Having unpacked your planer/thicknesser (see
below) and its accessories, please dispose of
any unwanted packaging properly. The
cardboard packaging is biodegradable.
Please unpack your new machine and check that all
the components against the “What’s in the Box” list.
Care should be taken when removing the main
assembly of the planer thicknesser from the box, (a)
it is heavy and (b) the motor control and junction
boxes actually protrude below the level of the
cabinet enclosure; they are only plastic….caution.
Likewise the ON/OFF NVR switch assembly are
‘hanging loose’, make sure you do not trap and
damage the cables whilst manoeuvring the machine.
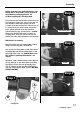
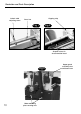
You will require the two supplied M4 x 50mm
Phillips Screws (A) and a screwdriver.
Line up the two fixing holes in the NVR switch
assembly (B) with the pre-drilled holes in the
guard (C) (See steps 1-2) (NOTE Make sure
the socket is pointing downwards, see
step 3).
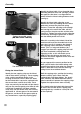
Introduce a M4 x 50mm Phillips screw (A) into
the top hole (b), in the NVR switch assembly
and lightly screw it into the guard (C) (See
step 4). Repeat for the remaining fixing hole,
see step 5 then tighten both screws. (DO NOT
OVER TIGHTEN)
Step 1
B
A
Fixing hole
Pre-drilled holes
Step 2
Step 3
Step 4
C
Socket
b
Continues Over....
NVR Switch, Assembly