
Instruction manual


23
Changing the Sanding Disc
Maintenance
DISCONNECT THE SANDER FROM THE MAINS SUPPLY
!
DISCONNECT THE SANDER FROM THE MAINS SUPPLY
!
Lift the edge of the disc and, gripping firmly, peel the disc away from the plate; turning the plate
as required to free the entire disc.
Remove and throw away. If you have been extremely fortunate all the adhesive will have been
removed with the disc. As this is rarely the case, be prepared to rub, scrape, pick etc., to remove
all the odd patches of adhesive and render the plate CLEAN. Fit the new sanding disc as detailed
in “STEP 5 Sanding Disc and Table Assembly”.
Remove any dust/resin build ups,
and blow the motor clean
Check the condition of the drive
belt is not frayed, worn or loose
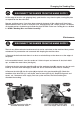
Fig 56
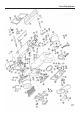
Fig 57
There is very little mechanical maintenance that can be carried out on the machine. Most prudent
maintenance is preventative and concerned with keeping the machine clean.
1. Remove the belt and check there is no dust or resin build up on the drums or at the edges of
the platen.
2. At reasonable intervals, turn the sander on it side to inspect and remove all dust/resin build
ups, and blow the motor clean (See fig 56).
3. Remove the dust extraction moulding (C) and the workstop plate (H), remove any dust or resin
build up and clean them thoroughly to allow the dust to travel over their surfaces smoothly.
4. Remove the table (E), the disc plate (G) and plastic disc guard moulding (F). Check the
condition of the drive belt (a) is not frayed, worn or loose (See fig 57). Replace all guards and
covers, etc., Reconnect to the supply and start up the machine, check that nothing has
disturbed the tracking.
a