EN Installation / User Instructions / Warranty FR Instructions de montage / Mode d'emploi / Garantie ES Instrucciones de montaje / Manejo / Garantía Montreux 16859xx0 Starck 10859xx0 Citterio 39834xx0
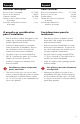
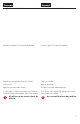
English Technical Information 25⁵⁄₁₆" 24¹¹⁄₁₆" 4⁹⁄₁₆" 3½" 1⁹⁄₁₆" 6⁷⁄₁₆" 2¾" 5¹¹⁄₁₆" 14⅛" ½" NPT 16859xx0 Installation Considerations • Please read over these instructions thoroughly before beginning installation. Make sure that you have all tools and supplies needed to complete the installation. 25" 14³⁄₁₆" 5⁹⁄₁₆" 2¾" 2⅞" 4⅜" 3⁹⁄₁₆" ½" NPT ⅝" 10859xx0 This faucet is for use with cold water only. Do not connect it to the hot water supply.
Français Español Datos tecnicos Données techniques Pression d’eau recommandée Pression d’eau maximum Capacité nominale Dimension du trou dans la surface de montage Profondeur maximale de la surface de montage 15 - 75 PSI 145 PSI 2.2 GPM 1³⁄₁₆ po 1½ po Presión recomendada en servicio Presión en servicio max. Caudal máximo Tamaño del orificio en la superficie de montaje Profundidad máxima de la superficie de montaje 15 - 75 PSI 145 PSI 1.
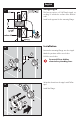
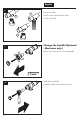
English Roughing-in 1 This faucet requires a ½" NPT male nipple, extending ½" outside the surface of the finished wall. Install stud supports for the mounting flange. Installation 2 Position the mounting flange over the nipple. 3 Mark the positions of the screw holes. Drill the screw holes. Do not drill into hidden electrical or plumbing lines. 2 1 3 Wrap the threads on the nipple with Teflon tape. 1 Install the flange.
Français Español Pièce intérieure Piezas interiores Ce robinet requiert un raccord mâle fileté NPT de ½ po dont une partie de ½ po doit dépasser de la surface du mur fini. Este grifo requiere un niple macho NPT de ½”, que se extienda ½” hacia afuera de la superficie de la pared terminada. Installez les supports de montant pour la bride de fixation. Instale los soportes para espárragos para la brida de montaje. Installation Instalación Placez la bride de fixation sur le raccord fileté.
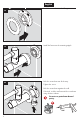
English 4 Install the escutcheon on the flange. 5 Install the faucet on the mounting nipple. 6 Push the escutcheon out of the way. Tighten the screw. Push the escutcheon against the wall. If desired, seal the wall around the escutcheon using silicone sealant. Do not use petroleum based putty.
Français Español Installez l’écusson sur la bride. Instale los escudos en la brida. Installez le robinet sur le raccord de fixation. Instale el grifo en el niple de montaje. Déplacez l’écusson pour faire de l’espace. Saque el escudo. Serrez la vis. Apriete el tornillo. Poussez l’écusson contre le mur. Presione el escudo contra la pared. Si nécessaire, scellez le mur autour de l’écusson à l’aide d’un agent d’étanchéité à base de silicone.
English Remove the aerator. 7 2 1 Turn on the water. Flush the faucet and check for leaks. Turn the water off. 3 Change the handle (Optional - Montreux only) 1 Remove the screw cover, screw, and handle. 3 mm 2 8 Install the new handle. Install the handle screw and screw cover.
Français Español Retirez l’aérateur. Retire el aireador. Ouvrez l’eau. Abra el suministro de agua. Rincez le robinet et vérifiez s’il y a des fuites. Lave el grifo y verifique para asegurarse de que no haya pérdidas. Fermez l’eau. Cierre el suministro de agua. Changement de poignée (Étape optionnelle - Montreux uniquement) Cambiar la manija (Opcional - sólo para Montreux) Retire la tapa del tornillo, el tornillo y la manija. Retirez le cache-vis, la vis et la poignée.
User Instructions / Instructions de service / Manejo Caution: Risk of Injury The pot filler may become hot when the arm is positioned above a hot stove burner. Always push the pot filler away from the burner after use. Attention : Risque de blessure Le robinet remplisseur peut devenir chaud lorsque le bras est placé au-dessus d’un brûleur de cuisinière activé. Éloignez toujours le robinet remplisseur du brûleur après l’utilisation.
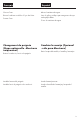
Replacement Parts / Pièces détachées / Repuestos Montreux 16859xx1 88789000 88790000 Starck 10859xx1 88789000 88790000 xx = Colors / Couleurs / Acabados 00 = Chrome 80 = Steel Optik 82 = Brushed Nickel 11
Citterio 39834xx1 88789000 88790000 xx = Colors / Couleurs / Acabados 00 = Chrome 82 = Brushed Nickel 12
Cleaning Recommendation for Hansgrohe Products Modern bathroom faucets, kitchen faucets and shower products are made from different materials to comply with the needs of the market with regard to design and functionality. To avoid damage to the product, it is necessary to take proper care of it. For best results: • Prevent the buildup of mineral scale and /or soap residue by cleaning your Hansgrohe product(s) when needed. • • Select a cleaning agent specifically intended for the type of product.
le chiffon (torchon, éponge) et effectuer comme cela le nettoyage, car les aérosols peuvent pénétrer dans les ouvertures et fentes de la robinetterie et peuvent provoquer des détériorations. • Après le nettoyage rincez avec suffisamment d’eau claire pour éliminer les restes de produits attachés. • L’utilisation d’appareil de nettoyage à vapeur n’est pas autorisée, car les températures importantes peuvent détériorer les produits.
Limited Consumer Warranty This product has been manufactured and tested to the highest quality standards by Hansgrohe, Inc. (“Hansgrohe”). This warranty is limited to Hansgrohe products that are purchased by a consumer in the United States or Canada after March 1, 1996, and installed in either in the United States or in Canada. WHO IS COVERED BY THE WARRANTY This warranty extends to the original purchaser only. This warranty is non-transferable.
EXCLUSIONS AND LIMITATIONS REPAIR OR REPLACEMENT (OR, IN LIMITED CIRCUMSTANCES, REFUND OF THE PURCHASE PRICE) AS PROVIDED UNDER THIS WARRANTY IS THE EXCLUSIVE REMEDY OF THE PURCHASER. HANSGROHE NEITHER ASSUMES NOR AUTHORIZES ANY PERSON TO CREATE FOR IT ANY OTHER OBLIGATION OR LIABILITY IN CONNECTION WITH THIS PRODUCT.