Installation Instructions / Warranty Starck 10930xx1 Citterio 39927xx1 Citterio 39931xx1 Citterio M 34934xx1 Massaud 18934001 Steel 35930801 Uno 38934xx1 Montreux 16833xx1 Montreux 16832xx1 Terrano 37925xx1 Terrano Carlton Carlton Phoenix Phoenix Urquiola 37920xx1 17925xx0 17920xx1 17942xx1 17943xx1 11925xx1
Starck 10930xx1 Citterio 39931xx1 Citterio 39927xx1 Citterio M 34934xx1 Massaud 18934001 Steel 35930801 Uno 38934xx1 Montreux 16833xx1 Montreux 16832xx1
Terrano 37925xx1 Terrano 37920xx1 Carlton 17925xx0 Carlton 17920xx1 Phoenix 17942xx0 Phoenix 17943xx0 Urquiola 11925xx1
Installation Considerations • For best results, Hansgrohe recommends that this unit be installed by a licensed, professional plumber. • Please read over these instructions thoroughly before beginning installation. Make sure that you have all tools and supplies needed to complete the installation. • This trim kit is for use with Quattro Diverter rough 15930181, Trio Stop Diverter rough 15981181, or Trio Diverter 15984181.
Consideraciones para la instalación • Para obtener mejores resultados, Hansgrohe recomienda que la instalación de esta unidad esté a cargo de un plomero profesional matriculado. • Antes de comenzar la instalación, lea estas instrucciones detenidamente. Asegúrese de tener las herramientas y los insumos necesarios para completar la instalación. • Utilice este dispositivo con pieza interior Quattro 15930181, Trio Stop 15981181, o Trio 15984181.
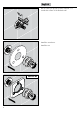
English Installation Cut the plaster shield so that it extends ¹⁄₁₆" outside the surface of the finished wall. (1) Seal the wall around the plaster shield with waterproof sealant. 1. Failure to seal the wall can lead to possible water damage. *S ilik on (2) Install the slip coupling. 2. (1) Cut the slip coupling so that it extends ¹¹⁄₁₆" outside the surface of the finished wall . (2) Install the extension spindle . 1. 2.
Français Español Installation Instalación Coupez le protecteur de façon à ce qu’une partie de ¹⁄₁₆ po soit à l’extérieur de la surface du mur fini. Corte el protector de yeso de modo que sobresalga ¹⁄₁₆" de la superficie de la pared terminada. (1) Scellez le mur autour du protecteur à l’aide d’un agent d’étanchéité. (1) Selle la pared alrededor del protector de yeso con un sellador impermeable. Si le mur n’est pas scellé, l’eau pourrait éventuellement causer des dommages.
English Cut the extension spindle so that it extends ¹³⁄₁₆" outside the surface of the finished wall. Install the escutcheon. Install the nut.
Français Español Coupez la tige d’extension de façon à ce qu’une partie de ¹³⁄₁₆ po soit à l’extérieur de la surface du mur fini. Corte el husillo de extensión de modo que sobresalga ¹³⁄₁₆" de la superficie de la pared terminada. Installez l’écusson. Instale el escudo. Installez l’écrou. Instale la tuerca.
English Montreux Urquiola Massaud 10 Massaud: Install the nut.
Français Massaud : Installez l’écrou. Español Massaud: Instale la tuerca.
English Install the handle Starck / Montreux / Terrano Push the handle onto the shaft. Tighten the screw. Install the screw cover. 3 mm Carlton / Phoenix Push the handle onto the shaft. Tighten the screw.
Français Español Installation de la poignée Instale la manija Starck / Montreux / Terrano Starck / Montreux / Terrano Poussez la poignée sur l’arbre. Coloque la manija a presión en el eje. Serrez la vis. Apriete el tornillo. Installez le cache-vis. Instale la tapa del tornillo. Carlton / Phoenix Carlton / Phoenix Poussez la poignée sur l’arbre. Coloque la manija a presión en el eje. Serrez la vis. Apriete el tornillo.
English Phoenix: Install the screw cover. Citterio M: install the icons on the escutcheon. Steel / Citterio M / Uno Install the snap connector. Install the screw, but tighten it by hand only three turns. Push the handle over the snap connector. Tighten the screw. Install the screw cover.
Français Español Phoenix seulement : Installez le cache-vis. Phoenix únicamente: Instale la tapa del tornillo. Citterio M : Installez les icônes sur l’écusson. Citterio M: Instale los iconos en el escudo. Steel / Citterio M / Uno Steel / Citterio M / Uno Installez le connecteur à encliqueter. Instale el conector a presión. Installez la vis, mais serrez-la à la main en faisant seulement trois tours. Instale el tornillo, pero apriételo a mano sólo tres vueltas.
English Urquiola Citterio / Massaud / Urquiola Install the snap connector. Tighten the screw. Install the handle. Tighten the handle screw. Install the icons. Massaud 2mm *S ili 16 ko n Massaud Urquiola Citterio 2mm Massaud / Urquiola: Seal the wall at the grout lines using waterproof sealant.
Français Español Citterio / Massaud / Urquiola Citterio / Massaud / Urquiola Installez le connecteur à encliqueter. Instale el conector a presión. Serrez la vis. Apriete el tornillo. Installez la poignée. Instale la manija. Serrez la vis. Apriete el tornillo. Installez les icônes. Instale los iconos. Massaud / Urquiola: Scellez le mur sur les lignes des joints à l’aide d’un agent d’étanchéité. Massaud / Urquiola: Selle la pared en las líneas de lechada de cemento con un sellador impermeable.
Replacement Parts / Pièces détachées / Repuestos 6 28 23 57x2 16 30 24 25 29 18 1 19 10 25 4 15 11 32 5 15 7 32 13 31 14 8 30 31 30 18
33 20 3 21 2 17 25 3 17 12 15 26 32 23 22 13x2 13x2 57x2 16 23 28 27 13x2 35 13x2 9 30 17 34 27 15 32 xx = colors / couleurs / acabados 00 = chrome 62 = oil rub bronze 80 = steel 82 = brushed nickel 83 = polished nickel 19
1 Starck handle poignée Starck manija Starck 10993xx1 2 Montreux cross handle poignée croisillon Montreux manija Montreux 16593xx0 3 screw cover cache vis tapón 97987000 4 Carlton lever handle poignée levier Carlton manija Carlton 17993xx1 5 Carlton cross handle poignée croisillon Carlton manija Carlton 17298xx1 6 Steel handle poignée Steel manija Steel 35993xx1 7 Terrano lever handle poignée levier Terrano manija Terrano 37993xx1 8 Terrano cross handle poignée croisillo
Cleaning Recommendation for Hansgrohe Products Modern bathroom faucets, kitchen mixers and showers consist of very different materials to comply with the needs of the market with regard to design and functionality. To avoid damage, it is necessary to consider certain criteria when cleaning. At the cleaning of the fittings and showers, in principle, it must be pointed out: • Only use cleaning material which is explicitly intended for this type of application.
• Pour le nettoyage avec produit vaporisé liquide, en aucun cas sur la robinetterie, mais au contraire aspergé sur le chiffon (torchon, éponge) et effectuer comme cela le nettoyage, car les aérosols peuvent pénétrer dans les ouvertures et fentes de la robinetterie et peuvent provoquer des détériorations. • Après le nettoyage rincez avec suffisamment d’eau claire pour éliminer les restes de produits attachés.
Limited Consumer Warranty This product has been manufactured and tested to the highest quality standards by Hansgrohe, Inc. (“Hansgrohe”). This warranty is limited to Hansgrohe products that are purchased by a consumer in the United States or Canada after March 1, 1996, and installed in either in the United States or in Canada. WHO IS COVERED BY THE WARRANTY This warranty extends to the original purchaser only. This warranty is non-transferable.
When warranty service is completed, any repaired or replacement product or part will be returned to you postage prepaid. EXCLUSIONS AND LIMITATIONS REPAIR OR REPLACEMENT (OR, IN LIMITED CIRCUMSTANCES, REFUND OF THE PURCHASE PRICE) AS PROVIDED UNDER THIS WARRANTY IS THE EXCLUSIVE REMEDY OF THE PURCHASER. HANSGROHE NEITHER ASSUMES NOR AUTHORIZES ANY PERSON TO CREATE FOR IT ANY OTHER OBLIGATION OR LIABILITY IN CONNECTION WITH THIS PRODUCT.