Installation Instructions / Warranty Starck 40871xx1
m m 2 The transformer is certified by CSA for use in the US and Canada. Le transformateur est certifié par la CSA pour l’utilisation aux États-Unis et au Canada. El transformador está certificado por CSA para su uso en Estados Unidos y Canadá.
Installation Considerations • It is the responsibility of the installer to know and follow all applicable local electrical codes and accepted safety practices when installing this unit. • This unit must be installed by a licensed, professional electrician. • Please read over these instructions thoroughly before beginning installation. Make sure that you have all tools and supplies needed to complete the installation. • This light is intended for use indoor use only.
Consideraciones para la instalación • Es responsabilidad del instalador conocer y cumplir con todos los códigos de electricidad locales aplicables y las prácticas de seguridad aceptadas, cuando instala esta unidad. • Para obtener mejores resultados, Hansgrohe recomienda que la instalación de esta unidad esté a cargo de un electricista profesional matriculado. • Antes de comenzar la instalación, lea estas instrucciones detenidamente.
Replacement Parts / Pièces détachées / Repuestos 95585000 95465000 (3.6 W / 0.
English 1 IN: 110 V / 70 - 170 mA – + max. 21 ft. OUT: 12 V DC / 500 mA Cut the electrical power to the installation point at the circuit breaker. 2 2 1 Install the transformer in the wall in an electrical box. It must be in a safe, dry, accessible location. Connect the load and neutral wires to the transformer. Connect the grounding wire to the grounding lug on the electrical box, if so equipped. 3 Be sure that no bare wire is visible after making the connections.
Français Coupez l’électricité du point d’installation au disjoncteur. Connectez les fils sous tension et neutre au transformateur. Connectez le câble du transformateur (fourni) au transformateur. Le fil positif (+) est rouge, et le fil negatif (–) est noir. Español Corte la electricidad para el punto de instalación en el disyuntor. Conecte los cables con corriente y los cables neutrales al transformador. Conecte el cable del transformador (incluido) al transformador.
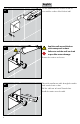
English Cut the 40876180 basic set box so that it is even with the surface of the finished wall. 4 5 Seal the wall around the box with waterproof sealant. ne o Silic Failure to seal the wall can lead to possible water damage. Remove the retainer and screws. Thread the transformer cable through the conduit and into the basic set box. 6 Pull the cable out at least 4" from the box. Install the retainer over the cable. min.
Français Español Coupez le boîtier de l’ensemble de base 40876180 de façon à ce qu’il soit égal avec la surface du mur fini. Corte la caja del juego básico de manera que quede pareja con la superficie de la pared terminada. Scellez le mur autour du boîtier à l’aide d’un agent d’étanchéité. Si le mur n’est pas scellé, l’eau pourrait éventuellement causer des dommages. Retirez la pièce de retenue et les vis. Selle la pared alrededor de la caja con un sellador impermeable.
English Connect the cable to the lamp (1). 7 Push the lamp assembly into the basic set box (2). 1 2 Apply a small amount of waterproof sealant at each grout joint. 8 e on ic Sil Install the screws and washers. 89 Do not overtighten the screws, or damage to the unit may result.
Français Español Connectez le câble à la lampe (1). Conecte el cable a la lámpara (1). Poussez l’assemblage de lampe dans le boîtier de l’ensemble de base (2). Coloque el conjunto de la lámpara en la caja del juego básico (2). Appliquez une petite quantité d’un agent d’étanchéité sur chaque joint de coulis. Aplique una pequeña cantidad de sellador impermeable en cada unión de la lechada de cemento. Installez les vis et les rondelles. Instale los tornillos y las arandelas.
English 10 Install the lamp housing, glass side up. 1 2 Install the housing screws. 11 Tighten the screws using a 2mm Allen wrench. Do not overtighten the screws. Install the screw covers.
Français Español Installez le compartiment de lampe avec le côté en verre placé vers le haut. Instale la tapa de la lámpara, con el vidrio hacia arriba. Installez les vis du compartiment. Serrez les vis à l’aide d’une clé hexagonale de 2 mm. Instale los tornillos del alojamiento. Apriete los tornillos con una llave Allen de 2mm. Installez les cache-vis. Instale las tapas de los tornillos.
Lamp Replacement / Remplacement de la lampe / Reemplazo de la lámpara 1 2 2 mm 2 Cut the power to the installation point at the circuit breaker. Coupez l’électricité du point d’installation au disjoncteur. Corte la electricidad para el punto de instalación en el disyuntor.
Cleaning Recommendation for Hansgrohe Products Modern lavatory faucets, kitchen faucets, and showers consist of very different materials to comply with the needs of the market with regard to design and functionality. To avoid damage and returns, it is necessary to consider certain criteria when cleaning.
Recommandations pour le nettoyage des produits Hansgrohe Les robinetteries modernes de lavabo, de cuisine et de douche utilisent des matériaux très différents pour répondre aux besoins du marché en termes de conception et de fonctionnalité. Certaines règles de base doivent être respectées lors du nettoyage de ces produits afin d’éviter de les endommager ou d’avoir à les retourner.
Recomendación de limpieza para los productos de Hansgrohe Hoy en día, las griferías de baño y de cocina así como duchas modernas se componen de materiales muy distintos para satisfacer las exigencias del mercado respecto al diseño y la funcionalidad. Para evitar daños reclamaciones hay que tener en cuenta ciertos aspectos tanto en el uso como en su limpieza posterior.
Limited Lifetime Consumer Warranty This product has been manufactured and tested to the highest quality standards by Hansgrohe, Inc. (“Hansgrohe”). This warranty is limited to Hansgrohe products which are purchased by a consumer in the United States after March 1, 1996, and installed in either the United States or Canada. WHO IS COVERED BY THE WARRANTY This warranty extends to the original consumer purchaser only. This warranty is non-transferable.
HANSGROHE SHALL NOT BE LIABLE TO PURCHASER OR ANY PERSON FOR ANY INCIDENTAL, SPECIAL, OR CONSEQUENTIAL DAMAGES, ARISING OUT OF BREACH OF THIS WARRANTY OR ANY IMPLIED WARRANTY (INCLUDING MERCHANTABILITY). Some States do not allow the exclusion or limitation of incidental or consequential damages, so the above limitation or exclusion may not apply to you. This warranty gives you specific legal rights, and you may have other rights which vary from State to State.
www.hansgrohe-usa.com US - Installation Instructions • Part No. 90103121 • Revised 06/2010 Hansgrohe, Inc. • 1490 Bluegrass Lakes Parkway • Alpharetta, GA 30004 Tel.