
User's Manual

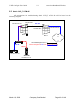
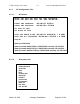
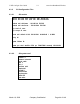
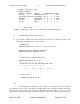
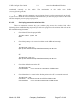
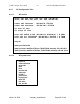
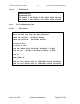
Table Of Contents
- Revision History
- PLEASE READ THESE SAFETY PRECAUTIONS!
- Document Overview
- AB-Access Overview
- AB-Access Reference Model
- Static Configurations
- CLIP_T
- CLIP_S
- Hybrid CLIP_S
- 1483_T
- 1483_S
- Native ATM
- Extender
- RF Design and Planning
- SNMP
- Rupee
- RTFD (Return To Factory Default)
U-NII Config & User Guide 5.2 Axxcelera Broadband Wireless
root@cs1 11:18:51 (9) [~] # route
Kernel IP routing table
Destination Gateway Genmask Flags Metric Ref Use Iface
10.9.144.1 * 255.255.255.255 UH 0 0 0 eth0
192.168.100.0 192.168.2.50 255.255.255.0 UG 0 0 0 atm0
192.168.2.0 * 255.255.255.0 U 0 0 0 atm0
10.9.144.0 * 255.255.255.0 U 0 0 0 eth0
127.0.0.0 * 255.0.0.0 U 0 0 0 lo
• Delete a route
root@cs1 11:20:26 (10) [~] # route del -net 192.168.100.0 netmask 255.255.255.0
4. Check the Switch for the correct PVC’s.
• Log into the ATM switch and check that the PVCs are mapped correctly. The
following commands are for an FVC switch.
• Add a PVC
ADMIN Access_NGI>set pvc add 101 0 34 be 102 0 34 be
Adding PVC i=101/0/34 o=102/0/34 to switch fabrice
Updating FLASH memory. Please wait ... Done.
• Show the PVCs mapped in the switch
ADMIN Access_NGI>show pvc list id 0
------------------------------------------------------------
PVC ID IPort IVPI IVCI BW OPort OVPI OVCI BW
------------------------------------------------------------
1 101 0 34 0 102 0 34 0
• Delete a PVC
ADMIN Access_NGI>set pvc del 1
SU
1. Check all physical connections. The radio is a network device, which means if
you connect it to a PC (NIC) you will use a straight cable. If you connect the radio to a network
device (hub, switch, router) you will use a Ethernet cross-over cable(1-3, 2-6). It is also
important to check that the cable is punched down correctly in the wall box and the cable is
March 10, 2003 Company Confidential Page 46 of 149