
User Manual


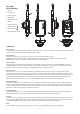
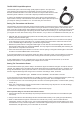


Antenna
Power Button
Volume Control
Shoe Mount
Microphone Output
Reset
Headphone Output
Signal Indicator
Power Indicator
Mini USB Charging Port
①
②
③
④
⑤
⑥
⑦
⑧
⑨
⑩
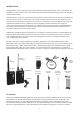
PRO-XRR
RECEIVER (RX)
OPERATION
Power On/Off
Turn on the PRO-XRR by pressing and holding the Power Button
② for 1 second. It may take a few seconds for the transmitter and
receiver to connect and show solid green Signal Indicator ⑨ lights.
Power Indicator
The Power Indicator light
⑨ will change color or blink to show the remaining battery capacity.
GREEN: more than 50% battery remains / ORANGE: between 30-50% battery remains / RED: 10-30% battery remains.
BLINKING RED: Less than 10% battery remains. Charge soon or risk losing audio.
Signal Indicator
When the receiver is paired and communicating with the transmitter, the Signal Indicator
⑧ will be SOLID GREEN. If this light is
FLASHING GREEN, it indicates that the receiver is not connected to the transmitter, or has gone out of range. If this light remains
blinking, the units will have to be paired again. See detailed instructions on pairing on page 7.
Volume Control
Use the Volume Control
③ to increase or decrease the microphone output gain level. A change in headphone level will also
correspond with the change in microphone output gain level. The Volume Control has a total of 6 increments. Each time the unit is
powered on it will start at the default volume setting. There are 2 increments of volume increase available above the default level. To
increase the volume, press the plus (+) button. There are 3 increments of volume decrease available below the default level. To
decrease the volume, press the minus (-) button. Each incremental change in volume corresponds to about 3 dB.
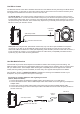
Microphone Output
The Microphone Output
⑤ on the receiver is a 3.5 mm, unbalanced TRS stereo jack that outputs a microphone level audio signal.
Use the included Audio Output Cable to connect the receiver to the mic input of a camera. Additionally, the Audio Output Cable can
be used in tandem with the TRS to TRRS Adapter Cable and/or the iOS Lightning to Headphone Cable to connect the receiver to a
smartphone or tablet. See more about connections on pages 8-9.
Headphone Output
The Headphone Output
⑦ is a 3.5 mm, unbalanced TRS stereo jack that outputs a line level signal that is generally intended for
headphones and earbuds (not included). Use this output to monitor the sound coming from the transmitter.
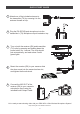
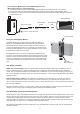
Charging
Charge the receiver by plugging one of the mini ends of the USB dual-charging cable into the receiver’s Mini-USB Charging Port
⑩
and then plug the USB-A end into the included AC adapter (to be plugged into a power socket). During charging the Power Indicator
⑨ will FLASH GREEN; once the battery is full, this light will turn off. Read more about charging on page 10.
Reset
The Reset Button ⑥ acts as an emergency off switch in case the unit’s Power Button ② becomes unresponsive.
6