
User's Manual
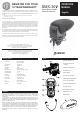

Quick Start Guide
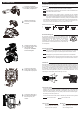
Insert two AA batteries
matching the polarity inside
the battery compartment.
Slide the microphone’s
shoe into your camera’s
shoe slot.
Tighten the thumb wheel
by turning it counter-clock-
wise to secure the
microphone. WARNING:
Do Not Overtighten!
Connect one end of the
audio output cable to the
microphone’s output jack.
Connect the other end of
the audio output cable to
the mic input on your
camera.
The SMX-30V requires AA batteries in order to function. Please install before use.
Power Switch
The microphone is powered off and will not drain the batteries.
The microphone is powered on and will continue to drain the batteries even
when disconnected from a camera.
The microphone will be powered on/off in conjunction with the connected
camera, and will be automatically powered off when disconnected. In order to
work, the AUTO feature requires the connected camera’s MIC input to provide
plug-in power. If the AUTO feature is not working, consult your camera’s manual.
The LED Battery Indicator light illuminates RED continuously to indicate good battery life.
From the time the LED first goes out, about 1 hour of battery life will remain; It is
recommended to change the batteries as soon as possible once this occurs.
Postition of the power switch
OFF BATT AUTO OFF BATT AUTOOFF BATT AUTO
Stereo/Mono Mixing Dial
By turning the mixing dial, you can vary the balance of audio
captured by the stereo microphone and shotgun microphone.
To record only from the stereo microphone, turn the dial fully
counter-clockwise. To record only from the shotgun
microphone, turn the dial fully clockwise. Or set the dial at any
place in-between to create the desired mix of sound from the
two microphones.
STEREO
MONO
Gain Adjustment Switch
Reduces the audio output level by 10 dB. Use this setting if the level going
into your camera is initially too loud. The level reduction occurs before the
microphone’s gain stage so to protect against internal distortion as well.
Disengages the gain adjustment and the output level is left unaffected.
Increases the audio output level by 20 dB. This setting is best for recording
very soft sounds or for optimizing signal-to-noise ratio with DSLR cameras.
-10
0
+20
Shock Mount
When the subject is located near the edge of the visual field, the swivel function in the
mount lets you point the microphone towards the subject without changing the position
of your camera, via a horizontal rotation adjustment of approximately 30 degrees to
the left or right. After attaching your camera to the microphone, rotate the microphone
to the position you like. Attach the cable firmly to one of the notches on the shock
mount to reduce noise produced by contact. For more effective attachment, run the
cable along the shoe adapter before attaching it to a notch.
Windscreen
The Windscreen is designed to
protect against light wind condition
when recording outdoors.
Cable (3.5 mm)
Connect each end of the cable
to the microphone’s output jack
and your camera’s input jack.
Function
MIC
Low-Cut Filter Switch
The low-cut filter switch can be used to help mitigate low-frequency noise when it’s
present in the surrounding environment by reducing the gain of low frequencies
recorded by the microphone. Examples of low-frequency noise include the hum
from a fan, vehicles passing on a busy nearby street, buzz from fluorescent lights,
air blowing from an HVAC system, etc.
The low-cut filter switch has two positions, indicated by a flat line and an angled line.
Low-Cut Filter is OFF Low-Cut Filter is ON