TRIM MOULDING DECK PORCH RAIL PAVERS AZEK Pavers Install Guide Installation Guidelines...........................................................................................................2 Tools Required........................................................................................................................2 Working with AZEK Pavers..................................................................................................3 Installation Instructions - All Applications.......
Installation Guidelines Visit www.azek.com/azek-deck/installation/ to view AZEK installation videos. Installation Guidelines AZEK Pavers should be installed in accordance with the local building codes and the installation guidelines included below. AZEK Building Products, Inc. accepts no liability or responsibility for the improper installation of this product.
Working with AZEK Pavers Extreme Heat Warning Be aware of excessive heat on the surface of AZEK products from external sources, such as but not limited to, fire or reflection of sunlight from energy-efficient window products. Low-emissivity (Low-E) glass can potentially harm AZEK products. Low-E glass is designed to prevent passive heat gain within a structure and can cause unusual heat build-up on exterior surfaces.
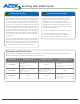
Installation Instructions - All Applications 1 DESIGN, PATTERN & COLOR CHOICE Calculate Square-Footage: Measure the dimensions of the area to be resurfaced and calculate the total square footage. Be sure to add extra to the measured square footage to allow for scrap and to have a few extras on hand in case of future damage. Calculate Amount of AZEK Paver Product Required: A full grid of AZEK Pavers includes a 16.0" x 16.0" grid filled with pavers (4 to 16 pavers depending on their size).
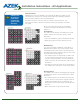
Installation Instructions - All Applications Choose Pattern: IMPORTANT: At least one paver must connect two grids in each direction. AZEK Pavers can be installed in a multitude of different patterns and combinations. Designs can include small and large repeating patterns. Some example patterns are provided below: At least one paver must connect two grids in each direction. The herringbone pattern does this without needing to specially orientate the grids.
8x8, 4x8, and 4x4 Standard Paver Patterns IMPORTANT: At least one paver must connect two grids in each direction. STARTING CORNER Choose Pattern: AZEK Pavers can be installed in a multitude of different patterns and combinations. Designs can include small and large repeating patterns. Some example patterns are provided below: At least one paver must connect two grids in each direction. STARTING CORNER Plain Weave: • 8 x 8 - 57.1% • 4 x 8 - 28.6% • 4 x 4 - 14.
Installation Instructions - All Applications 2 LAYING AZEK PAVERS • Choose your starting point based on the project dimensions and desired look, keeping in mind any cutting that may need to happen. Mix multiple pallets of the same color within an installation to disperse any potential slight variations in shade. • Begin by laying a handful of AZEK’s patented installation grids in the arrangement that matches your pattern to ensure pavers overlap grids in both directions.
Installation Instructions - All Applications 3 CUTTING INDIVIDUAL GRIDS AND PAVERS • Pavers can be cut to any shape using a jigsaw or miter saw, and a low tooth count wood ripping blade. • If using a miter saw, it works best to place the paver on a grid while cutting it. This allows the person cutting the product to both have more support holding the paver and keeps their fingers farther away from the blade. Short, quick motions with a miter saw also work better.
Installation Instructions - Flat Roof IMPORTANT: AZEK Pavers are a luxurious, low-maintenance covering that installs over an existing or new flat roof. AZEK Pavers are not a structural replacement for flat roof surfaces, and are not suited for all flat roof applications. Please consider wind-uplift and fire rating guidelines, along with the weight capacity of the roof when designing a project. Always consult your AZEK Representative for the recommended rooftop adhesion guidelines for your specific project.
Installation Instructions - Flat Roof 1 INSTALL SHEET DRAIN IMPORTANT: Follow drainage mat manufacturers’ installation recommendation 2 • Roll out Sheet Drain with the length of the roll going with the slope of the roof (ensure it is flat and does not curl). • Rows of the Sheet Drain will abut one another. • Offset seams of the grids and seams of the drainage mat for best results. • Cut out the Sheet Drain around roof drains to allow water to escape.
Installation Instructions - Deck Resurfacing Sub-Structure Requirements IMPORTANT: AZEK Pavers are designed to be a deck covering installed over a structural deck surface. AZEK Pavers are NOT a structural replacement for a deck surface, and should NEVER be used as the structural element of the deck. Prior to installing, be sure to verify that the deck can support the addition of AZEK Pavers. • The deck structure must meet and maintain all local codes.
Installation Instructions - Deck Resurfacing Covering Stairs Deck stairs can be covered in a similar fashion as the deck surface, but a few more steps are needed. Screw Grids to the Stair Treads: In all stair applications it is required to fasten the grid to the stair tread with deck screws. • Use 1.5" deck screws. • Screw each grid to the stair tread with four screws, each placed approximately 2" in from the corners.
Installation Instructions - Concrete Resurfacing Sub-Structure Requirements IMPORTANT: Water will flow out underneath the AZEK Paver system. The surface being covered should be sloped appropriately (typically 1 inch every 6 feet). AZEK Pavers are designed to cover an existing hardscape free from major undulations. AZEK Pavers will contour to the surface in which they are resting, and will reflect any imperfections.
Installation Instructions - 1 Non-Permeable Landscape SITE PLANNING AND MARKING Mark Project Area: Once the project layout has been determined, mark or spray paint the overall outline, approximately twelve inches wider than the planned installation area. This will provide the additional excavation area needed for installing edging. Any pavers that abut structures or other paved areas will not require installed edging and therefore do not require the additional twelve inches of excavation.
Installation Instructions - Non-Permeable Landscape IMPORTANT: These are general guidelines only and all base requirements vary by soil conditions, weather conditions, and other site-specific conditions. Areas that see freeze-thaw cycles or have wet, clay or silt type subgrades generally require a deeper base. Consult a landscape professional for more customized base recommendations.
Installation Instructions - 4 Non-Permeable Landscape INSTALL BASE MATERIAL AND SAND BED Install and Compact Base: • Add base material 2" at a time. • Compact each layer completely with a plate compactor or hand tamper. • Compact to 95% proctor density (ASTM D 698). IMPORTANT: Be sure to install base material at the proper slope. This should be approximately 1 inch over 6 feet to ensure sufficient water drainage.
Installation Instructions - 5 Non-Permeable Landscape INSTALL BORDERS AND ACCESSORY PAVERS If the project requires curved or straight borders the accessory pavers can eliminate much of the cutting. These include legless full pavers and wedge pavers. • Draw the shape of the desired border onto the pavers that will need to be cut. Laying the accessory pavers on top of the other pavers and tracing the interior edge is the easiest. A string line may also be used.
Installation Instructions - 7 Non-Permeable Landscape TAMPING PAVERS AND JOINT SAND The final steps to finish up the installation are a combination of tamping and sanding the pavers. This will even out small undulations and lock the pavers into place. Tamp (Compact) Pavers: Prior to sanding the pavers, use a vibratory plate compactor or a hand tamper to work the pavers into the sand bed.
Installation Instructions - 1 Permeable Landscape PERMEABLE BASE MATERIAL Each permeable application is different, and there are multiple considerations that must be taken into account (e.g. amount of rainwater, runoff water from hills and downspouts, soil type, the infiltration rate of the pavers). IMPORTANT: A civil engineer, landscape professional, or local municipality, is recommended to design the appropriate permeable base.
Installation Instructions - 3 Permeable Landscape TAMPING PAVERS AND JOINT FILL The final steps to finish up the installation are tamping and sweeping chip rock between the pavers. This will even out small undulations and lock the pavers into place. • Refer back to page 7 for laying AZEK Pavers. • Refer back to page 17 for borders and edging. Tamp (Compact) Pavers: Prior to sweeping chip rock between the pavers, use a vibratory plate compactor or a hand tamper to work the pavers into the bedding layer.
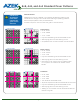
Installing AZEK Resurfacing Bullnose Pavers Resurfacing Bullnose Pavers LEAVE 6.5"-7" OF GRID REMAINING APPLY ADHESIVE GRID 4X8 PAVERS IN DESIRED PATTERN SCREW TABS Corner Assembly BULLNOSE PAVER CUT BULLNOSE PAVER 3 AS SHOWN CUT BULLNOSE PAVER 4 AS SHOWN CUT BULLNOSE PAVER 2 AS SHOWN SUB-STRUCTURE CUT BULLNOSE PAVER 1 AS SHOWN LEAVE 6.
Installing AZEK Resurfacing Transition Pavers Resurfacing Transition Pavers GRID APPLY ADHESIVE 4X8 PAVERS IN DESIRED PATTERN SCREW TABS TRANSITION PAVER Corner Assembly SUB-STRUCTURE CUT TRANSITION PAVER 2 AS SHOWN CUT TRANSITION PAVER 1 AS SHOWN TRANSITION PAVER TRANSITION PAVER TO BE FULLY SUPPORTED BY SUB-STRUCTURE 45° GRID SUB-STRUCTURE TRANSITION PAVER SCREW TAB 4X8 PAVERS IN DESIRED PATTERN APPLY ADHESIVE IMPORTANT: • For best results, a stainless steel #8 screw with a flat head design
Notes Page 23
AZEK Building Products, Inc. 888 North Keyser Avenue • Scranton, PA 18504 www.AZEK.