
Operating instructions


Aztec ADS430 | Optical dissolved oxygen probe | OI/ADS430–EN Rev. A 5
3 Installation
3.1 Siting
3.2 Probe dimensions
3.3 Storing the sensor cap
3.4 Fitting the sensor cap
1. Remove the probe assembly from the box.
Referring to Fig. 3.3:
2. Unscrew shroud
A from probe body B and remove dust
cover
C from probe tip D.
Retain the dust cover for later use.
3. Remove sensor cap
E from it’s sealed storage sleeve.
4. Align arrow
G on sensor cap E with index mark H on
the probe.
5. Slide sensor cap
E over probe tip D firmly until it seals
over O-rings
F – do not twist the cap.
6. Refit shroud
A by screwing it onto probe body B.
Ensure O-ring is fitted.
Fig. 3.1 Siting the sensor
Dimensions in mm (in.).
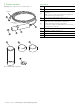
Fig. 3.2 Probe dimensions
IMPORTANT (NOTE) Prior to installation, the
sensor cap (see Fig. 2.1, page 4) must remain stored
in the sealed factory-supplied sleeve.
IMPORTANT (NOTE)
— Do not allow moisture or atmospheric humidity
inside sensor cap
E. Keep it in the sealed
sleeve until it is ready to be installed. Ensure the
2 O-ring grooves on the probe are dry and
O-rings
F are not rolled or pinched when
the cap is fitted.
— The sensor cap lifetime is 2-years after the first
reading has been taken. Install by the date
printed on the package.
210 m
(64 ft.)
Max.
203
(8)
57
(2.27)
47 (1.85)
IMPORTANT (NOTE) When fitting the sensor cap,
DO NOT touch the cap end.
Fig. 3.3 Fitting the sensor cap