Web Interface User’s Guide ADSL Ethernet & USB Combo Router
1. 2. 3. 4. 5. 6. Introduction ............................................................................................................................. 3 1.1 Features ......................................................................................................................... 3 Your gateway at a glance ....................................................................................................... 5 2.1 Ports and buttons ............................................................
1. Introduction The ADSL Ethernet & USB Combo Router is the perfect high-speed WAN bridge/router. This fullfeatured product is specifically designed to connect to the Internet and directly connect to your local area network via high speed 10/100 Mbps Ethernet. The ADSL Router has also full NAT firewall and DMZ services to block unwanted users from accessing your network. For game users, the ADSL Router had already pre configured for several low latency game ports.
Management Support • • • • • • • Web Based HTTP management GUI TFTP/FTP Support for Firmware Upgrade Web Based Firmware Upgrade (Local) Soft Factory Reset Button via Web GUI Diagnostic Test (DSL, OAM, Network, Ping Test) Telnet/CLI (Read Only) Syslog Support Security Support • • • • • NAT for basic Firewall support Packet Filtering Firewall Support Stateful Packet Inspection Support Protection against Denial of Service attacks Password Authentication to Modem External Connectors: • • • • • 1 x RJ-11 T
2. Your gateway at a glance The ADSL Ethernet & USB Combo may have different ports and LEDs. Let’s take a look at the different options. Depending upon your model, it may have some or all of the features listed below 2.1 Ports and buttons Reset and Restore to Factory Defaults: The restore to factory defaults feature will set the ADSL Router to its factory default configuration by resetting the ADSL Router.
3. Installing your ADSL Router 1. Locate an optimum location for the ADSL Router. 2. For connections to the Ethernet and DSL interfaces, please refer to the easy start guide. 3. Connect the AC Power Adapter. Depending upon the type of network, you may want to put the power supply on an uninterruptible supply. Only use the power adapter supplied with the ADSL Router. A different adapter may damage the product.
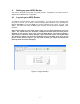
4. Setting up your ADSL Router This section will guide you through your ADSL Router’s configuration. The ADSL Router is shipped with a standard PPP configuration. 4.1 Log into your ADSL Router To configure your ADSL Router, open your web browser. You may get an error message at this point; this is normal. Do not panic!. Continue following these directions. Type the default IP address (192.168.1.1) Press the Enter key and the following screen, shown in Figure 1 will appear.
4.2 Quick Start The first screen (Figure 2) that appears (after the log in screen) is the Quick Start screen. By default the ADSL Router has being configured to PPP connection and user would only need to enter the username and password (as specified by the local ISP) to make connection to the internet. The Quick Start page is meant for basic users whom only require easy and seamless connectivity to the internet without worrying about any other advance configuration setting.
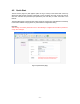
4.3 Setup (for advance user) From this screen the user can setup the ADSL Router (configure the LAN and WAN connection(s), configure the advanced configuration options within the ADSL Router (security, routing, and filtering), access tools that are helpful for debug purposes, obtain the status of the modem, and view the extensive online help. To setup your ADSL Router with a basic configuration, select Setup. Figure 3 illustrates the setup page.
4.4 Configuring the WAN Before the gateway will pass any data between the LAN interface(s) and the WAN interface, the WAN side of the modem must be configured.
Figure 4 (Bridge Connection Setup) To complete the connection you must now click the apply button. The apply button will temporarily save this connection. To make the change permanent, you need to click on Save Settings. At the system commands page, click on Save All. 4.4.1.2 PPPoA Connection Setup PPPoA is also known as RFC 2364. It is a method of encapsulating PPP packets over ATM cells which are carried over the DSL line.
Following is a description of the different options: a. Username: The username for the PPPoA access; this is provided by your DSL service provider or your ISP. b. Password: The password for the PPPoA access; this is provided by your DSL service provider or your ISP. c. On-Demand: Enables on-demand mode. The connection will disconnect if no activity is detected after the specified idle timeout value. d.
4.4.1.3 PPPoE Connection Setup PPPoE is also known as RFC 2516. It is a method of encapsulating PPP packets over Ethernet. PPP or Point-to-Point protocol is a method of establishing a network connection/session between network hosts. It usually provides a mechanism of authenticating users. To configure the gateway for PPPoE, click on Setup and then click on New Connection. The default PPPoE connection setup is displayed.
Figure 6 (PPPOE Connection Setup) To complete the connection you must now click the apply button. The apply button will temporarily save this connection. To make the change permanent you need to click on Save Setting (at the side of the page). At the system commands page, click on Save All. 4.4.1.4 DHCP Connection Setup Dynamic Host Configuration Protocol (DHCP) allows the ADSL Router to automatically obtain the IP address from the server.
Figure 7 (DHCP Connection Setup) To complete the connection you must now click the apply button. The apply button will temporarily save this connection. To make the change permanent you need to click on Save Settings (at the side of the page). At the system commands page, click on Save All. 4.4.1.5 Static Connection Setup Static is used whenever a known static IP is assigned. The accompanying information such as the Subnet mask and the gateway should also be specified.
Figure 8 (Static IP Connection Setup) To complete the connection you must now click the apply button. The apply button will temporarily save this connection. To make the change permanent you need to click on Save Settings (at the side of the page). At the system commands page, click on Save All. 4.4.1.
Figure 9 (CLIP Connection Setup) To complete the connection you must now click the apply button. The apply button will temporarily save this connection. To make the change permanent you need to click on Save Settings (at the side of the page). At the system commands page, click on Save All. 4.4.2 Modify an Existing Connection To modify an existing connection, click setup and then click the connection you want to modify.
4.5 Configuring the LAN By default, your ADSL Router has DHCP server (LAN side) enabled. If you already have a DHCP server running on your network, you must disable one of the two DHCP servers; if you plug a second DHCP server into the network, you will experience network errors and the network will not function normally. 4.5.1 Enable/Disable DHCP To enable or disable DHCP, Click setup. Under LAN Setup, select DHCP Configuration. This will bring up the screen shown in Figure 10.
Figure 10 (DHCP Server configuration) In addition to the DHCP server feature, the ADSL Router supports the DHCP relay function. When the ADSL Router is configured as DHCP server, it assigns the IP addresses to the LAN clients. When the ADSL Router is configured as DHCP relay, it is responsible for forwarding the requests and responses negotiating between the DHCP clients and the server. See figure 11.
By turning off the DHCP server and relay the network administrator must carefully configure the IP address, Subnet Mask and DNS settings of every computer on your network. Do not assign the same IP address to more than one computer and your ADSL Router must be on the same subnet as all the other computers. The apply button will temporarily save this connection. To make the change permanent you need to click on Save Settings (at the side of the page). At the system commands page, click on Save All. 4.5.
Figure 12 (Management IP address) The apply button will temporarily save this connection. To make the change permanent you need to click on Save Settings (at the side of the page). At the system commands page, click on Save All. 4.5.3 Firewall/NAT Services You can enable or disable Firewall and NAT by clicking on Setup and under LAN Setup, select Firewall/NAT Services. By unselecting the “Enable Firewall and NAT Services” button the firewall and NAT services is disabled for all WAN connections.
4.6.1 UPnP UPnP NAT and Firewall Traversal allow traffic to pass-thru the ADSL Router for applications using the UPnP protocol. This feature requires one active DSL connection. In presence of multiple DSL connections, select the one over which the incoming traffic will be present, for example the default Internet connection. To enable UPnP, you must first have a WAN connection configured. Once a WAN connection is configured, click Advanced and under Advanced, select UPnP.
4.6.2 Port Forwarding Using the Port Forwarding page, you can provide local services (for example web hosting) for people on the Internet or play Internet games. When users send this type of request to your network via the Internet, the ADSL Router will forward those requests to the appropriate PC. Port forwarding can be used with DHCP assigned addresses but remember that a DHCP address is dynamic (not static).
4.6.3 Advanced Security In the presence of the firewall, anonymous Internet traffic is blocked. Using the advanced security features, you can redirect this traffic to a dedicated computer on your local network (DMZ) or open the access from the Internet to the ADSL Router's management ports (web, telnet).
4.6.3.2 Enable Web from WAN Enabling the Web from WAN on your local network allows Web requests that come from the Internet to be re-routed to a Web Server that is on a different subnet. This is different that the Web server rule that is configurable via the port-forwarding page. In this case, the web server is on a different subnet. 4.6.3.
4.6.6 MAC Address Filters The MAC filtering mechanism provides a way for the users to define rules to allow/deny frames through the bridge based on source MAC address, destination MAC address and/or frame type. When bridge filtering is enabled, each frame is examined against the defined filter rules sequentially, and when a matched is determined, the appropriate filtering action (determined by the access type selected ... i.e. allow or deny) is performed.
Note: The MAC filter table contains 3 hidden rules. These rules are entered automatically by the system to ensure the user does not "lock" them out of the system. The first rule allows any and all ARP frames through the system. The second rule allows all IPv4 frames with the destination MAC address of the bridge to go through. The third rule allows all IPv4 frames with the source MAC address of the bridge to go through.
The apply button will temporarily save this connection. To make the change permanent you need to click on Save Settings (at the side of the page). At the system commands page, click on Save All. 4.6.8 Static Routing If the ADSL Router is connected to more than one network, you may need to set up a static route between them. A static route is a pre-defined pathway that network information must travel to reach a specific host or network.
4.6.9 Dynamic Routing Dynamic Routing allows the ADSL Router to automatically adjust to physical changes in the network. The ADSL Router, using the RIP protocol, determines the network packets’ route based on the fewest number of hops between the source and the destination. The RIP protocol regularly broadcasts routing information to other ADSL Routers on the network. The Direction determines the direction that RIP routes will be updated.
4.7 Tools The ADSL Router supports a host of tools that will allow you to customize and debug your ADSL Router. 4.7.1 System Commands To make the changes permanent you need to click on Tools (at the top of the page) and select System Commands. The following commands are used to configure the gateway: a. Save all: Press this button in order to permanently save the current configuration of the ADSL Router.
Figure 19 (Update Firmware) 4.7.4 Ping Test Once you have your ADSL Router configured, it is a good idea to make sure you can ping the network. You can get to the Ping page under the Tools title, by clicking on Ping Test. Type the target address that you want to ping. If you have your PC connected to the ADSL Router via the default DHCP configuration, you should be able to Ping the network address 192.168.1.1. If your ISP has provided their server address you can try to ping the address.
Figure 20 (Ping test) 4.7.5 Modem Test The Modem Test is used to check whether your ADSL Router is properly connected to the WAN Network. This test may take a few seconds to complete. To perform the test, select your connection from the list and press the Test button. Before running this test, make sure you have a valid DSL link; if the DSL link is not connected, this test will always fail. Also the DSLAM must support this feature; not all DSLAMs have F4 and F5 support. 4.
4.8.3 DHCP Clients Select to view the list of DHCP clients. 4.8.4 Modem Status Select to view the Status and Statistics of your broadband (DSL) connection. 4.8.5 Product Information You can display the ADSL Router’s driver and run-time information by going under Status title and click on Product Information. Figure 21 illustrates the typical product information, which is provided. Figure 21 (Product Information) 4.8.
5. Appendix A: Troubleshooting Below is a list of commonly asked questions. Before calling technical support, please look through these issues to see if they help to solve your problem. 5.1 The ADSL Router is not functional 1. 2. 3. 4. 5. 6. 7. 8. 9. 5.2 Check to see that the power LED is green and than the network cables are installed correctly. Refer to the easy start guide for more details. Check to see that the ETH/LAN and PPP/WAN LEDs are green.
5.3 The DSL Link LED continues to blink but does not go solid 1. This means that the DSL line is trying to train but for some reason it cannot establish a valid connection. The main cause of this is that you are too far away from the central office. Contact your DSL service provider for further assistance. 2. Verify that the phone line is connected directly to the wall and to the line input on the ADSL Router. 3.
6. ADSL Router terms What is a firewall? A firewall is protection between the Internet and your local network. It acts similarly to the firewall in your car, protecting the interior of the car from the engine. Your car's firewall has very small opening that allow desired connections from the engine into the cabin (gas pedal connection, etc), but if something happens to your engine, you are protected. The firewall in the ADSL Router is very similar.