
User Manual


Originally appeared in Spectrum Monitor
May, 2016
Radio Astronomy by Stan Nelson
Revisiting Radio Jove with a Low Cost Computer
Jupiter has been known for many years to generate radio emissions generally in the 20 MHz
range. They are caused by the interaction of Jupiter and its moons. They were discovered in the
1950s and are known to produce a variety of spectrum patterns called L (long) and S (short)
waves. To successfully detect Jupiter requires a good antenna gain and a sensitive receiver
without any AGC (automatic gain antenna.) The Radio Jove project has been around for several
years and is an excellent way to explore the radio astronomy hobby on a budget. Since the Radio
Jove receiver is a project designed for use in schools, the kit is relatively easy to assemble with
good soldering skills. The kit and other resources are available at the Radio Jove site:
http://radiojove.gsfc.nasa.gov/. A good source of details on the Radio Jove receiver and other
projects is covered in a book by Steven Arnold titled ‘Getting Started in Radio Astronomy’,
published by Springer.
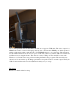
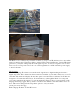
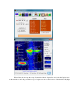
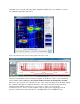
I have written about the Radio Jove receiver in past columns and have monitored the 20.1 MHz
frequency using the Radio Jove kit. I had detected several solar storms with it but I never
knowingly recorded any Jovian storms using the twin-dipole kit. The antenna took up backyard
space and I had discarded it after a year or so. Since then, I have installed a LWA designed
antenna which operates between 20 to 80 MHz with 35 dB gain preamps. I decided to hook up
the Radio Jove radio recently and try recording the Jupiter’s signals using Skypipe II. The setup
is straightforward.
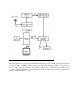
The PC
Since I monitor a number of frequencies with numerous PCs the electric bill tends to climb. I
started looking for low cost PCs that would allow me to overcome using the old power hungry
desktops. I recently saw an advertisement for the Azulle Quantum Access Mini PC Stick with
Windows 8.1, Intel Atom Z3735F, and 2GB RAM+32GB storage. I ordered one since it offered
a fairly small footprint and power requirements. The power supply is rated at 5 volts and 2 amps.
Hooking up the Mini PC was easy but I found it somewhat inconvenient to plug it into a HDMI
TV port. That may be a problem for some monitors. I used a DVI to HDMI adaptor and later
added a short HDMI extension cable to allow the mini-PC to be moved around.. There is only
one USB port so I used a powered USB hub to connect a keyboard and a mouse. The audio is set
up to feed through the HDMI port to the TV. There is no microphone or line input to input to the
software. I used an audio-microphone USB sound card by Syber SD-AUD20101 to feed the
audio from the Radio Jove.