
Manual


Table Of Contents
- Use & Care Manual
- Refrigerators Beverage Centers Wine Centers
- Table of Contents
- Page
- For your safety, read all instructions carefully before operating the appliance.
- DANGER: When using an electrical appliance, basic precautions should always be followed to reduce the risk of fire, electric shock, and injury to persons.
- Locate the unit away from direct sunlight and sources of heat (stove, heater, radiator, etc.).
- Save These Instructions
- Disposal of Old Appliance
- Dispose of your appliance packaging properly.
- Refrigeration equipment must be properly disposed of in a way which protects the environment. This applies to your old appliance and to your new unit once it has reached the end of its service life.
- Limited Warranty
- Limited Warranty (continued)
- IMPROPER USE: Azure assumes no liability for component failure or other damages resulting from improper usage or installation or failure to clean and/or maintain the product as set forth in the warranty packet provided with the product. This limited w...
- Installation Instructions
- Before Using Your Azure Appliance
- Installation of Your Appliance
- Installation Instructions (continued)
- Built-in Cabinet Instructions
- Installation Instructions (continued)
- Attention
- Check that the voltage marked on the product corresponds with your supply voltage.
- This appliance requires a standard 115/120 Volt AC~60Hz electrical ground outlet with three pins. Have the wall outlet and circuit checked by a qualified electrician to make sure the outlet is properly grounded. When a standard two-pin wall outlet is ...
- To prevent accidental injury, the cord should be secured behind the appliance and not left exposed or dangling.
- Installation Instructions (continued)
- Note: All parts removed must be saved to do the reinstallation of door
- How to Install and Adjust the Bottom Vent
- How to Install an Overlay Panel
- Setting a Temperature
- Setting the Temperature Control for your Wine Center
- Model Numbers: A115WC-S; A115WC-O; A124WC-S; A124WC-O
- Setting the Temperature Control for your Beverage Center and Refrigerator
- Model Numbers: A115BEV-S; A115BEV-O; A115R-S; A115R-O; A124BEV-S; A124BEV-O; A124R-S; A124R-O
- Key Lock
- Shelves
- Defrosting
- Storage
- Many bottles may differ in size and dimensions. As such the actual number of bottles you may be able to store may vary.
- Care and Maintenance
- Cleaning Your Azure Appliance
- Power Failure
- Vacation Time
- Moving Your Wine Center
- Energy Saving Tips
- Troubleshooting Guide
- Parts Listing
- A115WC-O
- Parts Listing
- Parts Listing
- Parts Listing
- Parts Listing
- Parts Listing
- Parts Listing
- Parts Listing
10
Installation Instructions (continued)
Built-in Cabinet Instructions
These units are designed for either built-in, or free standing installation. To use this unit in a built-in application
follow the dimensions listed below.
Model Numbers to Reference in Charts Below:
• 15” Models:
o Wine Centers: A115WC-S; A115WC-O
o Beverage Centers: A115BEV-S; A115BEV-O
o Refrigerators: A115R-S; A115R-O
• 24” Models:
o Wine Centers: A124WC-S; A124WC-O
o Beverage Centers: A124BEV-S; A124BEV-O
o Refrigerators: A124R-S; A124R-O
Product Dimensions
Model Size
Height
Width
Depth
Depth w/ Handle
15"
32" - 34-1/2"
14-5/8"
22-1/2"
24"
24"
32" - 34-1/2"
23-1/2"
22-1/2"
24"
Product Dimensions represent the actual size of the appliance
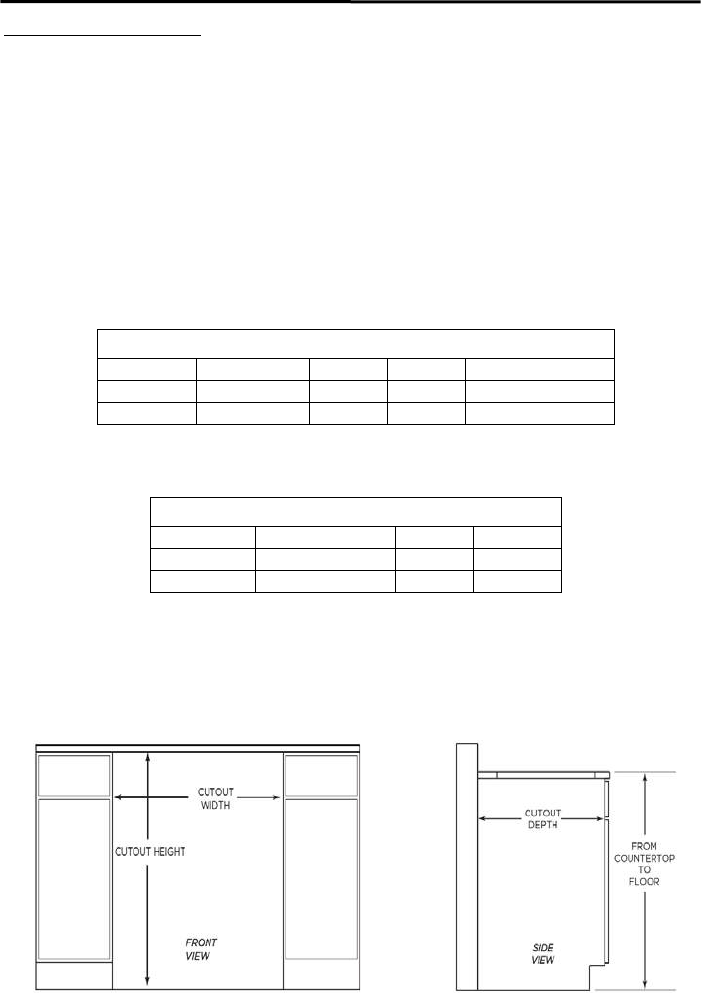
Cutout Dimensions for Cabinet
Model Size
Height
Width
Depth
15"
32-1/8" - 34-5/8"
14-3/4"
22-5/8"
24"
32-1/8" - 34-5/8"
23-5/8"
22-5/8"
Cutout Dimensions represent the opening dimensions needed for the appliance to fit into a built-in installation.
See diagrams below for reference.
***Important Note for Overlay Units – Adding an overlay panel will increase the cutout width of your
cabinet. The additional cutout width should be equal to that of the thickness of the panel itself***
Cutout Diagrams