Five Port Expandable Smart Switch Model 232XS5 Document No. 232XS53800 This product designed and manufactured in Ottawa, Illinois USA of domestic and imported parts by International Headquarters B&B Electronics Mfg. Co. Inc. 707 Dayton Road -- P.O. Box 1040 -- Ottawa, IL 61350 USA Phone 815-433-5100 -- General Fax 815-433-5105 Home Page: www.bb-elec.com Orders e-mail: orders@bb-elec.com -- Fax 815-433-5109 Technical Support e-mail: support@bb.elec.
2000 B&B Electronics . No part of this publication may be reproduced or transmitted in any form or by any means, electronic or mechanical, including photography, recording, or any information storage and retrieval system without written consent. Information in this manual is subject to change without notice, and does not represent a commitment on the part of B&B Electronics.
TABLE OF CONTENTS Chapter 1: INTRODUCTION ................................................... 1 Checklist ..................................................................................... 2 Specifications.............................................................................. 2 Chapter 2: SETUP .................................................................... 3 Port Configuration....................................................................... 4 Serial Data Configuration..................
Chapter 1: INTRODUCTION The RS-232 Five Port Expandable Smart Switch, Model 232XS5, allows one RS-232 host device to connect to as many as five RS-232 devices. The switch can be controlled in three different ways. The first way is referred to as smart switch mode or code activated switch mode. In this mode, the switch is controlled by sending a programmable preamble code to the "Master" port of the 232XS5. The second way the switch can be controlled is referred to as port combiner mode.
There are five LED's on the 232XS5 to indicate which port is connected to the master port. The master port has a DB-9S female connector and the slave ports have DB-9P male connectors. The 232XS5 requires 12Vdc at 100ma. which is provided through a 2.5mm power jack. Checklist Examine the shipping carton and contents for physical damage. If damage is found, file a claim with the shipper immediately. The following equipment should be in the shipping carton: 1. RS-232 Smart Switch 2. Instruction Manual 3.
Chapter 2: SETUP The 232XS5 is set up using an eight-position dipswitch and a three-position set of jumpers. This dipswitch is used to set the communication format, port configuration and expansion switch address. The jumpers are used to set the smart switch/port combiner mode, to enable/disable the enhanced features and to enable/disable Expander mode. To change the settings on the switch, remove the power from the unit, and remove the screws (4) from the bottom of the 232XS5.
Table 2. Mode Setup Jumper JP6 A B C Setting ON X X Enhanced Disabled * OFF X X Enhanced Enabled X ON X Smart Switch * X OFF ON Expansion X X ON Combiner Disabled * X ON OFF Combiner Enabled On = Jumper Installed Off = Jumper Removed X = DON'T CARE * = FACTORY DEFAULT Port Configuration In order to determine the proper port configuration of the 232XS5, it is necessary to have a basic understanding of the terms DCE and DTE.
Table 3. DCE MASTER PORT CHART Master Port A,B,C,D & E Ports (DCE) Signal (DTE) Pin# Direction Description Pin# Direction 3 Input Transmit Data (TD) 3 Output 2 Output Receive Data (RD) 2 Input 7 Input Request to Send (RTS) 7 Output 8 Output Clear to Send (CTS) 8 Input 4 Input Data Terminal Ready (DTR) 4 Output 6 Output Data Set Ready (DSR) 6 Input 1 Output Data Carrier Detect (DCD) 1 Input 5 <-------> Signal Ground (SG) 5 <-----> Table 4.
Serial Data Configuration In order for the host device that is connected to the master port to select any of the five ports, the Smart Switch must be set to match the host's communication format. Dipswitch “SW1” is used to select the communication format of the Smart Switch. Switch positions 1 through 3 select the baud rate. Switch position 4 selects 7 or 8 data bits. Switch position 5 determines if parity is enabled or disabled. NOTE: A data format of 7 data bits, no parity and one stop is not allowed.
Chapter 3: Smart Switch Operation Smart Switch mode is selected when jumper “JP6-B” is ON (installed). In Smart Switch mode, the 232XS5 is constantly looking for the three character preamble code by monitoring the data that is being received on the master port from the host device. The 232XS5 requires a three character preamble code to turn on and off a port. The first character must be the ASCII escape character (decimal 27). The second character is user programmable by setting dipswitch “SW2”.
Programming the Second Character The second character comes programmed as the ASCII STX character (decimal 2). You can change this to any 8-bit character you wish by reprogramming dipswitch “SW2”. “SW2” is an eightposition switch with each position equal to a certain weight. Refer to “Setup” for instructions on removing the cover to access “SW2”. Table 6 shows the weight chart for “SW2”. Table 6.
Smart Switch/Port Combiner Mode Preamble code controls access to slave ports if slave handshake line is not asserted Slave Port Master Port E Handshake line of any slave port controls access to master por Slave Port A D C B Slave Port Slave Port Slave Port Port Combiner Mode With the 232XS5 set up with a DTE master port, this mode allows Slave Ports A-E to select the master port using the RTS input line.
NOTE: When a port is selected via the Master Port, the RTS lines will be ignored until the Master Port sends the turn off code. When the Master Port is selected by RTS, all preamble codes will be ignored. The port combiner function is not available with the Master Port configured as a DCE or in expansion mode. A typical application would be to have RTS and CTS tied together on the master port. When RTS on port A is asserted, CTS on port A will be asserted when a connection is established.
SetTV$ = CHR$(27) + CHR$(2) +”T” + “6” The “T” tells the 232XS5 it is the set timer value command and the “6” indicates which timer value to use. Table 7 - Timer Values Data Byte Value 0 1 2 3 4 5 6 7 8 9 timer disabled 10ms 25ms 100ms 500ms 1s 5s 30 s 1 min. 5 min. The Set Timer Mode command tells the 232XS5 whether the time set by the Set Timer Value command will be used to determine the time-out of an inactive port, or the length of time switching commands are ignored.
If the data byte of the Set Timer Mode command is an ASCII “1”, the timer will be setup to ignore switching commands. Sending the following string to the 232XS5 will set up the timer to ignore switching commands. (Assuming programmable character is the factory default of 2). SetTM$ = CHR$(27) + CHR$(2) +”M” + “1” The “M” tells the 232XS5 it is the set timer mode command and the “1” indicates to set up the timer to ignore switching commands.
Expansion Mode Slave Port Master Port Expansion Port Slave Slave Port Port E E A D C B Slave Port Slave Port Address D Expansion Port Slave Slave Port Port A D C B Slave Port Slave Port Address C Expansion Port Slave Slave Port Port Slave Port E A D C B A B Slave Port Slave Port Slave Port Slave Port E D Address A C Address B Slave Port 17-Port Cascaded Expansion Mode The number of serial ports on the 232XS5 can easily be expanded to a maximum of seventeen ports.
You could then send SWB$ to select port B of Expansion switch unit address “C”. Similar strings could be used for turning on the other ports. To turn off the ports the string might look like this: TOFF$ = CHR$(27) + CHR$(2) + CHR$(4) When you are done with a port you can either select a new one directly or turn off the selected port and then turn on the next one. For information on preventing command codes from being received by slave devices, refer to the Enhanced Mode section.
Chapter 4: SOFTWARE Introduction The Smart Switch software allows the user to change Smart Switch ports on three different modules (232XSS, 232XS5, PortMUX). The Smart Switch software is designed as diagnostic software for the above modules. It will allow you a Module by Module connection to the individual port. Installation The software for the Smart Switch is designed to be run in any Windows environment. To install it on your hard drive follow these steps: Method One • Place the disk in drive A.
Should the user wish to change the Module choice to another there is a Module menu choice with the three support Module types (PortMUX, 232XSS, and 232XS5). After changing the Module the user will be prompted to restart the Smart Switch software to reset the connection. Default Values When you start Smart Switch software, the default values will be used.
The Baud Rate is the speed at which communication takes place between the PC and the Smart Switch. It must be specified so that it is equal to SW1 – positions 1 – 3 on the Smart Switch. The Number of Data Bits is the length of each character that gets sent from the PC to the Smart Switch. This value must be specified so that it is equal to SW1 – position 4 on the Smart Switch. The Module must be set so that it is equal to the Smart Switch Module which you are using (i.e. PortMUX if you are using a PortMUX).
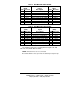
Appendix A: ASCII Character Codes DECIMAL to HEX to ASCII CONVERSION TABLE DEC HEX ASCII KEY DEC HEX ASCII DEC HEX ASCII DEC HEX ASCII 0 0 NUL ctrl @ 32 20 SP 64 40 @ 96 60 ` 1 1 SOH ctrl A 33 21 ! 65 41 A 97 61 a 2 2 STX ctrl B 34 22 “ 66 42 B 98 62 b 3 3 ETX ctrl C 35 23 # 67 43 C 99 63 c 4 4 EOT ctrl D 36 24 $ 68 44 D 100 64 d 5 5 ENQ ctrl E 37 25 % 69 45 E 101 65 e 6 6 ACK ctrl F 38 26 & 70 46 F 102 66 f 7 7 BEL
Appendix B: Cable Charts All charts will indicate if the Master Port of the 232XS5 should be configured as a DCE port or a DTE port. Refer to the Port Configuration section of the manual for information on Master Port configurations. Chart 1.
Chart 3. Modem DB25 Connector to Master Port Async Modem 232XS5 Serial Port Signal Master Port (DTE) DB25 Connector Direction DB9 Connector 2 <----------3 3 -----------> 2 4 <----------6 5 -----------> 4 7 <---------> 5* 8 -----------> 8 20 <----------7 * Pins are tied together inside the 232XS5, they are not connected to ports A, B, C, D, or E. NOTE: When connecting a DTE device to ports A, B, C, D or E of the smart switch, refer to Charts 8 and 9. Chart 4.
Chart 5. IBM PC DB25 Connector to Ports A - E (DCE) Master port configured as a DTE port. IBM PC 232XS5 Serial Port Signal Ports A - E (DCE) DB25 Connector Direction DB9 Connector 2 -----------> 3 3 <----------2 4 -----------> 7 5 <----------8 6 <----------6 7 <---------> 5 8 <----------4* 20 -----------> 4* * Pins are tied together inside the 232XS5, they are not connected to the master port. Chart 6. IBM PC DB9 Connector to Ports A - E (DTE) Master port configured as a DCE port.
Chart 7. IBM PC DB9 Connector to Ports A - E (DCE) Master port configured as a DTE port. IBM PC 232XS5 Serial Port Signal Ports A - E (DCE) DB9 Connector Direction DB9 Connector 1 <----------4* 2 <----------2 3 -----------> 3 4 -----------> 4* 5 <---------> 5 6 <----------6 7 -----------> 7 8 <----------8 * Pins are tied together inside the 232XS5, they are not connected to the master port. Chart 8.
Chart 9. IBM PC DB9 Connector to Ports A - E (DCE) Master port configured as a DTE port with a modem connected (see Chart 3). IBM PC 232XS5 Serial Port Signal Ports A - E (DCE) DB9 Connector Direction DB9 Connector 3 -----------> 3 2 <----------2 7 -----------> 6 8 <----------4* 6 <----------4* 5 <---------> 5 1 <----------8 4 -----------> 7 * Pins are tied together inside the 232XS5, they are not connected to the master port.