Model: 4007B, 4013B DDS Function Generator USER MANUAL 1
Safety Summary The following safety precautions apply to both operating and maintenance personnel and must be observed during all phases of operation, service, and repair of this instrument. Before applying power, follow the installation instructions and become familiar with the operating instructions for this instrument. If this device is damaged or something is missing, contact the place of purchase immediately.
CAUTION: This product uses components which can be damaged by electro-static discharge (ESD). To avoid damage, be sure to follow proper procedures for handling, storing and transporting parts and subassemblies which contain ESD-sensitive components.
CE Declaration of Conformity The model 4007B and 4013B meet the requirements of 2006/95/EC Low Voltage Directive and 2004/108/EC Electromagnet Compatibility Directive with the following standards. Low Voltage Directive - EN61010 Safety requirements for electrical equipment for measurement, control, and laboratory use. EMC Directive - EN55011 For radiated and conducted emissions.
1 INTRODUCTION .................................................................. 6 1.1 Introduction ............................................................................................. 6 1.2 Description ............................................................................................. 6 1.3 Specifications ......................................................................................... 6 2 INSTALLATION ................................................................... 8 2.
4007B/4013B – Operating Manual 1 Introduction 1.1 Introduction This manual contains information required to operate the B&K Precision model 4007B and 4013B DDS Function Generators. This section covers the instrument’s general description, specifications and characteristics. 1.2 Description The 4007B and 4013B are versatile high performance function generators.
Harmonic Distortion Square Rise/Fall Time Variable Duty Cycle Symmetry Accuracy at 50% Sweep Characteristics Sweep Shape Sweep Time Input and Output Sync Out General Memory Storage Power Requirements Max.
4007B/4013B – Operating Manual 2 Installation 2.1 Introduction This section contains installation information, power requirements, initial inspection and signal connections for the 4007B and 4013B signal generators. 2.2 Package Contents Please inspect the instrument mechanically and electrically upon receiving it. Unpack all items from the shipping carton, and check for any obvious signs of physical damage that may have occurred during transportation. Report any damage to the shipping agent immediately.
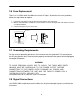
2.6 Fuse Replacement There is a 1A, 250V rated slow blow fuse at the AC input. Should the fuse ever get blown, follow the steps below to replace: 1. Locate the fuse box next to the AC input connector in the rear panel. 2. With a small flat blade screwdriver, insert into the fuse box slit to pull and slide out the fuse box as indicated below. 3. Check and replace fuse if necessary. Fuse box Fuse box slit Check/Remove Fuse 2.
4007B/4013B – Operating Manual 3 Operating Instructions 3.1 General Description This section describes the displays, controls and connectors of the function generator. All controls for the instrument local operation are located on the front panel.
3.2 Display Window The function generator has a graphic LCD display that can display up to 124 x 32 dots. When you poweron the unit sine waveform is selected and current settings appear in the display. The bottom displays a menu (selectable with function keys) that corresponds to the function, parameter or mode display selected. 3.3 Front Panel Controls The front-panel controls select, display, and change parameter, function, and mode settings.
4007B/4013B – Operating Manual 4. Use termination or impedance-matching devices to avoid reflections. 5. Ensure that attenuators and terminations have adequate power handling capabilities. If there is a DC voltage across the output load, use a coupling capacitor in series with the load. The time constant of the coupling capacitor and load must be long enough to maintain pulse flatness.
The offset voltage has three ranges as follows: Output Voltage Range 1.01 volt to 10.00 volts 0.101 volt to 1 volt 0.010 volt to 0.100 volt Constraints of Amplitude + Offset (Vp-p)/2 + |offset| <= 5 volts (Vp-p)/2 + |offset| <= 0.5 volts (Vp-p)/2 + |offset| <= 0.05 volts F4:SYM – (Symmetry) When the Square or Triangle waveforms are selected, the SYMMETRY(Duty cycle) parameter is available. Change the symmetry(Triangle) or duty cycle(square) by using the cursor keys, rotary dial or numerical keys.
4007B/4013B – Operating Manual F4: INTENSITY – Adjusts the intensity of the LCD screen. Valid range is 1 – 9; 9 giving the highest intensity and contrast. 3.6.3 SWEEP Key Selects the Sweep Mode and allows entering sweep parameters Sweep Start, Sweep Stop and Sweep Rate. To select the sweep mode, press SWEEP, then press the function key that corresponds to the desired Sweep menu option, as shown: Sweep Menu F1: ON/OFF – Enables/disables the sweep function. Select between Sweep ON or OFF.
Use this knob to increase and decrease numeric values. The cursor indicates the low-order position of the displayed value which changes when you rotate the knob (for straight numeric entries only). For other types of data, the whole value changes when you rotate the knob. 3.10 Power-On Settings Table 3-2 lists the factory default settings or selected after RECALL 0. Table 1 – Power-on Default Settings Key Function Function Frequency Amplitude Offset Output Sweep Value Sine 1.0000 kHz 5.00 V 0.
4007B/4013B – Operating Manual 3.13.1 Selecting a Standard Waveform You can select several standard waveforms as: sine, triangle, square. Creating a standard waveform requires selecting the waveform type, parameters and their settings that define the waveform. Generating a standard waveform requires the following: * Selecting the waveform * Setting the output frequency * Setting the output amplitude and offset 3.13.2 Setting the Output To set the output channel, press the Output ON key.
Recalling Setups To recall stored front-panel setup: 1. Press UTILITY to display the menu. 2. Press F1:RECALL to select the Recall mode. 3. Use the rotary input knob to select a buffer number. Valid buffers numbers range from 0 to 9. Buffer 0 is a read-only buffer that contains the default power-on setup.
SERVICE INFORMATION Warranty Service: Please go the support and service section on our website www.bkprecision.com to obtain a RMA #. Return the product in the original packaging with proof of purchase to the address below. Clearly state on the RMA the performance problem and return any leads, probes, connectors and accessories that you are using with the device. Non-Warranty Service: Please go the support and service section on our website www.bkprecision.com to obtain a RMA #.
Index Amplitude, 6, 12, 13, 15 cursor, 14 duty cycle, 13 Errors, 15 factory default, 15 frequency, 12 Impedance Matching, 12 intensity, 14 LCD, 11 Linear, 14 Offset, 12 recall, 17 safety, 2 Specifications, 6 store, 16 Symmetry, 13 Sync Out, 11
22820 Savi Ranch Parkway Yorba Linda, CA 92887 www.bkprecision.com © 2012 B&K Precision Corp.