
User Manual


17
2. Short the (+) and (-) output terminals with test leads, shorting
bar, or clip. (Refer to “– Wire Gauge Rating” to select
appropriate test leads)
3. Using the numeric keypad or the current adjust knob, enter a
small current value (i.e. 1.000 A). If entering with numeric
keypad, press first, then enter the value and press .
The current display will now show the value you entered.
4. Enable the output by pressing , and the LED next to the
button will be lit. The OFF annunciator will change to CC.
5. If the LED next to the button is not already lit, press the
button once and the current display will show the measured
current at the output, which may fluctuate slightly from the
current value entered in step 3.
6. (Optional) You may also verify the output current by connecting
either the (+) and (-) terminals on the rear panel to an external
current meter capable of measuring the current that you set.
The measured value should match or be within the entered
current value.
7. Press the power switch to (OFF) position to turn off the
power supply, then remove the short on the output terminals.
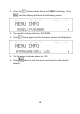
Check Model and Firmware Version
The model and firmware version can be verified by using the *IDN?
query remote command. It can also be found from within the menu
system by following these steps:
1. Press to enter the menu system.