
User manual


CHAPTER 13
Signal Recording Option
141
• Exclude Event, if you want to start and stop the recording using the Back-erase push-
button during the measurement
• External Event, if you want to start and stop the recording using an external trigger
signal, connected to the Trigger Input
• Level Event, if you want to start and stop the recording based on the level trigger set-
tings during the measurement
• All Events, if you want to start and stop the recording based on any of the events
Note: When Recording Control set to any of the events, you can limit the duration
of the recording, if Duration Limit is set to On. In this case the recording will be at
least Minimum Duration long, but no longer than the Maximum Duration. Use Pre-
recording Time and Post-recording Time to specify how much extra you want to be
recorded before and after the event
• Image Event (Type 2270 only), if you want to make a short recording together with
capturing an image. The recording will be "Pre-recording Time + Post-recording Time
+ 1" seconds long. See details in Appendix A
• Off, if you do not want to record the signal
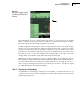
6) Set Recording Quality to High, Medium, Fair or Low in accordance with your needs.
Note: High quality requires more disk space than low quality – details in Appendix A.
7) Set Recorded Signal to either Input A/B-weighted, Input C-weighted or Input Z-weighted
(A/B-weighting is determined by setting the parameter in Setup > Frequency
Settings > Broadband (excl. Peak)). Input C-weighted is suitable for recordings used
afterwards to identify the sound source – it contains all the audible content of the signal,
but reduces the low-frequency noise from wind, etc.
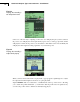
8) Set Automatic Gain Control to On – if you just want to listen to the signal afterwards. The
full 120 dB dynamic range (from max. input level and down) will be converted to 40 dB and
the signal is stored as a 16-bit wav-file.
Set Automatic Gain Control to Off – if you need to record calibrated signals or need to
analyze the wav-file afterwards on a PC. Select Resolution = 24 bit (recommended) to
cover the full 120 dB dynamic range (from max. input level and down) or select Resolu-
tion = 16 bit and specify the Peak Recording Level.
Under Input you specify Trigger Input if you want to start the recording using an external
trigger signal. See details in Appendix A.
To exit the screen, tap the icon.
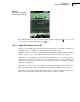
13.2.2 Controlling the Recording
The measurement is controlled in the same way you would control a normal logging measurement,
using Start/Pause, Continue, Reset and Save pushbuttons, see Chapter 11 for more details.
When the measurement signal is being recorded, then the Recording icon is displayed in
the Status Field. The recording is attached to the profile as a Marker 6 (Sound).