Disclaimer, Trademarks, and Copyright Information Disclaimer Control4® makes no representations or warranties with respect to this publication, and specifically disclaims any express or implied warranties of merchantability or fitness for any particular purpose. Control4 reserves the right to make changes to any and all parts of this publication at any time, without any obligation to notify any person or entity of such changes. Trademarks Control4 is a registered trademark of Control4 Corporation.
Contents Chapter 1 Get Started .........................................................................................1 Software and Network Requirements .............................................2 Install Composer Media Edition Software .......................................3 Launch Composer Media Edition Software ....................................4 Chapter 2 Set up Media and Playlists.............................................................7 Set up Media on a Controller ...................
File Menu ................................................................................. 40 Media Menu ............................................................................. 41 Help Menu ............................................................................... 42 iv Composer Media Edition User Guide December 20, 2005 Composer Media Edition 1.2.3 Release Control4 1.
chapter 1 Get Started Control4® Composer Media Edition is the software you use to add and scan media and create playlists on the Control4 system. It is a Windows XP-based PC program that has a drag-and-drop interface. The center of the Control4 system is the Media Controller or other Control4 controller hardware, such as Home Theater Controller. The controller hardware communicates with Control4 and third-party products to enable home automation and interaction of individual devices.
Software and Network Requirements Software and Network Requirements This product requires that your system is functioning correctly before attempting to use the software. Please see your authorized Control4 dealer if this product does not work as documented because it indicates that the Conrol4 system is not set up properly.
Install Composer Media Edition Software Install Composer Media Edition Software To install Composer Media Edition software: 1. Launch the Composer Media Edition installation and follow the on-screen instructions. You might be asked for a registration key. 2. When prompted to update, follow the on-screen instructions to update to the latest version of Composer Media Edition. The software version and the drivers might have been updated since the CD or Web download was created.
Launch Composer Media Edition Software Launch Composer Media Edition Software When you launch Composer Media Edition software, you must connect to Director on your home network. To launch Composer Media Edition Software: 1. From the desktop, double-click the Composer icon. 2. At the Composer startup screen, choose Director on Local Network. The Virtual Director and Remote Director shown on the Startup screen are not available with the Composer Media Edition. 3.
Launch Composer Media Edition Software 4. Click Connect. Composer is opened to the main Composer Media Edition interface chapter 1: Get Started December 20, 2005 Composer Media Edition 1.2.3 Release Control4 1.
Launch Composer Media Edition Software 6 Composer Media Edition User Guide December 20, 2005 Composer Media Edition 1.2.3 Release Control4 1.
Set up Media on a Controller Chapter 2 Set up Media and Playlists To view and select the media from the Navigator devices, including Wireless Touch Screen, On-screen, Mini Touch Screen, and System Remote Control, you first need to add and scan the media to the controller hardware (such as Media Controller). With the MP3 files you have added and scanned, you can create playlists of MP3 files saved to the controller hardware’s hard drive or the external hard drive.
Set up Media on a Controller Audio Cloud. When configuring these connections under the Connections view, there is always an open connection to the Digital Audio Cloud for each Digital Audio Server or Digital Audio client. Therefore, you will potentially see many connections to the Digital Audio Cloud depending on the hardware configured in the project. To add and scan available Digital Audio Player media by doing the following: 1. Within the controller pane (right pane), click Add.
Set up Media on DISC Changer 3. Refresh Navigator devices. See “Refresh Navigators” on page 23. The media is now selectable for viewing within the Navigator devices, including Wireless Touch Screen, On-screen, Mini Touch Screen, and System Remote Control. Set up Media on DISC Changer When setting up a DISC Changer, you can add and scan media according to the options available on your DISC Changer.
Set up Media on DISC Changer To scan media on DISC Changer to Media Database: 1. Highlight DISC Changer in the Media pane (left pane). 2. In the DISC Changer pane (right pane), click Scan. The scan results appear. After you Refresh Navigators you are ready to play music. See “Refresh Navigators” on page 23. To search media on DISC Changer to add to Media Database: 1. Highlight Media Controller in the Media pane (left pane). 2. In the DISC Changer pane (right pane), click Search. The search dialog appears.
Set up Media on DISC Changer 5. Highlight the appropriate DVD title and drag it directly over the empty line item and highlight it. 6. Click Finished. 7. Repeat these steps for the DVDs/CDs in the DISC Changer you want to add to the Media Database. 8. Refresh Navigator devices. See “Refresh Navigators” on page 23. The media you have added is now selectable for viewing within the Navigator devices, including Wireless Touch Screen, On-screen, Mini Touch Screen, and System Remote Control.
Set up Media on DISC Changer To add and search using New DVD or New CD options: 1. Highlight DISC Changer in the Media pane (left pane). 2. Highlight the empty field for the New DVD and New CD buttons to appear. 3. Click either New DVD or New CD as appropriate. The New Movie or New Album dialog appears. 4. In the Title field, enter the DVD you want to play. Example: A Beautiful Mind 5. Click Search. 6.
Set up Media on DISC Changer You can choose which information to import and edit any associated information before adding to the Media Database. 8. Click Finished. 9. Click OK. 10.Refresh Navigator devices. See “Refresh Navigators” on page 23. This particular DVD is now selectable for viewing within the Navigator devices, including Wireless Touch Screen, On-screen, Mini Touch Screen, and System Remote Control. Chapter 2: Set up Media and Playlists December 20, 2005 Composer Media Edition 1.2.
Autoscan Media Within Composer Autoscan Media Within Composer This is a new documentation topic. The benefits of running a DISC Changer with bi-directional communications (RS-232), such as Sony CX777ES, is that you can scan your DVDs/CDs stored in the disc changer to identify, index, and automatically apply cover art information.
Set up Media for Broadcast Television Channels Autoscan Added Media To autoscan added media: 1. From the Project Tree, click the Sony CX 777ES DISC Changer added to the project. The device properties page appears. 2. Ensure that a check is in the Auto Scan Enabled box. 3. Open the DISC changer drive and change the existing DVD/CD. 4. The autoscan begins automatically when the DISC Changer door closes and the information for the added DVD/CD is automatically available from the navigation devices.
Set up Media for Broadcast Television Channels 6. Click OK. The selected stations populate in the UHF/VHF pane. 7. Refresh Navigator devices. See “Refresh Navigators” on page 23. The media is now selectable for viewing within the Navigator devices, including Wireless Touch Screen, On-screen, Mini Touch Screen, and System Remote Control. 16 Composer Media Edition User Guide December 20, 2005 Composer Media Edition 1.2.3 Release Control4 1.
Set up Media for Broadcast Stations Set up Media for Broadcast Stations Set up Media for Broadcast Radio Stations: 1. Click Search. 2. When the dialog appears, note that your zip code appears automatically in the field. 3. Click Search and use the pull-down menu to select AM Broadcast Stations or FM Broadcast Stations. The available stations are populated to the Search Results window. 4.
Use External Storage Devices The selected stations populate in the FM Radio pane. 6. Refresh Navigator devices. See “Refresh Navigators” on page 23. 7. Repeat steps 1-7 for each radio (AM, FM, XM) you want to set up. Each of these must be set up separately. The media is now selectable for viewing within the Navigator devices, including Wireless Touch Screen, On-screen, Mini Touch Screen, and System Remote Control.
Use External Storage Devices 3. Once you physically connect the external storage device, you need to scan the music residing on the external device connected to the controller hardware (such as Media Controller) to make it available on the Control4 system. 4. Highlight the controller to which the external device is connected. 5. Click Scan. You can add media from the external storage device when connected to the Media Controller.
Add an Audio or Audio/Video Switch to Control4 System 4. Click Add or Scan. Add an Audio or Audio/Video Switch to Control4 System To highlight a few Audio/Video Switch products, the following audio or audio/video switch drivers are now available for use in the Control4 system: Control4 Audio Switch Anthem MCA 50 (Relay) B&K AV2600 (Relay) Knox RS16x15 HB Knox RS16x15 HB AO Knox RS16x15 HB VO Knox RS4x4 HB Knox RS8x8 HB Knox MediaFlex16 Marantz MM-9000 (IR) McIntosh MC2102 (Relay) Meridan 558.
Create Playlist To add an Audio or Audio/Video Switch: 1. Set up the audio or audio/video switch and any associated hardware. 2. Add the audio or audio/video switch to your project from within the System Design view, under the Items pane, select the Search tab > Device Type: Audio Switch or A/V Switch > Manufacturer: All manufacturers.
Create Playlist 5. Drag and drop any albums or individual songs you want to add to the playlist to Frank’s Playlist. 6. After you have added the albums, highlight the playlist to delete songs you do not want in your playlist by right-clicking the song and selecting Delete. You can select more than one by holding down the shift key. TIP: To remove individual song, right-click Delete. To remove multiple songs, press shift and highlight items, then right click Delete.
Refresh Navigators Refresh Navigators 1. In case your Navigators did not automatically refresh, choose File > Refresh Navigators. TIP: When you add or scan media, you need to use the Refresh Navigators option to update the media views on all Navigator devices. 2. Now that you have completed “Set up Media” continue to “Test System by Playing Media on Navigator Device” on page 131.
Edit Media Information within Composer 4. Click the Edit button or double-click the album under Album Title. 5. To edit and enter any changes, click in the boxes under Name, Artist, Label or Genre under the Album tab. Under Tracks and Notes tabs, view and edit Track Titles and Notes. When finished click OK. (Click Cancel to exit screen.) 24 Composer Media Edition User Guide December 20, 2005 Composer Media Edition 1.2.3 Release Control4 1.
Edit Media Information within Composer 6. Click one of the Search buttons beside Name or Artist to search the database for similar entries. 7. To select a search result, select the album Title and double-click or click Next. At the next screen you can view and edit the information of the album, including Name, Artist/Composer, Label, Genre, Year, Art, and Notes. Chapter 2: Set up Media and Playlists December 20, 2005 Composer Media Edition 1.2.3 Release Control4 1.
Edit Media Information within Composer 8. Make changes as desired and click Finished. If you would like to return to previous screens to make changes, click Back. 26 Composer Media Edition User Guide December 20, 2005 Composer Media Edition 1.2.3 Release Control4 1.
Edit Media Information within Composer Edit DVD Information Within Composer To edit a DVDs information within Composer: 1. Choose a movie under DISC Changer or DVD. 2. Click the Edit button or double-click the title under Discs. 3. Under the Movie tab, edit the Title, Director, Studio, Genre, Run Time, Release date and Rating as desired on this screen under the Movie tab. Under the Cast and Synopsis tab click in Cast and Synopsis fields to make desired changes.
Edit Media Information within Composer 4. Click Search under the Movie tab to search the database for other DVDs. 5. Double-click the desired DVD and edit as desired according to the steps above. 6. When you are done with your changes, click Finished. 28 Composer Media Edition User Guide December 20, 2005 Composer Media Edition 1.2.3 Release Control4 1.
Clear Media List Chapter 3 Other Composer Tasks This chapter provides steps for performing tasks using Composer. Clear Media List To clear media list: 1. Highlight the device that you want to clear the Media List. Example: Digital Audio 2. From the Media menu, select Clear Media List. This removes the information including the title art and information from the Media Database. This option does not remove the actual media files.
Connect to Director on Local Network Connect to Director on Local Network To connect to a Director on your home network: 1. Start Composer: Z From the desktop, double-click the Composer icon. Z Or go to the Composer Startup screen that is displayed, choose Director on Local Network. NOTE: Within Composer, to connect to a Director on your home network, from the File menu, select Connect to Director. 2.
Exit Composer Exit Composer To exit Composer: ` From the Composer Startup screen, choose Exit Composer ` From menu bar, choose File > Exit. Export Media List To export the Media List: 1. Highlight the device that you want to export the Media List. Example: Digital Audio 2. From the Media menu, select Export Media List. This saves a copy of the file that contains all the title art and information from the Media Database to your PC. This option does move the actual media files.
Search Topic Search Topic To search documentation: 1. Select Help > Search tab. 2. Enter a topic you want to find. 3. Press Enter. 4. Choose from the available entries. Update Composer Media Edition from Help Menu To update Composer from the Help menu: 1. From the Help menu, select Check for Updates. 2. Follow the online instructions to complete the update. Update Composer Media Edition from Windows Start Menu To update Composer from Windows Start Menu: 1.
View Index View Index To access documentation index: 1. Select Help > Index tab. 2. View the available topics and subtopics. 3. Choose from the available entries by double-clicking an entry to view the topic or a list of subtopics. Chapter 3: Other Composer Tasks December 20, 2005 Composer Media Edition 1.2.3 Release Control4 1.
View Index 34 Composer Media Edition User Guide December 20, 2005 Composer Media Edition 1.2.3 Release Control4 1.
Chapter 4 Introduction to Composer Media Edition Software The Composer Media Edition interface allows you to add and scan media to your controller hardware, such as Media Controller. You can also create playlists of MP3 files saved on the controller hardware’s hard drive in the Media Database. Adding or scanning media allows you to view and select the stored/ broadcast media and playlists from the Navigator devices, including Wireless Touch Screen, On-screen, Mini Touch Screen, and System Remote Control.
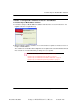
Composer Media Edition Startup Composer Media Edition Startup From the Composer Media Edition Startup Screen, you can connect to controller hardware locally (center option). The Composer Media Edition does not provide the Virtual (left option) or Remote Director (right option) options. Startup Screen X Director on Local Network. Allows you to manage media while connected to a Director on your home network. Launches the Directors dialog. For more information, see “Directors Dialog” on page 37.
Directors Dialog Directors Dialog This Directors dialog appears when you click the Connect to a Local Director from the Startup screen. Connecting to a Director on the home network allows you to set up your media on your controller hardware so it is viewable on the Navigator devices, such as Wireless Touch Screen, On-screen, and Mini Touch Screen. Each Director has an associated address. Directors dialog X Connect.
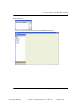
Media View Media View The Media view allows you to add to the system your media selections, including stored music and media collections or broadcasts channels and stations. Adding media in Composer Media Edition allows you to view and select the stored or broadcast media from the Navigator devices, including Wireless Touch Screen, Onscreen, Mini Touch Screen, and System Remote Controll.
Menu Bar Media View — Media View Related Tasks continued X “Now that you have completed “Set up Media” continue to “Test System by (left-side Playing Media on Navigator Device” on page 131.
Menu Bar File Menu From the File menu, you can connect or disconnect from a Director, refresh Composer and Navigator devices, including Wireless Touch Screen, On-Screen, and Mini Touch Screen. You can also exit Composer. File Menu X Connect to Director. Connects you to a Director residing on the controller hardware. When you connect, project configuration information from the controller hardware is presented to the screen in Composer. X Disconnect from Director. Disconnects you from a Director.
Menu Bar Media Menu From the Media menu, you can create new playlists. Also, you can use the Media menu to clear, export, and import media lists. Media List is the list of media information pertaining to the selected device, such as all DVDs with associated cover art, title, notes, etc. for each DVD in a DVD changer. The media has either been scanned or manually added into the Media Database.
Menu Bar Help Menu From the Help menu, you can access the on-line documentation version of this manual with index and search options. You can also check for updates and check the version of your Composer software and Director component. . Help Menu From the Help Menu, you have the following options: X Contents. Displays the Content tab of the User Help. X Index. Displays the Index tab of the User Help. X Check for Updates.
Index A H Add an Audio or Audio/Video Switch to Control4 System 20 Add and search using New DVD or New CD options 12 Auto Scan Enabled 15 Autoscan Media Within Composer 14 Autoscan Added Media 15 A-Z Tasks Add and search using New DVD or New CD options 12 Autoscan Media Within Composer 14 Channels 15 Create Playlist 21 Refresh Navigators 23 Scan media on DISC Changer to Media Database 10 Search media on DISC Changer to add to Media Database 10 Set up Media for Broadcast Stations 17 Set up Media on Digita
R T Refresh Navigators 23 Task Connect to a Local Director 30 Exit Composer 31 tutorials Media Setup Tutorial 7 Navigator User Interface Setup Tutorial 7 S Scan media on DISC Changer to Media Database 10 Search media on DISC Changer to add to Media Database 10 Set up Media for Broadcast Stations 17 Set up Media for Broadcast Television Channels 15 Set up Media on Digital Audio Player 7 Set up Media on DISC Changer description 9 New DVD or CD 9 Scan 9 Search 9 44 Composer Media Edition User Guide U Us