B&K SIMPLY BETTER! B&K Components, Ltd.
B&K Components, Ltd., 2100 Old Union Road, Buffalo New York 14227-2725 Phone 1-800-543-5252 or (716) 656-0026, Fax (716) 656-1291 E-mail: info@bkcomp.com Web: www.bkcomp.
TABLE OF CONTENTS Table of Contents ....................................................................................................................................................iii Safety Precautions .................................................................................................................................................. 1 Features....................................................................................................................................................
SAFETY PRECAUTIONS PLEASE READ BEFORE INSTALLING WARNING: to prevent fire or shock hazard, do not expose this unit to rain or moisture. Care should be taken to prevent objects or liquid from entering the enclosure. Never handle the power cord with wet hands. • The lightning flash with arrowhead, within an equilateral triangle, is intended to alert the user of the presence of uninsulated “dangerous voltage” within the product’s enclosure that may constitute a risk of electric shock to you.
FEATURES Your new Preamplifier Tuner is versatile audio control center. The Preamplifier Tuner is designed to sound sensational and be attractive, easy-to-use addition to your audio system. Remote Control - Easy control of your B&K Preamplifier Tuner. Front Panel Operation - Nearly all functions can be controlled directly from the Preamplifier Tuner. Control Output - One 12 VDC @ 200 mA output for controlling external systems such as a projection screen or B&K amplifier.
THE BASICS The following is intended to familiarize users with common terms and applications of home audio equipment. Amplifier - An amplifier takes the output of a preamplifier and increases its level to that necessary to drive a speaker. Your preamplifier Tuner includes full-range, high-pass, low-pass and mono preamplifier outputs for connecting to external amplifiers and/or powered speakers.
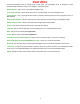
FRONT PANEL B & K Components, Ltd. PT 5 TUNER PREAMP PT 5 PREAMP HEADPHONE SLEEP PRESET ENTER SAVE TUNE - TUNE + SOURCE LOUDNESS LEVEL POWER ON/OFF 1 2 3 4 5 1. Headphone Jack - Stereo headphones having a standard ¼ inch binaural plug can be connected to the headphone output. The Preamplifier Tuner must be on and in HEADPHONE Mode for proper headphone operation. 2. Front panel buttons SLEEP Puts the Preamplifier Tuner in and out of standby mode.
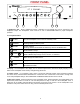
REAR PANEL SERIAL # B&K 2 0 0 m A To t a l Max Current CAUTION S I M P LY B E T T E R ! RS-232 CTRL OUT GROUND IR OUTPUT BALANCED OUTPUT D ATA I N VOLTAGE +12V AC LINE RS232 TRANSMIT RISK OF ELECTRIC SHOCK DO NOT OPEN ~ 2 3 4 RIGHT 5 PREAMP OUTPUTS MONO L+R FULL RANGE LEFT 1 ANTENNA Audio/Video Systems - Made in the U.S.A.
REMOTE CONTROL Your Preamplifier Tuner includes an IR remote control.
MAKING THE CONNECTION It’s tempting to just plug in your new Preamplifier Tuner and have great sound pour out. Before you do that, take a few minutes to plan out how you want the Preamplifier Tuner to fit into your audio system. Ask yourself the following questions: y What source components do I want to connect to my Preamplifier Tuner? (CD, DVD, etc.) y What equipment will be receiving the audio? (Amplifier, Powered Speakers, etc.
AUDIO CONNECTIONS Connecting your analog sources to your Preamplifier Tuner Audio source - connecting a CD player to the Preamplifier Tuner’s analog inputs. Use the same instructions for connecting to other audio sources such as a DVD, television, satellite receiver, cable box, etc. Attach one end of the audio interconnect cable to the left audio output on the CD player, then attach the other end to the left (white) CD audio input on the Preamplifier Tuner. Repeat for the right (red) audio connection.
USING FULL RANGE SPEAKERS Connect the Preamplifier outputs to your external amplifier(s) or powered speakers. Shown below is a typical Preamplifier output setup for use with large speakers: Note: the use of a sub woofer is optional.
USING SMALL SPEAKERS Connect the Preamplifier outputs to your external amplifier(s) or powered speakers. Shown below is a typical Preamplifier output setup for use with small speakers: Note: the use of a subwoofer is not optional and is needed to reproduce low frequency audio material.
ANTENNA CONNECTIONS The FM jack is a standard screw on F-type connector. The AM is a push type. Strip ¼ inch of insulation off your AM antenna wires and insert one wire end into each hole while holding the tabs down. Release the tabs to lock in the AM antenna wires. FM antenna FM Antenna Input from Indoor/Outdoor Antenna, Cable Box, etc. TUNER AM antenna AM Antenna Input from Loop Antenna IR Output - The Preamplifier has the capability to be controlled by an Infrared Data/Signal (see below).
OPERATION The following outlines the normal day-to-day operation of your Preamplifier Tuner from the supplied IR remote controller or directly from your Preamplifier Tuner’s front panel. POWER ON/OFF The main power switch on the front panel of your Preamplifier Tuner must be on for the Preamplifier Tuner to operate. When this switch is off all power is removed from your Preamplifier Tuner. This prevents turning it back on with the remote control.
CHOOSING A SOURCE In general, the selected source will appear at the PREAMP outputs and the TAPE output.
ADJUSTING BALANCE BAL (L) positions the source left by decreasing the right channel level. BAL (R) positions the source right by decreasing the left channel level. CD to CENTERED CD RIGHT - 2 From Remote From Front Panel Action ¶(BAL L) or •(BAL R) ∠ (LEVEL) step to BALANCE then use VOLUME KNOB adjust balance left or right ADJUSTING BASS BASS +/- increase or decrease the low frequency content in 2 dB increments with a range of +/- 12 dB.
TUNER OPERATION All TUNER operations require the Preamplifier Tuner’s source be set to TUNER. Manual Tuning - press TUNE + or TUNE - to tune the frequency UP or DOWN in single 10 kHz steps for AM or 200 kHz steps for FM. (9 kHz and 100 kHz steps for European version.) Direct Frequency Entry Tuning - for a few seconds after performing any tuner operation (TUNER, BAND, AM, FM or TUNE+/-) you may directly enter a frequency from the remote control’s numeric keypad.
PRESETS Presets allow you to save your favorite settings and recall them instantly. Your Preamplifier Tuner can store forty presets (0.39). Most Preamplifier Tuner’s only allow saving of tuner stations. With the presets you save not only the tuner station but also the volume, bass, treble, balance, loudness, and headphone mode. This allows you, for example, to save a music station with enhanced bass and a talk station with enhanced treble. You are not limited to 20 AM stations and 20 FM stations.
MENU For best results, perform the following set up procedure when you initially install your Preamplifier Tuner and anytime you change or add sources, speakers, etc. or when you rearrange your listening area THE MENU SYSTEM Setup of your Preamplifier Tuner will require you to navigate through the menu system via the front panel or remote. A complete guide to the menu system is included at the back of this manual. We recommend that you become familiar with your Preamplifier Tuner’s menu guide.
HEADPHONE ON The MAIN MENU Headphone selection provides for operating your Preamplifier Tuner’s with the CONTROL OUT set to off. This feature allows your Preamplifier Tuner to turn off external amplifiers or powered sub woofers with compatible CONTROL inputs. Your Preamplifier Tuner has the capability to be set up to allow for other control out functions (see ADVANCED FEATURES).
SETUP The MAIN MENU provides a SETUP selection that enables more advanced customization of your Preamplifier Tuner's operation. SETUP 1 2 3 From Remote From Front Panel Action MENU À or § SEL or ENTER ◊ (PRESET) and ↵ (ENTER) . (TUNE +) or - (TUNE -) ↵ (ENTER) enter menu system move to setup enter setup menu Favorite Preset Setup Favorite presets need only be setup after adding/changing presets or sources.
Source Names Setup From the factory, your Preamplifier Tuner will display source names that match those printed on the rear of the Preamplifier Tuner and on the supplied remote. However, this menu allows you to change the displayed names to match the actual sources used. If you do not want to change the names then skip this step. Note that the tuner name cannot be changed.
Preset Operation Setup This menu allows you to configure various aspects of how presets function. PRESET OPERATION 1 2 From Remote From Front Panel Action From setup menu: À or § SEL or ENTER From setup menu: . (TUNE +) or - (TUNE -) ↵ (ENTER) move to preset operation enter preset operation menu Preset Volume You can program presets to recall the volume level setting in effect when you saved the preset or to always use the current volume Setting.
Display Setup Set the intensity of the front panel’s alphanumeric display. DISPLAY SETUP 1 2 3 4 DISPLAY BRIGHT From Remote From Front Panel Action From setup menu: À or § SEL or ENTER ¶(BAL L) or •(BAL R) MENU From setup menu: .
FREQUENTLY ASKED QUESTIONS My collection of equipment differs from the labels on the back of my Preamplifier Tuner, how can I hook them up? Your Preamplifier Tuner provides 5 identical sets of inputs - V1, V2, TV, DVD and CD. It is convenient to connect components as labeled on the back of your Preamplifier Tuner, but since all the inputs are identical, you can connect any compatible source to any set of inputs. For example, you can connect a DAT player to V1 instead of a VCR.
ADVANCED SETUP FEATURES WARNING - The following describes the advanced features of the Preamplifier Tuner. Since changing some of these functions may cause severe effects such as no sound or no remote control operation, we suggest you leave this menu disabled (hidden) for normal operation. If you are unsure of what you are changing DO NOT perform any advanced operations. These features may be activated by simultaneously pressing the SLEEP, DOWN, and UP buttons on the front panel of the Preamplifier Tuner.
CONTROL OUT SETUP Your Preamplifier’s control output allows control of external devices such as power amplifiers, projection screens, etc. The control output may be programmed on/off depending on which source is selected. Control Out - Control out can be programmed to be on or off for each source. For example you may wish to use the control out to turn on an external video projector whenever DVD is selected. Control out can also be set to HEADPHONE mode.
TROUBLESHOOTING PROBLEM POSSIBLE CAUSE POSSIBLE SOLUTION No sound, display will not light 1. Power cord not plugged in. 2. Power off at AC source. 3. Power switch off. 4. AC power inlet fuse blown or faulty.* 1. Reconnect power cord. 2. Check power at plug. 3. Turn power switch on. 4. Check for shorts or overloading. Replace fuse. No sound, display on. 1. Preamplifier Tuner in mute 2. Volume control to minimum. 3. Wrong source selected. 4. Line stage to amp. cables loose or faulty. 5.
PREAMPLIFIER TUNER SPECIFICATIONS Preamplifier Specifications Miscellaneous Input Sensitivity: Maximum Output Level: Signal to Noise Ratio: Input Impedance: Output Impedance: Audio Analog Inputs Audio Analog Outputs High Pass Crossover Low Pass Crossover 5 - 20 kHz, +0/0.
LIMITED WARRANTY B & K Components Ltd., referred to herein as B & K, warrants your B & K equipment against all defects in material and workmanship for a period of five years from the date of purchase. This warranty applies only to the original purchaser and only to equipment in normal residential use and service.
MENU BUTTON 29 SETUP PRODUCT - INFO HELP HEADPHONE ON 0 TV-V3 -20 YES DVD 0DB DVD SEL TO CONFIRM MADE IN THE USA PERSONAL PRESETS USER CONTROLS (See next page for the ADVANCED SETUP flow chart) BACKUP MEMORY MEMORY OPTIONS ADVANCED SETUP DISPLAY BRIGHT AUTO NAMING YES PRESET VOLUME DVD DVD DISPLAY SETUP PRESET OPERATION SOURCE LEVELS SOURCE NAMES FAVORITE PRESETS TUNER PREAMP MENU TO EXIT PROGRAMMABLE BK PT5 ENTER TO SELECT SEL TO SELECT VOL -/+ DEC/INC UP/DN ROW/TXT MENU
ADVANCED SETUP 30 (option) RS-232 PORT SECURITY OPTIONS CONTROL SETUP POWER ON TITLES MISCELLANEOUS TRANSMIT ID 0 RECEIVE ID 0 UPDATE ENABLED ECHO ENABLED BAUD RATE 9600 PORT ENABLED IR LOCK NO FRONT LOCK NO MEMORY LOCK NO ADVANCED VISIBLE POWER ON LINE 2 POWER ON LINE 1 PRODUCT ID 2 MAX LEVEL +8DB CD TAPE C1 DVD C1 C1 TV V2 C1 C1 V1 TUNER C1 C1 PHONES PHONES PHONES PHONES PHONES PHONES PHONES ADAVNCED SETUP FLOW CHART ADVANCED MENU SYSTEM
31 VOLTAGE AC LINE ~ RS-232 IR OUTPUT CAUTION RISK OF ELECTRIC SHOCK DO NOT OPEN 2 0 0 m A To t a l Max Current D ATA I N RS232 TRANSMIT GROUND SERIAL # B&K LEFT FULL RANGE RIGHT BALANCED OUTPUT S I M P LY B E T T E R ! SUB MONO L+R HIGH PA S S FULL RANGE PREAMP OUTPUTS OUTPUT TA P E INPUT CD DVD TV SOURCE INPUTS V2 Audio/Video Systems - Made in the U.S.A.
NOTES B&K Components, Ltd., 2100 Old Union Road, Buffalo New York 14227-2725 Phone 1-800-543-5252 or (716) 656-0026, Fax (716) 656-1291 E-mail: info@bkcomp.com Web: www.bkcomp.
WWW.BKCOMP.COM B&K Components, Ltd.