
Installation Manual

WORK SAFELY! For maximum safety, perform this installation on a clean, level surface and with the
engine turned off. Place blocks or wedges in front of and behind both rear wheels to prevent
movement in either direction.
CAUTION: To avoid any possibility of bodily injury or damage to vehicle, do not attempt installation
until you are confident that the vehicle is safely secured and will not move.
INTRODUCTION
This B&M Cast Aluminum Differential Cover has been designed to work on most GM vehicles
equipped with a Chevy 8.2”, 8.5” & 8.6” 10 bolt style rear axle. The cover provides several
advantages over stock factory covers. The extra capacity provides increased oil volume and added
cooling, while the thick aluminum construction increases case rigidity. The reinforced center bar,
along with the load bolts, prevents bearing cap deflection under severe loads. The magnetic drain
plug feature allows regular gear oil changes without the usual mess, and limits ferrous debris from
circulating in the axle.
This differential cover can be installed in about an hour by carefully following the instructions. It is
suggested that the vehicle be allowed to cool off for a few hours to avoid burns from hot oil and parts.
The vehicle should be off the ground for ease of installation - jack stands, wheel ramps or a hoist will
work fine. MAKE SURE VEHICLE IS FIRMLY SUPPORTED - DO NOT WORK UNDER A VEHICLE
IF IT IS SUPPORTED BY ONLY A JACK! Try to raise the vehicle 1-2 feet so you will have plenty of
room to work. Also, have a small box to put bolts in and a drain pan to catch oil.
INSTALLATION
1. Clean axle housing cover area from dirt and other debris.
NOTE: On some vehicles it might be necessary to remove some parts (e.g. sway bar, panhard rod) to
make the installation of the cover easier.
2. Place a drain pan underneath the axle housing.
TechnicalSupport(707)544‐4761 1 www.bmracing.com
Installation Instructions
Cast Aluminum Differential Cover - Black
Fits: Chevy 8.2”, 8.5” & 8.6” 10 Bolt
See Application Guide for Specific Vehicles
Catalog # 71502
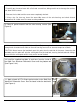
3. Remove the axle housing fill plug with a 3/8” square
ratchet and extension (See Figure 1).
NOTE: The fill plug is on the cover on newer vehicles with
an 8.6” axle.
Fig. 1
A
xle housing fill plug
Front of vehicle