Contents Safety .................................................................................................................... 3 Environment ........................................................................................................ 4 1 Getting Started ................................................................................................. 5 1.1 Getting to know your touch phone .................................................... 5 1.2 Installing the SIM card and storage card ...
9.1 Calendar ........................................................................................... 32 9.2 Alarm Clock ..................................................................................... 34 9.3 Calculator .........................................................................................
Safety Never attempt to disassemble your phone. You alone are responsible for how you use your phone and any consequences of its use. As a general rule, always switch off your phone wherever the use of a phone is prohibited. Use of your phone is subject to safety measures designed to protect users and their environment. Do not use your phone in damp areas (bathroom, swimming pool…). Protect it from liquids and other moisture.
manufacturers of such equipment will be able to give you any advice you may need in this area. Hospitals: Always make sure that your phone is switched off in hospitals when so instructed by warning signs or by medical staff. Road safety: Do not use your phone when driving. In order to give your full attention to driving, stop and park safely before making a call. You must comply with any current legislation.
1 Getting Started 1.1 Getting to know your touch phone 1.2 Installing the SIM card and storage card To install the SIM card Turn off the phone, pull out card slot. Add the SIM card according to instruction on the card slot. When you need to remove the SIM card, please shut down. * Note: • The phone can be supported the double SIM cards. Your phone is supported both 2G SIM card and 3G SIM card (WCDMA).
Warning: • As a safety precaution, the battery stops charging before it overheats. 1.4 Starting up the device Power on/off To power off your phone, press & hold POWER. On release, the Phone options menu opens. Select ‘Power off’ and confirm. To power on again, press & hold POWER. Silent mode To silence your phone,press Settings > Sound & notification. Select ‘Silent’ check box. Screen sleep After a period of inactivity, your screen will go to sleep (display will turn black).
2. Create Home screen shortcuts and widgets: • From the Home screen, touch the menu button to select ‘WIDGETS’, the widgets menu opens. • Select the widget you want to display on home screen, then touch & hold an application icon. It can be added to the Home screen; back to the home screen to see it. 3. To remove a shortcut or widget from your Home screen, touch & hold the item to enter “remove”. The application tab turns into a Trash button. Drag the item to the Trash button and release.
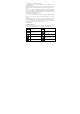
Alarm is set Battery electric quantity Bluetooth is on Battery is charging Connected the PC Connected the earphone Read your notifications When you see a notification in the status bar, touch the bar and slide your finger down the screen to open the list of notifications displayed in the sliding window. Ongoing notifications report activities such as call forwarding ON, current call status, song playing. Notifications report the arrival of new messages, calendar events, and alarms.
1. Touch Settings > More… > Airplane mode. 2. Touch ‘Airplane mode’ to enable or disable. When you disable Airplane mode, the phone function is turned back on and the previous state of Bluetooth and WLAN are restored. Adjusting the volume Press Volume button on the side of the phone to show the volume screen. If the phone is in vibrating mode, the voice will be muted automatically and the device will vibrate when there is an incoming call. 2.
this icon when Mute is on. 3. Hold: To put an active call on hold, select ‘Hold’ so it become regain. To resume the call, or take the call off hold, select it again so the bar is unfilled. If you take a call while already on a call, the first call will be placed on hold automatically. The status bar will display this icon when a call is on hold. 4. Add call: If you need to enter numbers while on a call, touch ‘Add call’. 5.
3 Setting on your device Control phone-wide settings from Settings. 3.1 Wireless & networks SIM cards You can select to activate or deactivate the SIM card you want to open. Set the default SIM to use Voice call, Messaging and Data connection. Wi -Fi Wi-Fi on/off: Select this check box if you prefer to use Wi-Fi for your data connection. Wi-Fi settings: Open the Wi-Fi settings screen; select it from the network list. Provide your username or password if required.
Sound & notification Select one user profile and enter the following options: Vibrate: Select to have your phone vibrate for incoming calls. Volume: Select to open the volume control, and then slide your finger along the volume bar to set an incoming call ring volume or alarm, playing back music, videos. Voice/video ring tone: Select to decide on a ring tone to use for incoming calls. Note that you can override this setting for individual contacts in the Edit contact details screens.
Manage applications: View all the applications stored on your phone and how much space they occupy. If you’ve downloaded an application from Android Market, you can uninstall it from this screen. Select a specific application to: 1. Clear your user data (if you have any associated with a particular application). 2. Disassociate the application with any actions. 3. Uninstall - If you’ve downloaded an application from Android Market, you will be able to uninstall it from this screen by selecting Uninstall.
Backup & reset You can select to reset your phone to factory settings. This will erase all your data from the phone and require you to sign in and go through the setup screens to use any of the applications. 3.4 System Date & time Set time, time zone, and date: Use Automatic unless you need to override the network values. Time format: Select from 12 or 24 hour formats.
Sync by application To control synchronization Contacts, you can do the following: 1. On the Home screen, select Settings. 2. Select Accounts. First you choose add account, then add account you have .When any of the applications are synchronizing, you will see the “sync” . You will also see the last time your data was synchronized. icon 3. By default, the personal information in Contacts will sync whenever you make a change or receive a new message.
3. Select ‘Discoverable’ check box to make your phone visible to other Bluetooth devices for 120 seconds. You must stay on the Bluetooth settings screen to remain discoverable. 4. Select ‘Discoverable’ again during the 120 seconds, or leave the Bluetooth settings screen, to make your phone undiscoverable. Name your Bluetooth device 1. Make sure you have turned Bluetooth on. 2. Select Settings > Bluetooth > Bluetooth settings > Device name. 3.
manually select that headset again after pairing. Rescan for Bluetooth devices If you want to update the list of Bluetooth devices, select ‘Scan for devices’. 5 Contacts The contacts on your phone are synced with your account contacts stored on the Web. To view the contacts on your phone, select Contacts. Contacts belonging to a specific group (you can choose which group) are listed in the Contacts tab. Only those contacts you star as “favorites” are listed in the Favorites tab.
The Pictures application opens. Navigate to a picture and select it, size the cropper with your fingertips. When finished, select ‘Crop’. The picture is associated with your contact. If you do not assign an icon, a default android icon will be assigned. 5. To save your contact, press BACK, or touch ‘Done’. Assign favorites Use Favorites as a way to display only those contacts you contact most frequently.
you must have a message to a contact mobile number stored for them in contact details. From the Contact details screen, select a phone number and click ‘Message’ icon, A Compose screen opens for your new message. Complete your message and select ‘Send’. 4. Send email to a contact: To send an email message to a contact, you must have an email address stored for them in their contact details. • Select the contact you want to email. Their Contact details screen opens.
“concatenated” messages. MMS messages are also known as “multimedia” or “picture” messages and can contain text, picture, audio, and video files. When you compose a message, the phone will automatically convert a text message into a multimedia message as soon as you add a subject or an attachment, or if you address the message using an email address rather than a phone number. View the message from the message list Select a message thread in the list to open it for reading.
touch & hold the individual message you want to delete to open the context menu. Delete all messages in a thread - With the message thread open in Read view, press MENU > Delete. You can also delete an entire thread from the message list by pressing & holding the thread to open the context menu, then select ‘Delete’. Delete all message threads - From the message list, press MENU and select Delete all threads. Compose text and multimedia messages 1. Press ‘+’ icon to make ‘New message’.
1. Notification settings You can receive a notification each time you receive a new message. Select ‘Notifications’ check box to receive a notification in the status bar when a new message arrives. If you want your phone to ring when a new message arrives, select that check box as well. Select Ring tone to open the ring tone menu and select a ring tone specific to new text and multimedia message notifications. Note that when you check a ring tone, it plays briefly.
Add an email account You can fetch messages from up to five POP3 or IMAP accounts. Follow these steps: 1. On the Home screen, select Email application. 2. The Set up new account screen appears. 3. Type your account email address and password. 4. If you want, select the Send email from this account by default check box. This setting only applies if you have more than one POP3 or IMAP account set up. 5. Select ‘Next’.
From the Inbox: 1. Press ‘pencil’ icon and select ‘Compose’. 2. Add recipients by typing a name or address in the ‘To’ field. Matching contacts will appear. Select the recipient or continue typing the address. Add as many as you wish. 3. Type a subject and message. 4. Select ‘Send’, ‘Save as draft’, or ‘Discard’. Pressing BACK will also save as draft unless you have not typed anything. 5. Delete message From the Inbox: 1. Expand the Inbox to display the messages. 2.
Outgoing server settings: Select Outgoing settings if you need to edit the SMTP server, port, security type, option to require sign-in, or username/password. Add another POP3 or IMAP To add another account (you can add up to five), go to your Inbox, press ‘settings’. Your Accounts screen opens. Select ‘Add account’ to add another account. 7 Internet 7.
• Confirm the URL and name, and then select ‘OK’. To view all your bookmarks, press MENU and select Bookmarks. 3. Refresh a Web page: To refresh the contents of the current page, press MENU and select ‘Refresh’. Open pages in separate windows You can keep more than one Web page open by using multiple windows to display the pages. You can open up to eight windows. Open a new window: From a Web page, press the icon on the bottom-right.
downloading from the Home screen > Settings: On the Home screen, select Settings > security, then select ‘Unknown sources’ check box. 2. All items downloaded form the Web are stored on your memory card, so be sure you have a card installed in your phone before you download from the Browser. 3. The Browser will only allow you to download items that are supported by an application installed on the phone. Warning! Applications downloaded from the Web can be from unknown sources.
Take a picture Captured pictures are saved to the “DCIM” folder on your memory card or the phone. Tip: Before you take a picture, wipe the sensor window (on the back cover) to remove any small amounts of oil. 1. To open the Camera, on the Home screen, select Camera icon. 2. The Camera opens in capture mode. Frame your picture within the screen and hold the phone steady. Touch Camera button to capture. Continue to hold the camera steady for a second after you hear the shutter sound. 3.
2. Share a picture: In full-screen view, select Share. Select to share your picture via Messaging (MMS), or another application (if you have another application installed on your phone that supports sharing). 3. Set as wallpaper: In full-screen view, press MENU and select Set picture as. From the menu that opens select Wallpaper. Touch & hold an edge of the cropper to reveal the sizing arrows, then drag the edge in or out to size. Touch & drag the center of the cropper to move it within the picture.
Select a category to view the lists within each. Once in a category, keep selecting until you reach the music you want to play. For example, if you select the Artists category, you will see a list of artists in A-Z order. If you select an artist, the list opens to display that artist’s albums. Select an album, and the album’s song list displays. Load music onto your Memory card All the music you can listen to on your phone is stored on memory card.
on and off. When the icon is grey, shuffle is off. 2. Repeat mode: Touch to step through repeat modes: repeat all songs, repeat current song, don’t repeat (grey icon). 3. Go to any point in song: Slide fingertip in progress bar to desired point in a song. 4. Playback control: from left to right icons: Go to beginning song, Pause/ resume play and Go to next of song. If a song is playing while you are on the Library screen, you can switch to the Playback screen quickly by selecting the lower song bar.
call ringtone. 4. Now, when you go to Home > Settings > Sound & notification > General, and select Voice call ringtone, your song will be listed as an option. Delete music from memory card All the music you play on your phone is stored on the inserted memory card. From your phone, you can delete music stored on the card: 1. From the Library screen, select the Artists, Albums, or Songs category. 2. Go to the screen that shows the artist, album, or song that you want to delete. 3.
View event details - Select a day to view all the events in that day. This will take you to either the Agenda or Day view, depending on which you last visited. Select the event to view its details. Edit an event - First select a day to go to either the Day or Agenda view. From there, select the event to view its details. Assuming you have write privileges on an event, select ‘Edit’ to edit.
they last. All-day events are displayed at the top of the day list. View event details - Highlight an event to open a small popup window in the lower part of the screen that provides more event information. This window will stay open for three seconds. (Note that highlighted events are outlined in orange.) To view the full event details, touch the pop-up window while the pop-up window is open, or select the event itself. You can also touch & hold the event to open the context menu, then select View event.
Set an alarm Two alarms are set up for you, ready to customize. All two alarms are turned off by default. Select the check box to turn on the alarm. If no day shows under the set time, the alarm will go off once when the set time is reached. Two alarms will go off at 8:30 am from Monday to Friday and at 9:00 am on Saturday and Sunday. You can customize the alarm according to your needs, select one of the default alarms to open Alarm settings.
2. Select settings > style 3. Choose the display you want. 9.3 Calculator To open Calculator, on the Home screen, then select the Calculator icon. The Calculator offers two panels: basic and advanced. Switch back and forth between panels and selecting ‘Scientific Calculator’ or ‘Simple Calculator’, as you wish.
FCC Warning: Any Changes or modifications not expressly approved by the party responsible for compliance could void the user’s authority to operate the equipment. This device complies with part 15 of the FCC Rules. Operation is subject to the following two conditions: (1) This device may not cause harmful interference, and (2) this device must accept any interference received, including interference that may cause undesired operation.