
User's Manual


6
ENGLISH
their Bluetooth settings.
It is possible for two paired devices to be connected
to T7. However, audio will only be heard from one
device at any one time. When two devices are
connected the other device can override the active
stream.
The primary device can be deleted from the T7
“memory” only by returning T7 to its default settings
using the reset button. All Bluetooth pairs will be
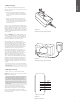
deleted following a reset. To perform a reset use a
straightened paper-clip to press and hold the reset
button for two seconds.
To disconnect a Bluetooth source device from
T7 press the T7 Bluetooth button twice in quick
succession. This will disconnect all Bluetooth
connected devices. T7 will provide audible feedback
when Bluetooth is disconnected and its Bluetooth
indicator will switch off.
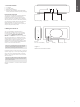
5.2 Wired connection
T7 incorporates an analogue auxiliary input for wired
connection to audio source devices that include an
analogue output. Connect to the input socket using
an appropriate cable. T7 will select its analogue
input automatically when a plug is inserted. If the
analogue audio source has an output volume
control, set it initially to around half volume. Use the
T7 buttons to control volume rather than the source
device volume controls. Only increase the source
volume if T7 maximum volume is inadequate.
Note: T7 will always switch automatically to its
Bluetooth input if an audio stream is received
from a connected Bluetooth source device.
6. Operating T7
Once paired with a Bluetooth source or connected
to a wired analogue audio source, operation of T7
is simple.
To increase or decrease volume press and hold the
T7 + or – buttons respectively. If no audio is playing
when the volume is adjusted T7 will provide audible
feedback of the volume level. T7 will also provide
audible feedback when the volume reaches either its
maximum or minimum level.
To play or pause Bluetooth streamed audio use
the T7 Play/Pause button. To skip to the next
track press the Play/Pause button twice in quick
succession. To skip to the previous track press the
Play/Pause button three times in quick succession.
Note: The play/pause button will not control
audio from the T7 analogue input.
To connect to the primary Bluetooth source press
the Bluetooth button. To disconnect from the
currently connected Bluetooth source press the
Bluetooth button twice in quick succession. If
two Bluetooth devices are connected to T7, both
devices will be disconnected. T7 will provide audible
feedback of Bluetooth disconnection and switch to
the analogue input.
To select the T7 analogue wired input insert a
connection plug or disconnect from the connected
Bluetooth source.
To check the T7 battery charge press the Standby
button.
To switch T7 off press and hold the Standby button.
Indicator Sequence Operational State
Illumination sweeps up and down T7 switching on.
Indicator one lit continuously T7 switched on.
Indicator one blinking slowly T7 is in “sleep” state.
Illumination sweeps down and up T7 switching off.
All indicators ash for 2 seconds T7 has insufcient battery charge to
switch on.
All indicators ash for two seconds T7 reset underway
Table 1
The indicator sequences and their meaning
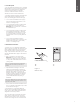
7. T7 Indicators
The ve indicators on the T7 side panel illuminate in
a variety of different sequences to indicate particular
operational states. The indicator sequences and
their meaning are listed in Table 1.
Note: Indicators are numbered one to ve,
bottom to top.
Note: When the Standby button is briey
pressed (< 3s), T7 will display its battery state
by the column of indicators displaying different
illumination sequences for different levels of
battery charge. For example, If all the indicators
become illuminated after three seconds the
battery is between 90% and fully charged.
Similarly, if the rst three indicators only become
illuminated after three seconds the battery
is between and 50% and 60% charged. The
illumination sequence evolves with each 10%
change of battery charge. A similar sequence
of indicator illumination displays battery charge
level when the T7 power supply is connected.
Diagram 4 illustrates all the indicator illumination
sequences for battery charge and discharge
levels.
8. T7 Firmware Update
Updated T7 rmware may from time to time be made
available for download from the T7 support section
of the Bowers & Wilkins website.
9. Cleaning your T7
Wipe surfaces with a dry clean lint-free cloth.
10. Troubleshooting
If you need help troubleshooting a specic problem,
or have a question you’d like answered, please
consult the T7 support section of the Bowers &
Wilkins website: www.bowers-wilkins.com