Getting to Know: A-Line Series Model BL100A www.babylock.
No matter what you choose as your next adventure, Amelia can keep up with 99 built-in stitches, push-button features, a drop-in bobbin and plenty of accessories. She even comes with a convenient travel bag so she’s always ready to go.
Winding the Bobbin Removing the Bobbin 1. Remove the bobbin cover by sliding the bobbin cover latch to the right and push down the left lower corner of the bobbin cover at the same time. 2. Remove the bobbin from the machine. Winding the Bobbin 1. Slightly raise horizontal spool pin. 2. Slide a spool of thread onto the spool pin so the thread unwinds to the front from the top of the thread spool. Secure it with the spool cap that best fits the size of the spool being used to ensure smooth flow of thread.
Inserting the Bobbin 1. Place bobbin into bobbin case with the thread unwinding counterclockwise. 2. Draw thread into notch (A). 3. Pull thread toward the left and along the inside of spring (B) until it slips into notch (C) being sure that thread does not slip out of notch (A). 4. Pull thread out about 10 inches and replace the bobbin cover by inserting the left side and lowering the right side until it snaps into position.
Threading the Machine Threading the Upper Thread 1. Raise presser foot lever. 2. Press the needle up / down button or rotate the handwheel toward you to raise the needle in the up position. 3. Place a spool of thread onto the spool pin and secure with the proper size spool cap. (see Manual page 11) 4. Pass the thread around upper thread guide for upper threading 5. Bring thread forward down the right channel, then to the left and up the left channel. 6.
Using the Needle Threader 1. Lower the presser foot. 2. Set needle in up position. 3. Lower the threader slowly and draw thread through thread guide (A) and pull toward the right. 4. Lower the lever as far as it will go so the threader turns and the hook pin will go through the needle eye. 5. Position thread below the needle eye and under the hook pin.
Using the Needle Threader 6. Hold thread loosely and release lever. Hook will turn and pass thread through needle eye while making a loop. 7. Raise presser foot and pull thread out about 10 inches from needle eye. Note: The needle threader is used for needle sizes 11, 14, and 16.
Raising the Lower Thread Drawing Up the Bobbin Thread 1. Raise the presser foot. 2. Hold the upper thread loosely and press needle up/down button twice. The handwheel will turn one complete turn. 3. Pull upper thread lightly. Bobbin thread will come up in a loop. 4. Pull both upper and bobbin threads about 10 inches toward the back and under the presser foot.
Operational Panel • Stitch length: Press stitch length button, indicator light turns on, and LED display automatically changes to show the size of stitch length. • Stitch width: Press stitch width button, indicator light turns on, and LED display automatically changes to show the size of stitch width. • Pattern selector: Press pattern selector button, LED displays the number of pattern. To choose the various pattern selections press the up or down pattern selector buttons.
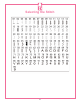
Selecting the Stitch 8
Starting to Sew The machine will be set at 01 automatically to sew straight stitches when power switch is turned on. 1. Check the presser foot (All Purpose Presser Foot). 2. Place the fabric under the presser foot. 3. Lower the presser foot. 4. Hold both threads to the back when starting to sew. Let threads go after sewing a few stitches. 5. While sewing regulate the speed with slide speed control lever if using the START/STOP button or foot control when attached. 6.
Starting to Sew Reverse Stitching Reverse stitching is used for reinforcing the ends of the seams. 1. Place the fabric in position where back stitching is to be made and lower the presser foot. 2. Press reverse stitch button and sew 4-5 stitches. (If using foot control, press pedal while pressing reverse stitch button.) 3. Press start button and resume sewing. (If using foot control, release reverse stitch button and press foot control to sew forward.) 4.
Starting to Sew Seam Guide on the Stitch Plate The figure on each guide line on the stitch plate indicates the distance between this guide line and the center needle position. Guide the fabric along the specific guide line in order to get the desired seam allowance between the stitching and the edge of the fabric.
Get familiar with your new machine while making this flattering skirt. By the end of the project, you’ll feel comfortable with the basics as well as decorative techniques.
13
For other exciting projects like this one, visit our website at www.totallystitchin.net or www.babylock.