Pantone 117C KIT I Instruction and Reference Guide_tacony_ H1-4 To register your machine warranty and receive Baby Lock product updates and offers, go to www.babylock.com/profile. If you have questions with registration, visit your Authorized Baby Lock Retailer.
CONTENTS Chapter 1 How to Create Bobbin Work.................................................................................... 3 ABOUT BOBBIN WORK ........................................................................................................... 4 PREPARING FOR BOBBIN WORK ............................................................................................ 5 Required Materials ................................................................................................................
BEFORE YOU START It is important to perform the upgrade according to the procedure outlined in the Installation Guide. The machine can then be used as outlined in this upgrade Instruction and Reference Guide. Additional new machine features and instructions are located in the New Features of Version 2 guide. NEW FEATURES The following features will be activated with the upgrade for Kit I.
Chapter 1 How to Create Bobbin Work
ABOUT BOBBIN WORK Beautiful embroidery work, with a three-dimensional appearance, can be created by winding the bobbin with heavy weight thread or ribbon, which is too thick to be threaded through the machine’s needle. The decorative thread or ribbon will stitch out on the underneath side of fabric while sewing with the fabric wrong side facing up. Bobbin work is sewn using the special bobbin case (gray) and bobbin cover with tabs included with Kit I. 1. Utility stitches 2. Decorative stitches 3.
PREPARING FOR BOBBIN WORK ■ Bobbin case and bobbin cover a Bobbin case (gray) There is a notch at the location indicated by the letter “A”. ■ Upper thread Upper thread choices can vary depending on the finished look you would like to achieve. By using sewing machine embroidery thread (polyester), multipurpose polyester thread, or monofilament (transparent nylon) thread the appearance of a single design can be changed many times just by choosing a different upper thread weight and/or color.
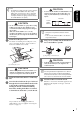
Upper Threading a d Remove the bobbin case. Install a needle appropriate for the upper thread and fabric to be used. For details on installing the needle, refer to “CHANGING THE NEEDLE” in the machine’s Instruction and Reference Guide. b a Bobbin case Attach the presser foot. For details on attaching the presser foot, refer to the following topics in the machine’s Instruction and Reference Guide.
Note CAUTION • Be sure to use the machine’s included bobbin or one designed specifically for this machine (Class 15). Using any other bobbin may result in damage or injuries. Actual size 11.5 mm (approx. 7/16 inch) CAUTION This model • Be sure to use the bobbin case (gray) when creating bobbin work. Using any other bobbin case may result in the thread becoming tangled or damage to the machine. • Make sure that the bobbin case is correctly installed.
■ When tension is applied to the bobbin thread ■ When tension is not applied to the bobbin thread Insert bobbin into bobbin case so the thread unwinds from the left side. Pass the thread carefully through groove of needle plate cover as shown below. If the bobbin thread in the trial stitching is too tight and adjusting the bobbin case tension does not help, do not pass the thread through the tension spring.
o Gently pull the upper thread to bring the bobbin thread up through the needle plate. ENGLISH → A loop of the bobbin thread comes out through the hole in the needle plate. p Insert tweezers through bobbin thread loop and pull bobbin thread above the needle plate. q Align the upper thread and bobbin thread, and then pull out about 10 cm (approx. 4 inches) of the threads and pass them under the presser foot toward the rear of the machine. r Install the the bobbin cover with tabs.
CREATING BOBBIN WORK (SEWING) d Positioning the Fabric and Sewing Make sure the automatic thread cutting ( ) and automatic reinforcement/reverse stitching ( ) have been turned off. Note • Recommended stitches for bobbin work are open “airy” type stitches. • Be sure to sew trial stitches using same fabric and threads as project in order to check the sewing results. • The bobbin thread may become tangled due to the type of pattern and thread that are being used.
j l Raise the presser foot lever, and then use tweezers to pull up the bobbin thread and bring the end of the thread to the top of the fabric. Note • Pull the thread while holding down the fabric so it does not move out of place. m Align the upper thread and bobbin thread, and then pass them under the presser foot toward the rear of the machine.
r Raise the needle and presser foot. s Leaving about 10 cm (approx. 4 inches) of thread at the ends, use scissors to cut the threads. b Working from the wrong side of the fabric, tie the bobbin and upper threads together by hand. Cut away excess threads with scissors. a Wrong side of fabric b Right side of fabric a 10 cm (approx. 4 inches) Note • To ensure threads do not come undone after being tied place a drop of fabric glue on knots.
CREATING BOBBIN WORK (EMBROIDERY) Select one of the bobbin work embroidery patterns. Embroidery patterns for bobbin work appear with the letter “B” in the lower-left corner of the key. Note ENGLISH h Selecting the Pattern • Prepare the machine for bobbin work as described in “PREPARING FOR BOBBIN WORK” on page 5. a Attach the embroidery foot “W” and the embroidery unit. b Install a bobbin wound with an adequate amount of thread for pattern.
i Press . → The sewing screen is displayed. j Press , and then adjust the tension of the upper thread. For details on adjusting the tension of the upper thread, refer to “Adjusting Thread Tension” in chapter 5 of the machine’s Instruction and Reference Guide. Memo • We recommend a setting between 6 and 8 for the upper thread tension.
d Press . → The screen changes, and all keys and operation buttons are locked. Using the presser foot lever, raise the presser foot. f To bring the bobbin thread above the fabric, rotate the handwheel counterclockwise while holding the upper thread. g Stop the machine, and then tie the upper thread and the bobbin thread together to secure the threads. l Start sewing again to finish the pattern.
o Remove the fabric from the embroidery frame, and check the finished embroidery. a Right side of fabric p b Wrong side of fabric If the desired results could not be achieved, adjust the tension of the bobbin thread and of the upper thread, and then try sewing the pattern again. For more details, refer to “ADJUSTING THE THREAD TENSION” on page 17. Memo • Check bobbin after each bobbin work embroidery pattern is sewn to make sure there is adequate bobbin thread for the next pattern.
ADJUSTING THE THREAD TENSION ■ Adjusting the upper thread tension We recommend a setting between 6 and 8 for the upper thread tension. If utility stitches are being used, refer to “Setting the Thread Tension” in chapter 2 of the machine’s Instruction and Reference Guide. If embroidery patterns are being used, refer to “Adjusting Thread Tension” in chapter 5 of the machine’s Instruction and Reference Guide.
TROUBLESHOOTING Several solutions for minor problems are described below. If the problem persists, contact your nearest authorized Baby Lock retailer. ■ The thread was accidentally cut automatically and the bobbin thread is caught inside the machine a d Apply slight tension on bobbin thread by holding thread out to the left side of presser foot. Press the “Thread Cutter” button again. Cut the thread near the fabric above the needle plate, and then remove the fabric.
Chapter 2 New Features and New Patterns
HOW TO USE NEW FEATURES Displaying the Fabric While Aligning the Embroidery Position c Press d When the following message appears, press . . The fabric hooped in the embroidery frame can be displayed on the LCD so that the embroidery position can be aligned. This feature can be used from the sewing screen of embroidery mode and the edit and sewing screens of embroidery edit mode. As an example, the following procedure is described using the edit screen of the embroidery edit mode.
e When the fabric appears as a background for the pattern, the pattern can be edited if it is necessary. g Press to start embroidering. → When embroidery is finished, the fabric displayed in the background disappears. a ENGLISH Whether the fabric disappears or remains displayed can be specified from page 8/8 of the Settings screen. b c f Use to align the pattern with the desired embroidery position.
■ Positioning the pattern on thick fabric When positioning the pattern on thick fabric such as quilting, the fabric may not be detected correctly. In order for the fabric to be correctly detected, its thickness must first be measured. f Affix the embroidery positioning sticker to the fabric within the area indicated by the red frame in the LCD, and then press . g When the following message appears, remove the embroidery positioning sticker, and then press .
In the embroidery edit screen, the size of the pattern can be changed while the desired thread density is maintained. With this function, the pattern will be enlarged or reduced at a larger ratio than with normal pattern resizing. c Press d Press to enter Stitch Recalculator mode ( ). .
f Select how to change the pattern size. g Press . h Press . Note • Depending on the pattern, embroidering may not be possible at the appropriate thread density. Before sewing on your project, be sure to sew trial embroidery on a piece of scrap fabric that is the same as the fabric used in the project using the same needle and embroidery thread. • If the pattern is enlarged and there is space between stitches, a better effect can be achieved by increasing the thread density.
NEW PATTERNS Utility embroidery patterns ENGLISH Thumbnail List Note • Must be accessed through Embroidery mode; not Embroidery Edit mode.
Embroidery Patterns Color Change Table Embroidery patterns for bobbin work are reversed when they have been sewn. Use these patterns to create beautiful bobbin work embroidery after selecting upper and lower threads of the desired colors according to the descriptions in “Required Materials” on page 5. The beginning and end of stitching are specified for bobbin work patterns. They cannot be used for normal embroidering. No.1 4 min a Time required for embroidering 030 22.4 cm 19.9 cm 4.5 m (3.9m + 0.
No.8 No.9 1 min 1 min 1 min 620 405 13.6 cm 13.3 cm 509 15.4 cm 10.0 cm 1.6 m (1.0m + 0.6 m) 6.3 cm 7.5 cm 1.6 m (1.0m + 0.6 m) 1.1 m (0.5m + 0.6 m) No.10 No.11 No.12 1 min 2 min 3 min 405 7.5 cm 6.8 cm 1.0 m (0.4m + 0.6 m) 030 328 12.6 cm 12.6 cm 22.4 cm 17.7 cm 2.4 m (1.8m + 0.6 m) 3.5 m (2.9m + 0.6 m) No.13 No.14 2 min 2 min 542 209 12.4 cm 13.6 cm 2.7 m (2.1m + 0.6 m) ENGLISH No.7 8.2 cm 11.8 cm 2.2 m (1.6m + 0.
Pantone 117C KIT I Instruction and Reference Guide_tacony_ H1-4 To register your machine warranty and receive Baby Lock product updates and offers, go to www.babylock.com/profile. If you have questions with registration, visit your Authorized Baby Lock Retailer.