
Specifications


162
EMBROIDERY — — — — — — — — — — — — — — — — — — — — — — — — — — — — — — — — — — — — — — — — — — — — —
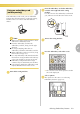
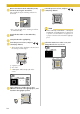
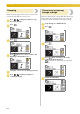
Example: Embroidery thread number selected
b
Set the embroidery thread, and thread the
needle.
• Refer to “Threading the upper thread” (page
30) and “Threading the needle” (page 32).
Note
z Before using the needle threader, be sure to
lower the presser foot.
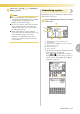
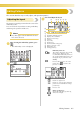
c
Pass the thread through the embroidery foot
hole, and hold it lightly in your left hand.
Give the thread a little slack.
CAUTION
d
Lower the presser foot lever.
a Presser foot lever
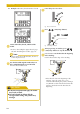
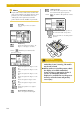
e
Press / (“Start/Stop” button).
a “Start/Stop” button
f
After progressing 5-6 stitches, press /
(“Start/Stop” button) to stop the machine.
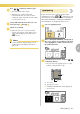
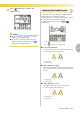
g
Use scissors to cut the thread at the beginning
of the stitching.
Cut the thread at the edge of the stitching.
• If the thread is left at the beginning of the
stitching, it may be sewn over as you
continue embroidering the pattern, making it
very difficult to deal with the thread after the
pattern is finished. Trim the thread at the
beginning.
● If the thread is pulled too tight, the needle
may break or bend.
● Do not let hands or objects hit the
carriage while sewing. The pattern may
misalign.
1
1