"IMPORTANT SAFETY INSTRUCTIONS" When using the needle felting machine, basic safety precautions should always be followed, Including the following. "Read all instructions before using". DANGER - To reduce the risk of electric shock. 1. The needle felting machine should never be left unattended when plugged in. Always unplug this needle felting machine from the electrical outlet immediately after using and before cleaning. 2. Always unplug before replacing light bulb.
11. Always use the proper needle plate. The wrong needle plate can cause the needles to break. 12. Do not use bent needles. 13. Do not pull or push fabric while stitching. It may deflect the needles causing them to break. 14. Switch the needle felting machine to the symbol "O" position when making any adjustments in the needle area, such as changing needles, changing needle plate, or changing cloth presser, and the like. 15.
1.Overview of Baby Lock Embellisher Cloth presser height adjusting screw Yarn port Yarn & ribbon guide Ribbon guide Handwheel Cloth presser Finger guard Needle plate Needle clamp holder Accessory storage Socket for foot controller Ribbon slot Power switch Sewing table Yarn Stand components Yarn stand Instruction book Yarn stand pin Washer Yarn threader Wing nut Foot controller Art of Embellishing Book Machine cover Detail of accessories (large:2mm) (small:1.
2. Setting Up Your Baby Lock Embellisher 1. Plug in the machine: Plug the power cord into the machine first, then into a wall outlet. Always make sure the power is off and remove the plug from the wall outlet when the machine is not in use, or when making any adjustments such as changing needles or light bulb. Available foot control for U.S.A.: Model EZ-168A. 2. Polarized Plug: This appliance has a polarized plug (one blade wider than the other).
2. Setting Up Your Baby Lock Embellisher cont. 5. Set up yarn stand a) From the top side of the yarn stand, insert the threaded end of the yarn stand pin into opening in yarn stand. b) Place washer and wing nut on the threads of yarn stand pin and tighten with fingers. c) Insert the "L" shape side of yarn stand into slotted opening located on the back of the machine body.
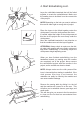
3. Remove and replace Finger Guard Finger guard is a safety device to reduce risk of injury. If you would like to remove finger guard, special care is required around the felting needles. To remove finger guard: a) Open the lamp cover. b) Loosen the screw of finger guard by turning it counterclockwise. c) Remove finger guard. d) Retighten the screw slightly by turning it clockwise. This will prevent the screw from vibrating out. e) Close the lamp cover. To replace finger guard: a) Open the lamp cover.
4. Start Embellishing Let your creativity soar with your new Baby Lock Embellisher! Now you can make your projects even more distinctive. Let your imagination run free with new ways to create beautiful felted embellishment on your crafts, home decorating, quilting, sewing, and scrapbooking. What kind of fabrics and trims can I use with the Embellisher? Just about any fabric can be felted with the Embellisher.
4. Start Embellishing cont. Layer the cloth/fabric/materials that will be felted together to create the embellishment. Make sure the smaller piece to be felted is on the correct side of the project. NOTE:Depending on the look you want to achieve this can be either right or wrong side of project. Place the layers to be felted together under the cloth presser. Lower the cloth presser lifter lever.
5. Yarn Embellishing 1. Rotate the yarn & ribbon guide toward the back of the machine. Align the guide with the top of the yarn stand pin. 2. Place yarn or thread on the yarn stand and pull yarn end from center. 3. While sitting in front of the machine insert yarn into the third hole of the yarn & ribbon guide as shown in Fig. 1. 4. Wrap yarn to the underside of yarn & ribbon guide and insert into the second hole as shown in Fig. 2. 5.
5. Yarn Embellishing cont. Yarn threader 5. Rotate the handwheel to bring the needle bar to its highest position. 6. Raise the cloth presser lifter lever. 7. Insert yarn into the yarn port using the yarn threader. (Fig. 4) 8. Pull the yarn from the bottom of the cloth presser. (Fig. 5) 9. Place fabric under the cloth presser. 10. While embellishing with yarn, fabric may be moved in all four directions. (Fig. 6) 11. Lower the cloth presser lifter lever. Fig.
6. Ribbon Embellishing 1. Rotate the yarn & ribbon guide toward the back of the machine. Align the guide with the top of the yarn stand pin. 2. Place ribbon on the yarn stand. 3. Insert the ribbon into the slot of the yarn & ribbon guide. 4. Rotate the ribbon guide toward the front of the machine. 5. Insert the ribbon into slot of the ribbon guide. 6. Rotate the handwheel to bring the needle bar to its highest position. 7. Slide ribbon into the ribbon slot of the cloth presser. 8.
7. Maintenance Changing the Needle(s) Use #365A017 needles for the Embellisher machine. Do not use any other type of needles Note: #365A017 needle is a very special needle and is exclusive for the Embellisher machine. See your Baby Lock retailer for replacement needles. Caution: When changing needle(s), unplug the power cord from the electrical outlet. Allen screwdriver 2mm Needle clamp fixing screw Needle fixing screws Allen screwdriver 1.5mm 1. Open lamp cover and remove finger guard. (see page 4.) 2.
7. Maintenance Cont. Replacement of light bulb Swing the lamp cover towards the left to open. Remove the light bulb and replace with new one that is the same type rated 15 watts/120 volts or 15 watts/230 volts. ATTENTION: To prevent possibly injury, unplug main power cord prior to replacing light bulb. Make sure the light bulb is cool to the touch before removing it from the machine. Cleaning Remove the sewing table and open the free arm door.
Trouble Shooting Needle bent or needle breakage: 1. Are you moving the materials too quickly? 2. Are the needles touching the cloth presser or needle plate? 3. Is there dust or lint around the edge of the needles, cloth presser, or holes of the needle plate? 4. Does the free arm area need to be cleaned? For problems other than bent needles or needle breakage, please contact your Baby Lock retailer. Specifications Needle: #365A017 Number of needles: 12 Needle clamp holder: Round type (2.
EMB12 EI-35-Ta 2008.8.