
Combustion Gas Analyzer Operation & Maintenance


Instruction 24-9460
28
Fyrite
®
INSIGHT
Instruction 24-9460
29
Fyrite
®
INSIGHT
4.11 Powering OFF the Analyzer & Purging
Power OFF the analyzer by pressing the PWR button
for at least 2 seconds, or until two beeps are heard. The
unit will count down 5 seconds before shutting down,
giving the operator an opportunity to keep the analyzer
powered ON by pressing the RUN/HOLD button.
If the analyzer was not purged with fresh air then the analyzer may remain
ON with its pump running and display the message "PURGING SENSORS"
as the result of combustion gases still being present inside the analyzer. At
this time the operator should ensure that the probe is removed from the stack,
allowing the analyzer to purge itself with fresh air. The 5-second-shutdown
sequence will not begin until the gas levels inside the analyzer drop below
predeterminded levels.
TIP: Although not recommended, the purging process can be bypassed
by pressing the PWR button a second time.
4.12 Low Battery Alarm
When the batteries are nearly depleted, an empty battery icon appears in
the upper-right corner of the display, and a short beep is sounded every 10
seconds.
After a low battery alarm occurs, the analyzer will continue to operate for
only a few minutes. The amount of operating time that remains depends
on many factors (e.g. pump and backlight being ON or OFF and the type
and condition of the batteries).
4.13 Memory
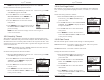
All saved data can be retrieved for viewing through the MEMORY option.
To open and view saved test data:
1. Display the MAIN MENU by pressing the MENU (F2) button. If
necessary, press ESC until MENU appears above F2.
2. Use the ▲▼ buttons to select MEMORY.
Press ENTER to display the MEMORY
MENU.
3. Use the ▲▼ buttons to select Memory Direc-
tory. Press ENTER to display the saved data
contained in the Memory Directory.
TIP: When displaying the contents of the
memory directory, the operator can quickly
page through the screens by pressing the
PAGE– (F1) and PAGE+ (F3) buttons. Or
move to the first or last memory location by
pressing the
buttons, respectively.
To Clear Test Data:
1. Display the MAIN MENU by pressing the
MENU (F2) button. If necessary, press ESC
until MENU appears above F2.
2. Use the ▲▼ buttons to select MEMORY.
Press ENTER to display the Memory Screen.
3. Use the ▲▼ buttons to select CLEAR
MEMORY. Press ENTER to display the
Clear Memory Options.
4. Use the ▲▼ buttons to select YES and press
ENTER. The screen will briefly display a
confirmation that the memory has been
cleared.