H-10G Refrigerant Leak Detector Congratulations! You have just purchased the most versatile, high performance service leak detector available in the industry today. It will detect refrigerants with a sensitivity that will effectively pinpoint both small and large leaks quickly and efficiently. We encourage your review of this manual to assure satisfactory performance and a long service life.
Condensed Instructions 1. Plug power cord into an appropriate AC outlet and let unit warm up for 2 minutes. 2. Check flotation of airflow ball in probe tip. 3. Set Leak Size switch to SM(cal) position. 4. Adjust Balance Control until unit ticks slowly (1–3 ticks per second). 5. Place probe tip over Calibrate Reference Bottle (remove cap disc from bottle) and check for faster audio and flashing lamp. 6. Probe for leaks. 7.
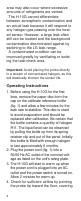
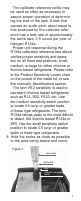
screwdriver adjustable sensor heat control is located on the bottom of the unit. The probe nozzle consists of a transparent tip, airflow ball, filter, and neon leak-signal lamp, connected to the control chassis by a length of flexible tubing. The calibrated reference leak is a removal bottle containing halogen gas R11, and is calibrated to provide a leak equivalent to approximately 0.5 ounce per year of R134a. As an accessory, a maintenance kit is provided that contains extra filters and airflow balls.
area may also occur where excessive amounts of refrigerants are vented. The H-10G cannot differentiate between atmospheric contamination and an actual leak because it will respond to any halogen gas passing over the heated sensor. However, a large leak often still can be located and the background contamination discriminated against by switching to the LG leak range. A contaminated condition can be improved greatly by ventilating or isolating the leak-check area.
Figure 1 sensor cover power cord calibrate reference bottle flexible hose power switch leak size switch speaker control unit chassis balance control probe tip Caution: The H-10G is available for operation on either 110, 120, 220/230, or 240V AC. Operate the unit only on the proper supply voltage (as shown on the rating plate); otherwise the unit could be damaged. Warning! Personal Injury Hazard Do not use the H-10G in an explosive or combustible atmosphere.
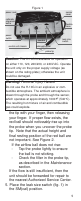
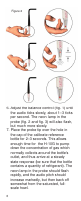
Figure 2 6. Adjust the balance control (fig. 1) until the audio ticks slowly, about 1–3 ticks per second. The neon lamp in the probe (fig. 2 and fig. 3) will also flash, but much more slowly. 7. Place the probe tip over the hole in the cap of the calibrate reference bottle for 2–3 seconds.
The calibrate reference bottle may be used as often as necessary to assure proper operation of determining the size of the leak. A leak that causes an audio pitch about equal to that produced by the calibrate reference has a leak rate of approximately the same size, 0.5 ounce per year of halogen R134a.
the tip at about one inch per second along seams or joints suspected of leaking. When the probe encounters a leak, both the audio pitch and the flashing rate of the neon lamp will increase. Both will continue to respond at the faster rate as long as the probe is held at the leak. 9. For detecting much larger or smaller leaks, set the leak size switch to the appropriate range LG or MED, readjust the balance control for slow ticking (1–3 ticks per second), and probe for leaks as in the previous step.
(fig. 4) and perform calibration. When making sensor adjustments, move the sensor heat control in small increments, either up or down, as appropriate. After each adjustment wait about 30 seconds for the sensor temperature to stabilize, then check the sensitivity as described in steps 5, 6, and 7, in the Operating Instructions section. Note: For best sensor life, avoid excessive sensitivity and excessive clockwise setting. Maintenance The H-10G is designed for long life with very little maintenance.
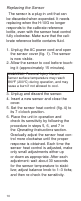
Replacing the Sensor The sensor is a plug-in unit that can be discarded when expended. It needs replacing when the H-10G no longer responds to the calibrate reference bottle, even with the sensor heat control fully clockwise. Make sure that the calibrate reference bottle contains fluid. 1. Unplug the AC power cord and open the sensor cover (fig. 1). The sensor is now visible. 2. Allow the sensor to cool before touching it (approximately 15 minutes).
Troubleshooting **Solution number corresponds to Cause number** Problem Responds continuously on small leak size positions. Balance control will not stop response. Cause 1Excessive sensitivity 2Atmosphere contaminated with excessive halogen Solution 1Reset sensor heat control more counterclockwise. 2Ventilate area, switch to larger leak size.
Troubleshooting (continued) **Solution number corresponds to Cause number** Problem No response to calibrate reference Cause 1Calibrate reference empty 2No air flow. Probe ball does not float 3Sensor exposed to excessive amounts of halogen 4Water in probe 5Low line voltage Solution 1Replace with part#3015-0864 2Replace filter in probe tip. Check operation of pump. 3Place probe to clean air and allow unit to run several minutes while sensor purges itself.
Specifications Product Sensitivity (moving probe) (Movement not to exceed 2 in/sec, not greater than 0.25 inches from leak.) Switch Position LG MD SM R134a R12 5.0 3.0 1.0 0.5 0.5 0.1 Product Sensitivity (stationary probe) (Probe directly on leak source, no movement.) Switch Position LG MD SM R134a R12 5.0 3.0 0.5 0.1 0.1 .05 Power Supply ±10% (100, 120, 220, 240 volts) 50/60 Hz 20 watts, in accordance with rating plate Response Time Approx. 1 second Reference Leak Approx. 0.5 oz/yr R134a.
Ordering Informaion 3015-0456 H-10G Refrigerant Leak Detector (specify AC power requirements when ordering) 3015-0326 14 inch Flexible Probe Extension 3015-0641 Clear Probe Tip 3015-0680 Rubber Probe Tip 3015-0486 Replacement Sensor 3015-0737 Maintenance Kit: 12 Filters, 4 Airflow Balls 3015-0781 Tune-Up Kit: Sensor, 100 Filters, 4 Airflow Balls, 3 Rubber Probe Tips, and Calibration Bottle 3015-0784 Maintenance Kit: 100 Filters, 4 Airflow Balls, and 3 Rubber Probe Tips 3015-0864 Calibration Reference Bottle
Repair Information Should it become necessary to repair your H-10G, please contact an Authorized Service Center. Units should be carefully packed to prevent shipping damage and shipped prepaid. Warranty Send units under warranty and a copy of the purchase receipt to an Authorized Service Center for repairs. Please include your company name, telephone number including area code, and a contact name.
Authorized Service Centers United States Bacharach Sales/Service Center 621 Hunt Valley Circle New Kensington, PA 15068 Phone: 724-334-5051 Fax: 724-334-5723 E-mail: help@MyBacharach.com Canada Bacharach of Canada, Inc. 20 Amber St. Unit #7 Markham, Ontario L3R 5P4 Canada Phone: 905-470-8985 Fax: 905-470-8963 E-mail: bachcan@idirect.
Notes: 17
Notes: 18
Notes: 19
621 Hunt Valley Circle New Kensington, PA 15068 Ph: 724-334-5000 • Fax: 724-334-5001 • Toll Free: 1-800-736-4666 Website: http://www.MyBacharach.com • E-mail: help@MyBacharach.com 3015-0846 REV.