
Specifications


36 Instruction 3015-4148
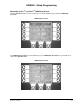
Navigating to the 2
nd
RDM Setup Screen
From RDM Setup Screen #1 press the MORE key to go to RDM Setup Screen #2. Press the BACK key to
return to RDM Setup Screen #1.
RDM Setup Screen #2
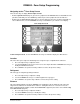
Setting Relay Parameters
This setting determines the function of relays 1 and 2 mounted inside the RDM unit.
1. Press the key adjacent to the relay parameter you want to adjust.
2. Use the UP/DOWN cursor keys to select unused, monitor on, evacuate, spill, leak, fault, or alarm..
3. Press ENTER to accept the new entry or QUIT to revert to the previous setting.
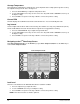
HGM Node Address
This value is the node address from 1 to 15 assigned to each HGM300 which is on the network. These
values must match the dip switch settings on each HGM300 circuit board. Refer to HGM Node Address Dip
Switch Settings on Page
11.
1. Press the adjacent key to adjust the address for each HGM300.
2. Use the UP/DOWN cursor keys to modify the setting.
3. Press ENTER to accept the new entry or QUIT to revert to the previous setting.
Node Address DIP
Switches in HGM Unit