
Instruction manual

Setup / Operation / Maintenance
Place your Ice Cream Maker on a level counter.
Make sure all Ventilation Openings (B) have a minimum clearance of 10” (25cm.)
from surrounding walls and other appliances.
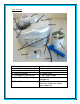
Before using your SNO Ice Cream Maker, remove the Bowl (C) and Churn (H)
and wash in warm water. The Lid (E) and Motor Drive (G) are attached and
should be cleaned with a damp cloth. Do not place any part in the dishwasher.
Thoroughly dry the Bowl (C) inside and outside and the blade (H) into the Lid/
Churn motor assembly (E/G) and set aside.
Plug the Power Cord (K) into a standard electrical outlet (110/120V-60Hz).
With the Lid/Churn Motor Assembly (E/G) off, pour ingredients according to the
selected recipe into bowl (C). Replace Lid/Churn Motor Assembly (E/G).
Turn the main power Switch (I) located at the rear of the appliance on. This turns
on the cooling compressor and Timer Display Panel (J).
Next, set the required time. The Timer Display (J) will automatically display the
time set from the previous batch. To change and set the time, press the yellow
timer set switch. By pressing and releasing, single minutes can be set, pressing
and holding the yellow timer set switch down, will advance the minutes quickly.
The time can be set from 0-60 minutes. Recommended time is 25-30 minutes.
The previously set time may be changed by pressing the yellow timer set switch
a second time within 6 seconds of the first setting.
Once the time has been set, press the Red Start/Stop Switch to start the Churn
Blade (H).
When the set time has elapsed to “0” on the Timer Display (J), the buzzer will
buzz 5 times alerting you that the ice cream is done. Press the Red Start/Stop
Switch to stop the churn. Remove the Lid/Churn Motor Assembly (E/G) and
check the ice cream. If it is ready shut the Main Power Switch (I) and remove the
ice cream. Always use plastic or wooden utensils, never use metal to avoid
damaging the Bowl (C).
The Yellow Timer Set Switch works as a timer only; it does not turn the churn or
cooling motor “Off” automatically. Both must be turned “On” and “Off” manually.
If the ice cream needs more time, do not turn “Off” the Main Power Switch (I).
Place the Lid/Churn Motor Assembly (E/G) in position, set the additional time
required and press the Red Start/Stop Switch to start the churn.