Camden Fire Pit Table SKU 272-5473 Please read through the instructions before beginning assembly. Identify all parts packed in the carton against the parts list. Remove all protective materials. Place parts on a non-abrasive surface to avoid scratching. Do not fully tighten bolts until the end of assembly. Do not attempt to assemble if any parts are missing or damaged. Warning: Please Do Not Use Acid Or Alkaline Washing Liquid To Clean This Product. Assemble the product as shown step by step below.
IMPORTANT SAFETY INFORMATION SAVE THESE INSTRUCTIONS WARNING: FUELS USED IN LIQUEFIED PROPANE GAS APPLIANCES, AND THE PRODUCTS OF COMBUSTION OF SUCH FUELS, CAN EXPOSE YOU TO CHEMICALS INCLUDING BENZENE, WHICH IS KNOWN TO THE STATE OF CALIFORNIA TO CAUSE CANCER AND CAUSE BIRTH DEFECTS OR OTHER REPRODUCTIVE HARM. For more information go to: www.P65Warnings.ca.gov. WARNING: For Outdoor Use Only. DANGER If you smell gas: 1. Shut off gas to the appliance. 2. Extinguish any open flame. 3.
CAUTION • Always place the appliance on a firm and level surface. • Solid fuels shall not be burned in this gas appliance. • The appliance shall be used only outdoors in a well-ventilated space and shall not be used in a building, garage or any other enclosed area. • When in use, keep the appliance area clear and at least side-40" (101.6cm) and top-72” (182.9cm) from combustible materials, gasoline and other flammable liquid and vapors. • Do not use the appliance under combustible surfaces.
Before beginning assembly of this product, make sure all parts are present. Compare parts with the package contents list and hardware contents below. Remove all protective materials, place parts on a nonabrasive surface to avoid scratching. If any parts are missing or damaged, do not attempt to assemble the product. Contact customer service for warranty replacement details (Monday-Friday 8:30 a.m.-4:30 p.m. CST) at cs@patiohelpdesk.
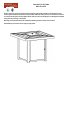
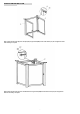
OPERATION INSTRUCTION Step 1: Attach the side panel (D) to the side panel (B) using two bolts (BB) and two metal washer (CC). Do not tighten the bolts until assembly is complete. Step 2: Attach the side panel (C) to the assembled frame using two bolts (BB) and two metal washer (CC). Do not tighten the bolts until assembly is complete.
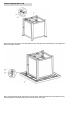
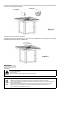
OPERATION INSTRUCTION Step 3: Attach support frame (E) to the side panels (B&C) using four bolts (AA) and four metal washers (CC). Do not tighten the bolts until assembly is complete. Step 4: Carefully place table top (A) upside down on a flat, soft surface. Attach the table top (A) to the assembled frame using four bolts (AA) and four metal washers (CC).
OPERATION INSTRUCTION Step 5: To cover the unused fire pit burner, place the Burner Cover (F) in the given space of the tabletop. Specification Rated Heat Input 25000BTU/hr Propane Regulator Pressure 11 inches water column Natural Gas inlet Pressure 7 inches water column Clearance to combustible surfaces Sides: 24in.
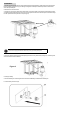
Installation 1. Carefully unpack all parts from the box, compare parts with package content listed above, make sure all parts are present before beginning assembly of products. If any part is missing or damaged, do not attempt to assemble the products. Contact customer service for replacement parts. 2. Put Burner Cover onto the fire bowl. 3. Open the door, place the gas cylinder into the cylinder holder, connect the regulator, screw the black handle clockwise to tighten.
6. Place Fire Glass around the burner, then remove the label from the pilot box (see Figure 4). This gas fire pit requires approximately 8.82 lbs. of fire glass (fire glass sold separately). Fire glass Pilot box Figure 4 7. Place Burner Cover onto the fire bowl (see Figure 5). NOTE: Fire glass is not included. When the fire pit is not in use and has cooled COMPLETELY, cover it with the Burner Cover. DO NOT USE BURNER COVER ON A HOT FIRE PIT OR WHEN IN USE.
LIGHTING 1. Make sure control knob (2#) is on the “OFF” position on the control panel. 2. Open the access doors. Turn on gas cylinder valve (7#) to fully opened position. 3. Push and turn the control knob (2#) to “HIGH”. (Fig.12) 4. Hold ignitor (3#) to light the burner. Release the control knob (2#) after 45 seconds. (Fig. 13) 5. Adjust flame to desired flame with the control knob (2#). (Fig. 13) WARNING Do not operate if there is a kink in the flexible gas hose as this could lead to a gas leak.
Trouble Shooting Problem Observed Gas odor Possible Cause Gas leak Low gas pressure Check gas supply pressure. Delayed ignition Clogged or dirty burner ports. Blocked orifice. Dead battery. Low or insufficient burner flame Corrective Measures Perform "Leak Check" on page 11. If odor continues shut off gas supply and contact your customer service department. Check gas supply pressure Clean burner ports with a wire brush, Clear orifice opening of any debris. Replace with a new battery.