
Assembly Instructions
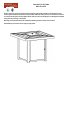
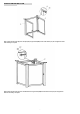
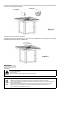


6. Place Fire Glass around the burner, then remove the label from the pilot box (see Figure 4). This gas fire pit requires approximately
8.82 lbs. of fire glass (fire glass sold separately).
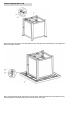
7. Place Burner Cover onto the fire bowl (see Figure 5).
NOTE: Fire glass is not included. When the fire pit is not in use and has cooled COMPLETELY, cover it with the Burner Cover. DO NOT
USE BURNER COVER ON A HOT FIRE PIT OR WHEN IN USE.
Operation
LEAK CHECK
Do not use an open flame to check for leaks.
Do not smoke during testing.
Do not test indoors.
A leak check must be performed whenever the gas cylinder is replaced.
WARNING
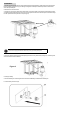
1. Make sure the gas control knob (2# ) is in the “OFF” position. Open the access door.
2. Make sure the gas cylinder is correctly and securely connected to the pressure regulator, with a tight fit.
3. Turn on the gas cylinder valve (7#). Apply 50% soap and 50% water solution to the gas hose at connections between the
knob (5#) and the gas cylinder.
NOTE
4. If there is a leak, you will see bubbles form. In the case of a leak, turn off the gas supply, unscrew the connections.
Reconnect the gas hose and retest. If the leak persists, consult the customer service center for assistance.
5. If the connection is sound, continue to the next step.
Figure 4
Figure 5
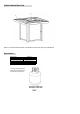
Fire glass
Pilot box
9