PTO GRASS COLLECTION SYSTEM DESIGNED FOR: MODEL 48031001 BAD BOY PUP SERIES MOWERS OPERATOR’S MANUAL ASSEMBLY MANUAL PART#: Q0336 OPERATION $4.
PTO GRASS COLLECTION SYSTEM TABLE OF CONTENTS SECTION PAGE SECTION Safety - - - - - - - - - - - - - - - - - - - - - - - - - - - - - - - 2 Safety Alert Symbols - - - - - - - - - - - - - - - - - - - - - - 3 Warranty - - - - - - - - - - - - - - - - - - - - - - - - - - - - - 4 I INTRODUCTION AND DESCRIPTION - - - - - - - - - - - - - - 5 1-1 Introduction - - - - - - - - - - - - - - - - - - - - - - - - - 5 1-2 Description - - - - - - - - - - - - - - - - - - - - - - - - - 5 II INSTALLATION FOR USE - - - - - -
SAFETY WARNING! NEVER operate the unit unless the discharge guard and either the deflector assembly or the vacuum collector adapter are fastened securely in place. WARNING! Do not work around the mower deck boot or the blower area until you are certain that the mower blades and the blower impeller have stopped rotating. WARNING! To avoid serious injury, perform maintenance on the vacuum collector; ONLY AFTER STOPPING THE MOWER’S ENGINE AND WAITING FOR ALL MOVING PARTS TO COME TO A COMPLETE STOP.
PECO LIMITED WARRANTY FOR NEW PRODUCTS A. WHAT IS WARRANTED? PECO extends the following warranties to the original purchaser of each new PECO consumer product subject to the following limitations: 1.
SECTION I INTRODUCTION AND DESCRIPTION 1-1 Introduction 23HP, 32HP Vanguard & 26HP Briggs ELS - Add (2) flat washers P#(K0131) between clutch and pump pulley, use (1) 7/16”-20 x 4” HHCS P#(K0359) and (1) 7/16” lock washer P#(K0053) to fasten engine pulley assembly. We are pleased to have you as a Bad Boy customer. Your collection system has been designed to give you a low maintenance, simple, and effective way to collect the grass clippings from your mower.
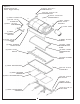
2-2 PTO Assembly Installation 2-3 Belt Installation Remove the (2) existing bolts and nuts from the right side that fastens the mower’s rear frame to the mower’s chassis. Align the (2) lower holes on the PTO assembly P#(A0610) (Figure 2) to the (2) lower holes on the mower’s rear frame. Fasten by using (2) 5/16”18 x 1-1/4” Grade 8 HHCS P#(K0118) and (2) 5/16”18 flange nuts P#(K1178).
2-4 Cam Assembly Adjustment Figure 7. Lower Mount Tube The cam assembly P#(A0422), which controls the blower belt tension, comes from the factory pre-adjusted. If the belt is too tight or becomes too loose, remove the hair pin clip P#(K0099) from the belt tension rod P#(K0326) and pull the “L” end of the rod out of its hole in the cam assembly. The tension rod may then be screwed out to tighten the belt or screwed in to loosen the belt.
Figure 11.
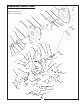
Exploded Parts View 1 2 5 Exploded View Of The A0610 - PTO Assembly 3 8 9 10 11 4 6 7 13 22 14 23 18 12 15 16 32 27 28 25 30 17 19 33 20 21 31 34 35 24 26 29 36 53 34 52 38 51 37 48 50 47 41 46 49 45 42 40 42 44 39 43 43 9
Parts View 65 66 69 56 64 59 70 54 57 71 61 60 67 62 72 58 55 68 63 Item 1 2 3 4 5 6 7 8 Part No. Qty.
2-9 Boot To Mower Deck Installation 2-7 Upper Frame Assembly Installation 60” Boot Plate Mounting Instructions To mount the boot plate P#(B0184) to the boot P#(E1113) use (2) 3/8”-16 x 1” carriage bolts P#(K1182) and (2) 3/8”-16 flange nuts P#(K1215). See Figure 11 for bolt placement. NOTE: During this step, it is suggested that two people install the upper frame to the lower mount tube.
lock bushing, forcing the blade to break-away from the taper-lock bushing. If the impeller will not move, hit the base of the impeller, between each vein, with a hammer, then try again. Figure 12. To Replace: Place impeller blade over the engine shaft. Slide the taper-lock bushing into the engine shaft and into the impeller blade, aligning the non-threaded holes of the taper-lock bushing to the threaded holes of the impeller blade. Fasten by using (2) 1/4”-20 x 1” HHCS Grade 8 (torque to 15 ft.
2-14 Lower Hose To Blower Cone Installation 2-12 Lengths Of Hose Adjustment The hoses in steps 2-13 and 2-14 must be cut to fit your machine. Follow steps 2-13 and 2-14. Do not cut the hoses until you have tried to fit them on your machine. Remember that the hoses have to be long enough to allow for enough clamping surface between the inlet, blower assembly, and the deck boot. Slide a 7”-8” hose clamp P#(J6006) over both ends of the lower hose. Then proceed to slide the lower hose onto the blower cone.
2-17 Installation/Removal Of Collection Bags Figure 20. Plastic Top To install the bag onto the bag ring, first make sure the bag ring end caps are fastened to the bag ring. Place the seam openings of the bag onto the bag ring openings and turn the bag until the slot bracket in the bag ring is protruding from the opening in the bag (Figure 19). Do this for each of three bags. Install the completed assemblies onto the support frame and close the plastic top.
SECTION III OPERATING INSTRUCTIONS 3-3 Disengagement Of The Blower A. To disengage the blower, rotate the engagement handle towards the mower. 3-1 General Safety Only qualified people familiar with this operator’s manual and the mower’s operator’s manual should operate this machine. WARNING: The blower will continue to spin. DO NOT TOUCH the blower, pulleys, or the belt until the tractor is turned off. DO NOT adjust the belt tension until the mower is turned off.
3. Make sure all shields are in place and in good condition. Repair or replace any missing or damaged shields. 4-2 Lubrication NOTE: Use only white lithium based grease for lubrication of the shaft on the blower assembly. 4. Perform lubrication per paragraph 4-2. 5. Listen for abnormal sounds, which might indicate loose parts, damaged bearings, or other damage. Correct any deficiency before continuing operation. 1. On initial use: Grease the fitting on the blower shaft. 6.
SAFETY DECALS To promote safe operation, Bad Boy supplies safety decals on all products manufactured. Damage can occur to safety decals either through shipment, use or reconditioning. Contact your local Service Center for replacement decals.
Bad Boy 18
NOTES 19
Turn any Bad Boy Lawn Vac into a total lawn grooming tool with the Bad Boy Wand Kit! With your Bad Boy Wand Attachment you will double the ability of your Bad Boy Lawn Vac. Using the same powerful vacuum/blower that makes your Lawn Vac work so well, you will be able to get to all those hard-to-reach places where you needed a rake or broom before.