
Owner's manual


5
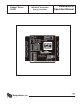
Programming the Badger
®
Series 340N2
Prior to introducing the Badger Series 340N2 onto a N2
network, it needs to be congured for the pipe’s size, desired
units of measure, and its the default network address should
be changed to an unused address to avoid any conicts with
other instruments on the N2 network. Programming the Series
340N2 is accomplished using the Badger Meter PC software.
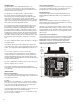
1. Load the interface software into the computer that was
shipped with the Model A-302 programming cable or down-
load from our website.
2. The Series 340N2 buss connector should be connected to
a Com port using Badger Meter Model A-302 programming
cable. (If not available a B&B Electronics Model 485SD9TB
may be used) The RS232 side should be connected to a
PC Com port and the RS485 side to the Series 340N2.
3. Connect the Series 340N2 transmitter to a power supply.
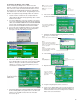
4. Open the interface software and select the appropriate
Com port as shown in the dialog box below.
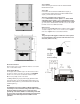
5 Select the N2 Protocol as shown below
6. If the Series 340N2 is new from the factory the default
Series 340N2 address is 248. If the selected Series 340N2
address is wrong the unit will not communicate with the
software. To select the correct polling address press the
select button as shown below.
7. If the Series 340N2 has a known address then select it with
the New Polling Address drop down menu as shown below
and press the Set Address button then the exit button.
Proceed to step 11.
Step #1
Select a new N2 address by pressing the
new polling address drop down arrow
Step #2
Press Set Address to select the new
polling address
Step #3
Press Exit to return
to the main screen
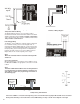
8. If the Series 340N2 polling address is not known then press
the Auto Find Address button as shown below.
Press the Auto Find Address to
search for the Series 340N2
Polling address
9. Search for the Series 340N2 polling address by following
the steps as shown below.
Step 1
Press the search button to begin the
search for the Series 340N2 polling
address once an address has been found
press the stop button.
Step 2
Select the detected Series 340N2 address
Step 3
Press the Select button to return to
the N2 polling address window with
the auto find address
10. Then follow the steps as shown below.
Step #1
Press Set Address to select
the new polling address
Step #2
Press Exit to return to the main
screen
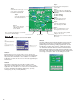
11. Open the Parameters Screen as shown below.
To go to the calibration
settings screen select
“parameters” from either
place shown.
12. Program using diagram below as a reference.
13. Set the Series 340N2 address by pressing the Advanced
button in the Parameters window opening the Advanced
Parameters window. Press the Change Device’s Address
button and set as shown below.