KDX200220 Dual Sport Kit Installation Manual 185 Bosstick Blvd. ♦ San Marcos ♦ California ♦ 92069 Phone (760) 560-2252 ♦ 0383 E-Mail: Fax (760) 560- bajades@bajadesigns.
Internet: Warranty: http://www.bajadesigns.com/ Baja Designs manufactures its own products as well as resells products manufactured by others. Baja Designs makes no express or implied warranties on products not manufactured by Baja Designs including without limitation any warranties or merchantability and fitness for a particular purpose. We will however, pass on all warranties made by the manufacturer, who has sole responsibility for performing such warranties.
‘95-on Kawasaki KDX 200/220 Installation Manual 1. Get a degree in Mechanical and Electrical Engineering. (Just kidding!) 2. Remove the seat, side panels, radiator shrouds, and gas tank. 3. Unplug the taillight from the stock wiring harness, remove the taillight lens, and remove the taillight socket and wiring. If you are color blind or even think you might be a little color blind, now is the time to get someone to assist you. Successful installation of the kit requires good color recognition.
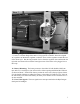
Photo 1 CDI Unit Remove AC Voltage Regulator 6. Locate the AC voltage regulator found mounted to the top of the airbox lid. It is a silver finned aluminum box measuring approximately 11/4" x 2" (Photo 1) with two wires exiting it . Unplug the regulator from the wiring harness and remove regulator. 7. The stock stator on the KDX is good for about 40 watts of lighting output. This is not enough to run the full street lighting system.
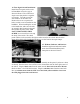
Photo 3 7/16” 3/8” diameter bolt and nut to sandwich two fender washers on the inside and outside of the fender. Carefully heat the inside of the fender with a heat gun until you can pull the bolt down to horizontal. Reinstall turn signals. 9. Rear Turn Signal Installation: Turn signal mounting requires that you drill a 15/32 inch hole in either side of the rear fender near where it meets the side panels. You can achieve a clean, durable installation using this mounting location..
10. Brake Light Switch: The KDX uses a hydraulic brake switch. This requires replacing the rear master cylinder banjo bolt with a specially made switch. Installing the switch requires bleeding the rear brake. If you do not feel competent bleeding your rear brake, please refer this job to a qualified mechanic as failure to do it correctly will render the brake inoperable. Remove the bolt holding the Photo brake fluid reservoir to provide access to the master cylinder.
Photo 7 Wires Exit Here Zip Ties Run wires to right side of bike Battery Regulator 11. Voltage Regulator Installation: Install the voltage regulator as shown in the Photo 7. Use the 6 x 40 mm flange bolts and 3/4” long spacers to attach it where the original AC regulator sat. Mount the regulator so that the wires exit the regulator towards the rear of the motorcycle.
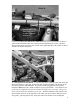
14. Turn Signal Switch Installation: Install the turn signal switch on the left handlebar next to the grip as shown in Photo 8. The switch has a single screw that pinches it together on one side. Two tabs secure the switch halves on the other side. Remove the screw to separate the halves so that it can be installed on the handlebar. When installing the switch to the handle bar, make sure the tabs are seated in their locating holes and Photo 8 then tighten the pinch screw.
Photo 10 Connect yellow and white stator wires to yellow regulator wires here Connect the yellow wire and the new white wire from your rewound stator to the two yellow leads with male connectors coming from the Baja Designs rectifier/ regulator. They should connect just below the seat rail at the right hand side of the airbox as shown in Photo 10 and the color photo. Photo 11 Cable Routing 17.
frame tube that the tank rests on, back along the left side of the airbox to the area behind the airbox and above the rear fender (Photo 11). 18. Front Wiring Connections: You will now make all the connections required at the front of the bike. A. Ignition Switch: The only place the Baja Designs kit interfaces with the KDX’s ignition system is through the kill button lead. In no other way does this lighting kit effect the operation of the motorcycle’s ignition system.
B. Right Turn Signal: Connect the black and green pair of wires to the right turn signal. C. Left Turn Signal: Connect the black and brown pair of wires to the left turn signal. D. Headlight, Flasher, Running Light and High Beam Indicator: Plug the headlight connector (white three terminal connector) into the back of the headlight. Connect the yellow and black wire pair to the two wires from the high beam indicator (May be previously connected). Connect the red/green and orange wires to the flasher.
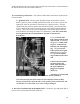
Photo 13 6,8 9 13 14 10,11 12 4 4. Locate the blue wire from the gray multi-conductor cable and connect it to the black wire coming from the fuse block. 5. Locate the black male lead from the gray multi-conductor cable and connect it to the black/yellow lead of the stock wiring harness that formerly connected to the stock taillight. Note that the stock red wire will not be used in this installation. 6.
12. Plug the other lead from the left turn signal into the brown wire of the wiring harness. 13. Connect the black single female terminal from the wiring harness to one side of the right turn signal. 14. Connect the green lead from the wiring harness to the other side of the right rear turn signal. Route wires as shown in the photos for a clean and secure installation. Zip tie the wire in place to limit their movement. 15. Install the fuse in the fuse block.
Kill Button Fourth Position:High Beam Third Position: Low Beam Second Position: Turns on Ignition and running lights First Position: Shuts off bike, turns off lights Horn Turn Signal Switch The turn signal switch in this kit controls both the lighting and ignition functions in one compact package. Using the lighting selector, push the switch to the second position. The rear taillight should come on. Try the turn signal switch to the right and the left.
do not pass over any sharp edges, are pulled overly tight, or can be crushed by the seat, tank, fender, etc. Use all the zip ties provided to securely fasten the wires. Any unwanted movement or chafing means early failure when off the road. Note : When zip tying the wires, do so separately of the radiator vent hose to the overflow tank. Make sure you do not cut off the flow in this line with a too tight zip tie.
while you are riding, however, when you turn the engine off and the lights are still on the battery is being discharged. With the Ni-Cad battery if you forget and leave the lights on, don’t sweat it. You can deep cycle (drain down and charge back up) a Ni-Cad all you want. If you are doing a lot of slow trail riding where you are on the brakes a lot, the battery may slowly discharge (if the headlight selector is on high or low beam). The rewound KDX stator is capable of a total of 72 watts at 4000 rpm.